

Introduction: Why Hide Comments Before Printing?
Microsoft Word is an indispensable tool for creating, editing, and sharing documents. One of its most valuable features is the ability to add comments, allowing collaborators to provide feedback, suggest changes, and discuss specific sections of the text. However, there are scenarios where you might want to print a clean, comment-free version of your document. Whether it’s for formal submissions, presentations, or simply to have a clutter-free hard copy, knowing how to hide comments before printing is an essential skill for any Word user.
In this comprehensive guide, we’ll walk you through various methods to achieve this, ensuring you can produce polished, professional documents every time. We’ll cover everything from simple settings adjustments to more advanced techniques, catering to users of all skill levels. Let’s dive in and explore the ways to keep those comments under wraps when you hit the print button.
Understanding Comments in Microsoft Word
Before we delve into the methods for hiding comments, it’s crucial to understand how Word handles them. Comments are annotations added to a document to provide feedback, explanations, or suggestions. They’re typically displayed in balloons in the margin or as inline notes, making them easily visible to anyone reviewing the document. This feature is incredibly useful for collaborative projects, but it can be distracting or inappropriate for final printouts.
Word offers several ways to manage comments, including the ability to show or hide them, resolve them, or delete them altogether. Each of these options serves a different purpose, and understanding the nuances of each can help you maintain control over your document’s appearance and content. Knowing how to toggle comment visibility is the first step toward achieving a clean printout.
Method 1: Adjusting Print Settings to Exclude Comments
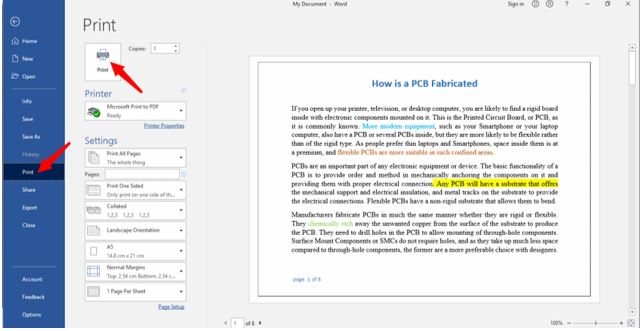
The simplest and most direct way to hide comments before printing is by adjusting the print settings in Word. This method allows you to specify exactly what elements of the document should be included in the printout, giving you precise control over the final output.
Step-by-Step Guide
- Open Your Document: Start by opening the Word document you wish to print.
- Access the Print Menu: Click on the “File” tab in the top-left corner of the Word window. From the dropdown menu, select “Print.” Alternatively, you can use the keyboard shortcut Ctrl+P (or Cmd+P on a Mac) to directly access the print menu.
- Customize Print Settings: In the Print menu, you’ll see a range of options. Look for the dropdown menu labeled “Settings.” This menu allows you to customize what gets printed.
- Choose “Print All Pages”: Ensure that “Print All Pages” is selected. This is usually the default setting, but it’s worth double-checking.
- Select “Print Markup”: This is where the magic happens. Click on the dropdown menu that likely says “Print Markup.” This option controls whether comments and tracked changes are included in the printout.
- Change to “Document”: From the dropdown menu, select “Document.” This setting tells Word to print only the main content of the document, excluding any comments or tracked changes.
- Print Your Document: Once you’ve selected “Document,” click the “Print” button. Your document will now print without any comments.
Tips and Considerations
- Double-Check Your Settings: Before hitting the print button, always double-check your settings to ensure you’ve selected the correct options. It’s easy to accidentally leave “Print Markup” enabled, resulting in a printout with comments.
- Save Your Settings: Word typically remembers your last print settings, so the next time you print a document, the “Document” option should still be selected. However, it’s always a good idea to verify, especially if you share your computer with others.
- Consider Saving as PDF: If you need to share the document electronically, consider saving it as a PDF with comments hidden. This ensures that the recipient won’t see the comments, even if they open the document in a different version of Word.
Method 2: Using the “No Markup” View Before Printing
Another effective method for hiding comments before printing is to switch to the “No Markup” view in Word. This view displays the document as it would appear without any comments or tracked changes, giving you a clear preview of the final printout.
Step-by-Step Guide
- Open Your Document: Begin by opening the Word document containing the comments you want to hide.
- Go to the “Review” Tab: Click on the “Review” tab in the Word ribbon. This tab contains all the tools related to tracking changes and managing comments.
- Find the “Tracking” Group: In the “Review” tab, locate the “Tracking” group. This group contains options for controlling how changes and comments are displayed.
- Select “No Markup”: In the “Tracking” group, you’ll see a dropdown menu labeled “Display for Review.” Click on this menu and select “No Markup.” This will hide all comments and tracked changes from view.
- Print Your Document: With the “No Markup” view enabled, go to “File” > “Print” (or use the shortcut Ctrl+P/Cmd+P). The print preview will now show the document without any comments. Click the “Print” button to print the clean version.
Benefits of Using “No Markup” View
- Visual Confirmation: The “No Markup” view provides a visual confirmation that comments are indeed hidden. This can give you peace of mind before printing, ensuring that you’re producing the desired output.
- Easy Toggle: Switching between different markup views is quick and easy, allowing you to toggle comments on and off as needed.
- Simplified Workflow: This method streamlines the printing process by allowing you to preview and print the document in a single step.
Method 3: Removing Comments Permanently Before Printing
If you’re certain that you no longer need the comments in your document, you can remove them permanently before printing. This method ensures that the comments are completely gone, leaving you with a clean, comment-free document. However, it’s important to note that this action is irreversible, so make sure you have a backup copy of your document if you might need the comments in the future.
Step-by-Step Guide
- Open Your Document: Start by opening the Word document containing the comments you want to remove.
- Go to the “Review” Tab: Click on the “Review” tab in the Word ribbon.
- Find the “Comments” Group: In the “Review” tab, locate the “Comments” group. This group contains tools for navigating and managing comments.
- Delete Comments Individually: You can delete comments one by one by clicking on each comment and then clicking the “Delete” button in the “Comments” group. Alternatively, you can right-click on a comment and select “Delete Comment” from the context menu.
- Delete All Comments at Once: To delete all comments in the document at once, click the dropdown arrow below the “Delete” button in the “Comments” group. From the dropdown menu, select “Delete All Comments in Document.” This will remove all comments from the document.
- Print Your Document: With all comments removed, go to “File” > “Print” (or use the shortcut Ctrl+P/Cmd+P). The print preview will now show the document without any comments. Click the “Print” button to print the clean version.
Precautions and Best Practices
- Backup Your Document: Before deleting any comments, always create a backup copy of your document. This will allow you to revert to the original version if you later decide that you need the comments.
- Consider Resolving Comments: Instead of deleting comments, you might consider resolving them. Resolving a comment marks it as completed, but it remains visible in the document. This can be useful for maintaining a record of the feedback that was provided.
- Use the “Track Changes” Feature: If you’re collaborating on a document, consider using the “Track Changes” feature instead of comments. This feature allows you to see all the changes that have been made to the document, making it easier to review and accept or reject them.
Method 4: Converting the Document to a Different Format
Sometimes, the easiest way to hide comments is to convert the document to a different format that doesn’t support comments, such as a plain text file (.txt) or a Rich Text Format file (.rtf). This method strips out all formatting and comments, leaving you with the bare text of the document.
Step-by-Step Guide
- Open Your Document: Open the Word document you want to print without comments.
- Save As: Click on “File” > “Save As.”
- Choose a Format: In the “Save As” dialog box, select a format that doesn’t support comments, such as “Plain Text (.txt)” or “Rich Text Format (.rtf).”
- Save the File: Choose a location to save the file and click “Save.”
- Open and Print: Open the newly saved file in a text editor or Word, and print it. The comments will be gone.
Limitations and Considerations
- Loss of Formatting: Converting to a different format will remove all formatting, including fonts, styles, and images. This method is best suited for documents where formatting is not critical.
- Plain Text Limitations: Plain text files (.txt) have very limited formatting options. Rich Text Format (.rtf) preserves some formatting, but it may not be compatible with all applications.
- Review the Output: Always review the output to ensure that the conversion process hasn’t introduced any errors or unexpected changes.
Method 5: Using VBA Macro to Hide Comments
For advanced users, a VBA (Visual Basic for Applications) macro can be used to hide comments before printing. This method provides a more automated and customizable solution, allowing you to tailor the process to your specific needs.
Step-by-Step Guide
- Open Your Document: Open the Word document containing the comments you want to hide.
- Open VBA Editor: Press Alt + F11 to open the VBA editor.
- Insert a Module: In the VBA editor, go to “Insert” > “Module.”
- Enter the Code: Copy and paste the following VBA code into the module:
Sub HideCommentsBeforePrint() Dim originalPrintSetting As Boolean originalPrintSetting = Application.PrintComments Application.PrintComments = False Dialogs(wdDialogPrint).Show Application.PrintComments = originalPrintSetting End Sub - Run the Macro: Press F5 to run the macro. This will open the Print dialog box with comments hidden.
- Print Your Document: Click the “Print” button to print the document without comments.
Explanation of the Code
- `Sub HideCommentsBeforePrint()`: This line declares the start of the subroutine named “HideCommentsBeforePrint.”
- `Dim originalPrintSetting As Boolean`: This line declares a variable named “originalPrintSetting” as a Boolean data type. This variable will store the original print setting for comments.
- `originalPrintSetting = Application.PrintComments`: This line assigns the current value of the “Application.PrintComments” property to the “originalPrintSetting” variable. This saves the original setting so that it can be restored later.
- `Application.PrintComments = False`: This line sets the “Application.PrintComments” property to False, which tells Word not to print comments.
- `Dialogs(wdDialogPrint).Show`: This line displays the standard Word Print dialog box. The user can then adjust any other print settings as needed.
- `Application.PrintComments = originalPrintSetting`: This line restores the original value of the “Application.PrintComments” property. This ensures that the print setting for comments is not permanently changed.
- `End Sub`: This line marks the end of the subroutine.
Customization Options
- Error Handling: You can add error handling to the macro to handle unexpected situations, such as the document not being open or the VBA environment not being properly configured.
- User Prompts: You can add user prompts to allow the user to specify whether or not to hide comments before printing.
- Integration with Ribbon: You can integrate the macro with the Word ribbon to make it more accessible to users.
Troubleshooting Common Issues
While hiding comments before printing is generally straightforward, you might encounter some issues along the way. Here are some common problems and their solutions:
Comments Still Appear After Printing
- Check Print Settings: Double-check your print settings to ensure that “Print Markup” is set to “Document.”
- Restart Word: Sometimes, restarting Word can resolve unexpected issues.
- Update Word: Ensure that you’re using the latest version of Word. Updates often include bug fixes and performance improvements.
Comments Are Grayed Out or Inaccessible
- Document Protection: The document might be protected, preventing you from modifying or deleting comments. Remove the protection to gain full access.
- Compatibility Mode: If you’re working with an older document format, try converting it to the latest Word format (.docx).
Macro Doesn’t Work
- Enable Macros: Make sure that macros are enabled in Word. Go to “File” > “Options” > “Trust Center” > “Trust Center Settings” > “Macro Settings” and select “Enable all macros.”
- Check Code: Double-check the VBA code for errors. Even a small typo can prevent the macro from working correctly.
- Digital Signature: Consider adding a digital signature to your macro to ensure that it’s trusted by Word.
Best Practices for Managing Comments in Word
To ensure a smooth and efficient workflow when working with comments in Word, follow these best practices:
Use Comments Strategically
- Be Clear and Concise: When adding comments, be clear and concise in your feedback. Avoid ambiguity and provide specific suggestions.
- Target Specific Sections: Target your comments to specific sections of the text. This makes it easier for others to understand the context of your feedback.
- Use Consistent Formatting: Use consistent formatting for your comments. This makes them easier to read and understand.
Manage Comments Effectively
- Resolve Comments Regularly: Resolve comments regularly to keep your document clean and organized.
- Delete Unnecessary Comments: Delete comments that are no longer needed. This reduces clutter and makes it easier to focus on the remaining feedback.
- Use the “Track Changes” Feature: Use the “Track Changes” feature for collaborative editing. This makes it easier to see all the changes that have been made to the document.
Communicate Clearly
- Explain Your Reasoning: When providing feedback, explain your reasoning. This helps others understand why you’re suggesting a particular change.
- Be Respectful: Be respectful in your feedback. Avoid personal attacks and focus on the content of the document.
- Be Open to Feedback: Be open to feedback from others. This helps you improve your writing and produce better documents.
Conclusion: Mastering the Art of Comment Management
Hiding comments before printing in Microsoft Word is a fundamental skill that enhances your ability to create polished and professional documents. Whether you choose to adjust print settings, use the “No Markup” view, or remove comments permanently, the methods outlined in this guide provide you with the tools to control the final output of your work.
By understanding the nuances of comment management and following the best practices outlined in this article, you can streamline your workflow, improve collaboration, and ensure that your documents always make the right impression. So go ahead, experiment with these techniques, and master the art of comment management in Word. Your pristine, comment-free printouts will thank you for it!
