

Unlocking the Power of Lines in Canva: A Deep Dive
Canva, the ever-popular graphic design platform, has democratized design for millions. Whether you’re a seasoned professional or just starting your creative journey, Canva provides an intuitive interface and a vast array of tools to bring your ideas to life. Among these tools, the humble line stands out as a fundamental element, capable of adding structure, emphasis, and visual interest to your designs. This comprehensive guide will walk you through everything you need to know about drawing and manipulating lines in Canva, from the basics to advanced techniques.
Why Lines Matter in Design
Before we dive into the ‘how,’ let’s consider the ‘why.’ Lines, seemingly simple, are incredibly versatile. They can:
- Create Structure: Lines can divide sections, create grids, and guide the viewer’s eye.
- Add Emphasis: A well-placed line can draw attention to a specific element.
- Convey Emotion: The thickness, style, and direction of a line can evoke different feelings. A thick, bold line might suggest strength, while a thin, wavy line could imply fluidity and calmness.
- Enhance Visual Appeal: Lines can add visual interest and depth to a design, preventing it from looking flat and uninspired.
Understanding the power of lines allows you to use them intentionally and effectively, transforming your designs from ordinary to outstanding.
Getting Started: The Basics of Drawing Lines in Canva
Canva offers several ways to draw lines, each with its own advantages. Let’s explore the most common methods:
1. Using the Elements Tab
This is the most straightforward way to add lines to your design.
- Open Canva: Start by logging into your Canva account or creating a new one.
- Create a Design: Choose a design template or create a custom size.
- Navigate to Elements: Click on the ‘Elements’ tab in the left-hand sidebar.
- Search for ‘Line’: Type ‘line’ into the search bar and press Enter.
- Choose a Line: Browse the available lines. You’ll find basic straight lines, dotted lines, curved lines, and more. Select the one that suits your needs.
- Add to Design: Click on the chosen line to add it to your design canvas.
Once the line is on your canvas, you can manipulate it using the various handles and options that appear around it.
2. Using Keyboard Shortcuts
For faster workflow, Canva offers keyboard shortcuts. The shortcut for adding a line is simple:
- Select the Canvas: Make sure your design canvas is active.
- Press ‘L’: Press the ‘L’ key on your keyboard. This will instantly add a basic straight line to your design.
This shortcut is incredibly convenient for quickly adding lines without navigating through menus.
Customizing Your Lines: Making Them Your Own
Adding a line is just the first step. The real magic happens when you start customizing it to fit your design’s aesthetic. Canva provides a wealth of options for tweaking your lines:
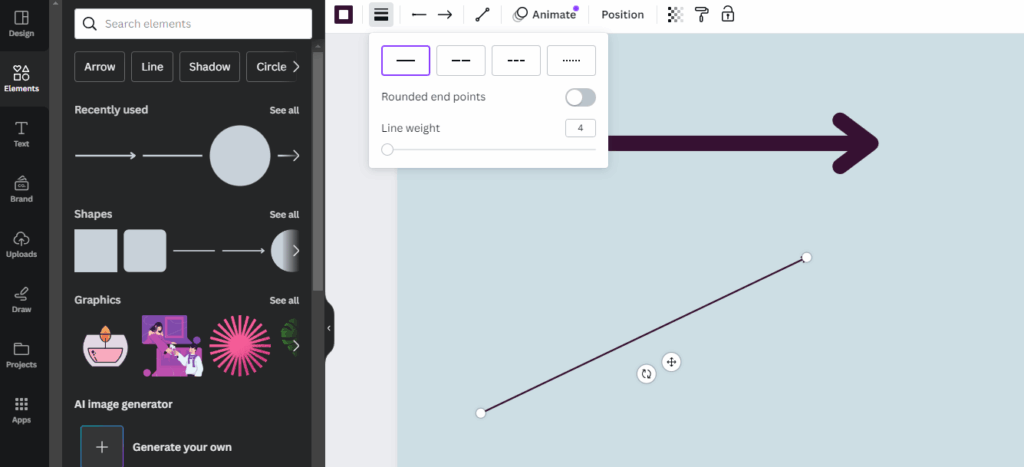
1. Adjusting Line Weight (Thickness)
The weight or thickness of a line can dramatically impact its visual presence. To adjust the line weight:
- Select the Line: Click on the line you want to modify.
- Find the Line Style Options: Look for the line style options in the toolbar at the top of the Canva interface. This is usually represented by a small icon with three horizontal lines.
- Adjust the Weight: Use the slider or enter a numerical value to change the line weight. Experiment with different weights to see what works best for your design. A thicker line will appear more prominent, while a thinner line will be more subtle.
2. Changing Line Color
Color is another crucial aspect of line customization. To change the line color:
- Select the Line: Click on the line you want to modify.
- Find the Color Picker: Look for the color picker icon in the toolbar. It’s usually a small square or circle filled with color.
- Choose a Color: Select a color from the available palette, or use the color picker to choose a custom color. Canva allows you to enter hex codes for precise color matching. Consider your design’s overall color scheme when choosing a line color. A contrasting color can make the line stand out, while a complementary color can create a more harmonious look.
3. Modifying Line Style (Solid, Dashed, Dotted)
Canva offers various line styles to add visual interest and convey different meanings. To change the line style:
- Select the Line: Click on the line you want to modify.
- Find the Line Style Options: As before, look for the line style options in the toolbar.
- Choose a Style: Select from solid, dashed, or dotted line styles. You can also adjust the spacing and pattern of dashed and dotted lines for further customization. Experiment with different styles to see which best suits your design’s purpose. Dashed lines can suggest movement or separation, while dotted lines can add a touch of whimsy.
4. Adding Line Ends (Arrows, Circles, Squares)
Adding line ends can enhance the directionality and visual appeal of your lines. To add or modify line ends:
- Select the Line: Click on the line you want to modify.
- Find the Line Style Options: Locate the line style options in the toolbar.
- Choose Line Ends: Look for options to add or change the line ends. Canva usually offers a selection of arrowheads, circles, squares, and other shapes. Choose the line ends that complement your design’s style and purpose. Arrowheads are useful for indicating direction, while circles and squares can add a decorative touch.
5. Rotating and Resizing Lines
Rotating and resizing lines are essential for positioning them accurately within your design. To rotate and resize lines:
- Select the Line: Click on the line you want to modify.
- Use the Handles: Use the handles that appear around the selected line to resize and rotate it. The corner handles allow you to resize the line proportionally, while the side handles allow you to stretch or compress it. The rotation handle (usually a curved arrow) allows you to rotate the line to any angle.
- Use the Position Tool: For precise placement, you can use the ‘Position’ tool in the toolbar. This allows you to specify the exact coordinates of the line on the canvas.
Advanced Techniques: Taking Your Line Skills to the Next Level
Once you’ve mastered the basics, you can explore more advanced techniques to create truly stunning designs with lines.
1. Creating Custom Shapes with Lines
Lines can be combined to create custom shapes and illustrations. This technique requires a bit of patience and precision, but the results can be incredibly rewarding.
- Add Multiple Lines: Add several lines to your canvas using the Elements tab or the ‘L’ shortcut.
- Position and Rotate: Position and rotate the lines to form the desired shape. Use the handles and the Position tool to ensure accuracy.
- Group the Lines: Once you’re satisfied with the shape, select all the lines and group them together. This will allow you to move and resize the entire shape as a single object.
This technique is perfect for creating logos, icons, and other custom graphics.
2. Using Lines to Create Patterns and Textures
Lines can be used to create interesting patterns and textures, adding depth and visual interest to your designs.
- Create a Repeating Pattern: Add a line to your canvas and duplicate it multiple times. Arrange the lines in a repeating pattern, such as stripes or a grid.
- Adjust Spacing and Color: Adjust the spacing and color of the lines to create different visual effects. Experiment with different line styles and weights to add further variation.
- Use as a Background: Use the pattern as a background for your design, or overlay it on other elements to create a textured effect.
This technique is great for creating backgrounds, website headers, and social media graphics.
3. Animating Lines in Canva
Canva allows you to animate lines, adding movement and dynamism to your designs. This is particularly useful for creating engaging social media content and presentations.
- Select the Line: Click on the line you want to animate.
- Click Animate: Click the ‘Animate’ button in the toolbar.
- Choose an Animation Style: Select from a variety of animation styles, such as ‘Rise,’ ‘Fade,’ ‘Pan,’ and ‘Wipe.’ Each style will animate the line in a different way.
- Adjust Animation Speed and Direction: Adjust the animation speed and direction to fine-tune the effect. You can also add multiple animations to a single line for more complex effects.
Animating lines can add a professional touch to your designs and make them more visually appealing.
Tips and Tricks for Working with Lines in Canva
Here are some additional tips and tricks to help you get the most out of lines in Canva:
- Use Guides and Rulers: Canva provides guides and rulers to help you align lines accurately. Enable them in the ‘File’ menu.
- Zoom In for Precision: Zoom in on your design to make fine adjustments to line placement and size.
- Experiment with Different Line Styles: Don’t be afraid to experiment with different line styles, weights, and colors to see what works best for your design.
- Use Lines to Create Visual Hierarchy: Use thicker lines to emphasize important elements and thinner lines to create a sense of balance.
- Consider the Overall Design: Always consider how the lines you add will impact the overall design. Make sure they complement the other elements and contribute to the overall aesthetic.
Common Mistakes to Avoid
While lines are a powerful design element, they can also be misused. Here are some common mistakes to avoid:
- Overusing Lines: Too many lines can make a design look cluttered and confusing. Use lines sparingly and intentionally.
- Using Lines Inconsistently: Use consistent line styles and weights throughout your design to create a cohesive look.
- Ignoring Line Alignment: Misaligned lines can make a design look unprofessional. Use guides and rulers to ensure accurate alignment.
- Choosing the Wrong Line Style: Choose line styles that are appropriate for the design’s purpose and aesthetic. Avoid using overly decorative lines in formal designs.
Examples of Effective Line Usage in Canva Designs
To inspire you, here are some examples of how lines can be used effectively in Canva designs:
- Minimalist Logos: Simple logos often use clean lines to create a sophisticated and memorable image.
- Infographics: Lines can be used to connect different sections of an infographic and guide the viewer’s eye.
- Website Headers: Lines can add visual interest and structure to website headers.
- Social Media Graphics: Animated lines can create engaging social media content.
- Presentations: Lines can be used to highlight key points and add visual appeal to presentations.
Conclusion: Embrace the Power of Lines
Lines are a fundamental element of design that can be used in countless ways to enhance your Canva creations. By understanding the basics of drawing and customizing lines, and by exploring advanced techniques, you can unlock their full potential and create truly stunning designs. So, go ahead, experiment with lines, and let your creativity flow!
Remember that design is a journey of continuous learning and experimentation. Don’t be afraid to try new things, make mistakes, and learn from them. The more you practice, the better you’ll become at using lines to create visually appealing and effective designs.
Canva is a powerful tool, and lines are just one of the many elements you can use to bring your ideas to life. Explore the platform, experiment with different features, and have fun creating!
Further Exploration and Resources
To continue your learning journey, here are some additional resources you may find helpful:
- Canva Design School: Canva offers a wealth of tutorials and courses on design principles and techniques.
- Online Design Communities: Join online design communities to connect with other designers, share your work, and get feedback.
- Design Blogs and Websites: Follow design blogs and websites to stay up-to-date on the latest trends and techniques.
- Inspiration Websites: Browse inspiration websites like Dribbble and Behance to see examples of great design work.
With dedication and practice, you can master the art of using lines in Canva and create designs that are both visually stunning and highly effective. Good luck, and happy designing!
