

Unlocking the Secrets of Japanese Short Rows: A Knitter’s Deep Dive
Have you ever found yourself staring at a knitting pattern, completely baffled by the term “Japanese Short Rows”? Don’t worry, you’re definitely not alone! While short rows, in general, might seem a little intimidating at first, Japanese short rows offer a wonderfully clean and almost invisible method for shaping your knitted fabric. They’re perfect for creating beautifully curved hemlines, adding bust darts to garments, shaping shoulders, and even crafting whimsical, three-dimensional objects. This comprehensive guide will walk you through everything you need to know to master this technique, transforming you from a short-row novice into a confident knitting artist.
Why Choose Japanese Short Rows? The Advantages Unveiled
Before we dive into the how-to, let’s explore why Japanese short rows have become a favorite among knitters. Compared to other short-row methods like wrap-and-turn or yarn-over short rows, Japanese short rows boast several distinct advantages:
- Invisibility: The most significant benefit is their near-invisibility. The resulting fabric is smooth and seamless, with no telltale bumps or holes to disrupt the flow of your design. This is crucial for projects where a clean, professional finish is desired.
- Ease of Execution: Once you understand the basic principles, Japanese short rows are surprisingly easy to execute. The technique involves placing a marker and slipping stitches, making it less fiddly than methods that require wrapping and picking up wraps.
- Versatility: Japanese short rows are incredibly versatile and can be used in a wide range of projects, from sweaters and shawls to hats and even toys. Their adaptability makes them a valuable addition to any knitter’s skill set.
- Reduced Bulk: Unlike some short-row methods that can create unwanted bulk in your fabric, Japanese short rows maintain a consistent gauge, ensuring a smooth and even texture.
Understanding the Basics: The Anatomy of a Japanese Short Row
At its core, a Japanese short row involves working part of a row, turning your work, and then working back in the opposite direction, leaving some stitches unworked. The magic lies in how you conceal the turning point, creating a seamless transition. Here’s a breakdown of the key components:
- The Turning Point: This is the spot where you stop knitting and turn your work. It’s crucial to mark this point so you can easily identify it later.
- The Marker: A small stitch marker (either a ring marker or a locking marker) is used to mark the turning point. This marker plays a crucial role in concealing the short row.
- Slipping Stitches: Slipping stitches with the yarn in the correct position is essential for creating a smooth and invisible join.
- Hiding the Short Row: The final step involves working the slipped stitch together with the marker, effectively concealing the turning point and creating a seamless transition.
Step-by-Step Guide: Knitting Japanese Short Rows
Now, let’s get down to the nitty-gritty. Here’s a detailed, step-by-step guide on how to knit Japanese short rows:
- Knit to the Turning Point: Begin by knitting (or purling, depending on your pattern) to the point where you want to create the short row. This is your designated turning point.
- Place the Marker: Place a stitch marker on the right needle, just before the stitch you are about to work. This marker indicates the turning point.
- Slip the Next Stitch: Slip the next stitch purlwise (as if to purl) from the left needle to the right needle with the yarn held in back (for knit rows) or in front (for purl rows). This is a crucial step for creating a clean join.
- Turn Your Work: Turn your work as you normally would when knitting.
- Work Back Across the Row: Now, work back across the row in the opposite direction, knitting (or purling) as instructed by your pattern.
- Repeat as Needed: Repeat steps 1-5 to create additional short rows as needed.
- Hiding the Short Row (On a Knit Row): When you come to the slipped stitch with the marker on a knit row, slip the stitch from the left needle to the right needle. Then, insert the left needle into the front of both the slipped stitch and the marker. Knit these two together as one stitch (k2tog). Remove the marker.
- Hiding the Short Row (On a Purl Row): When you come to the slipped stitch with the marker on a purl row, slip the stitch from the left needle to the right needle. Then, insert the left needle into the back of both the slipped stitch and the marker. Purl these two together as one stitch (p2tog). Remove the marker.
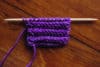
Visual Aids: Pictures and Videos for Clarity
While written instructions are helpful, sometimes seeing the technique in action can make all the difference. Search online for video tutorials demonstrating Japanese short rows. Many talented knitters have created excellent resources that can help you visualize each step.
Troubleshooting Tips: Common Issues and Solutions
Even with clear instructions, you might encounter a few snags along the way. Here are some common issues and how to address them:
- The Marker Keeps Falling Out: Use a locking stitch marker or a small safety pin to secure the marker in place.
- The Join Looks Loose or Gappy: Make sure you are slipping the stitch correctly with the yarn in the proper position (back for knit rows, front for purl rows). Also, ensure you are knitting or purling the slipped stitch and the marker together tightly.
- I Can’t See the Slipped Stitch: The slipped stitch can be subtle, especially after you’ve worked several rows. Use a contrasting color yarn for practice to help you identify the slipped stitches more easily.
- The Fabric is Puckering: This can happen if you are pulling the yarn too tightly when working the short rows. Try to maintain a consistent tension throughout your project.
Advanced Techniques: Exploring Variations of Japanese Short Rows
Once you’ve mastered the basic technique, you can start exploring variations of Japanese short rows to create even more interesting effects:
- Double Japanese Short Rows: This technique involves creating two short rows in the same location, resulting in a more pronounced curve.
- Short Rows with Different Yarns: You can use Japanese short rows to introduce different colors or textures into your knitting, creating unique and eye-catching designs.
- Short Rows for Shaping Sleeves: Japanese short rows are excellent for shaping the caps of set-in sleeves, providing a smooth and professional finish.
Project Ideas: Putting Your New Skills to Use
Now that you’re armed with the knowledge and skills to knit Japanese short rows, it’s time to put them to use! Here are a few project ideas to get you started:
- Curved Hemline Sweater: Design a sweater with a gently curved hemline using Japanese short rows.
- Shawl with Asymmetrical Shaping: Create a shawl with interesting asymmetrical shaping using short rows to add depth and dimension.
- Fitted Hat with Earflaps: Use Japanese short rows to shape the earflaps of a fitted hat, ensuring a snug and comfortable fit.
- Bust Darts in a Cardigan: Incorporate bust darts into a cardigan using short rows to create a more flattering silhouette.
The Importance of Swatching: Gauge and Tension Considerations
As with any knitting project, swatching is crucial when working with Japanese short rows. Swatching allows you to determine your gauge and ensure that your finished project will match the intended size. Pay close attention to your tension when working the short rows, as variations in tension can affect the appearance of the fabric. Knit a swatch that includes several short rows and measure your gauge carefully. Adjust your needle size if necessary to achieve the desired gauge.
Choosing the Right Yarn and Needles: A Matter of Preference
Japanese short rows can be worked with a wide variety of yarns and needles. The best choice for your project will depend on the desired effect and your personal preferences. Consider the following factors when selecting your materials:
- Yarn Weight: Choose a yarn weight that is appropriate for your project. Lighter-weight yarns will create a more delicate fabric, while heavier-weight yarns will produce a more substantial fabric.
- Yarn Fiber: The fiber content of your yarn will also affect the appearance and drape of your finished project. Wool yarns are warm and durable, while cotton yarns are cool and absorbent. Silk yarns are luxurious and have a beautiful drape.
- Needle Size: Use a needle size that is appropriate for your yarn weight and your desired gauge. Refer to the yarn label for recommended needle sizes.
- Needle Material: The material of your needles can also affect your knitting experience. Wooden needles are warm and smooth, while metal needles are fast and slick. Choose a needle material that you find comfortable to work with.
Beyond the Basics: Exploring Advanced Shaping Techniques with Short Rows
Once you’ve mastered the fundamentals of Japanese short rows, you can begin to explore more advanced shaping techniques. Short rows can be used to create a wide variety of shapes and textures, adding depth and dimension to your knitting projects. Consider experimenting with the following techniques:
- Combining Short Rows with Increases and Decreases: This technique allows you to create complex shapes and contours. For example, you can use short rows to shape the shoulders of a sweater while simultaneously increasing stitches to create a wider neckline.
- Using Short Rows to Create Three-Dimensional Shapes: Short rows can be used to create three-dimensional shapes, such as the petals of a flower or the ears of a stuffed animal. By strategically placing short rows, you can manipulate the fabric to create the desired form.
- Incorporating Short Rows into Lace Patterns: Short rows can be used to add subtle shaping to lace patterns, creating a more fluid and organic design. This technique is particularly effective for creating shawls and scarves with intricate lace details.
Maintaining Your Knitted Projects with Short Rows: Care and Longevity
Proper care is essential for maintaining the beauty and longevity of your knitted projects, especially those that incorporate short rows. Follow these tips to ensure that your creations stay looking their best:
- Hand Washing: Hand washing is generally the safest method for cleaning knitted projects. Use a mild detergent and lukewarm water, and gently squeeze the fabric to remove excess water. Avoid wringing or twisting the fabric, as this can damage the fibers.
- Blocking: Blocking is the process of shaping and setting your knitted fabric. This is particularly important for projects that incorporate short rows, as it helps to even out the tension and create a more polished finish. Pin your project to a blocking board and gently stretch it into the desired shape. Allow it to dry completely before removing the pins.
- Storage: Store your knitted projects in a cool, dry place away from direct sunlight. Avoid hanging knitted garments, as this can cause them to stretch out of shape. Instead, fold them neatly and store them in a drawer or on a shelf.
The Knitter’s Journey: Embracing Challenges and Celebrating Successes
Learning to knit Japanese short rows is a journey that requires patience, practice, and a willingness to embrace challenges. Don’t be discouraged if you don’t get it right away. Like any new skill, it takes time and effort to master. Celebrate your successes along the way, no matter how small. Each short row you knit is a step forward on your knitting journey. Embrace the process, enjoy the creativity, and revel in the satisfaction of creating something beautiful with your own two hands.
Final Thoughts: The Enduring Appeal of Knitting and Short Rows
Knitting is more than just a hobby; it’s a craft that connects us to generations past. The rhythmic click of the needles, the soft texture of the yarn, and the satisfaction of creating something tangible from a simple strand of fiber – these are the elements that make knitting so enduringly appealing. And within the vast world of knitting techniques, Japanese short rows stand out as a particularly elegant and versatile method. Whether you’re shaping a delicate shawl, crafting a cozy sweater, or simply adding a touch of flair to your knitting projects, mastering Japanese short rows will undoubtedly elevate your skills and expand your creative possibilities. So, grab your needles, choose your favorite yarn, and embark on your own short-row adventure. The possibilities are endless!
