

Introduction: Why Middle Alignment Matters in Excel
In the world of spreadsheets, Microsoft Excel reigns supreme. But beyond the formulas and functions, there’s an often-overlooked aspect that contributes significantly to the clarity and professionalism of your work: formatting. One of the most basic, yet powerful, formatting tools is text alignment. While left, right, and center alignments are common, middle alignment is a secret weapon for achieving a visually balanced and easy-to-read spreadsheet.
Middle alignment, also known as vertical alignment, positions text evenly between the top and bottom boundaries of a cell. This is particularly useful when dealing with varying row heights or when you want to create a sense of symmetry within your data presentation. It’s not just about aesthetics; it’s about making your data accessible and understandable at a glance. Think of it as giving your text ‘breathing room’ within the cell, preventing it from feeling cramped or cluttered.
This comprehensive guide will delve into the various methods of middle aligning text in Excel, covering everything from the basics to more advanced techniques. Whether you’re a seasoned Excel user or just starting out, you’ll discover valuable tips and tricks to enhance the visual appeal and readability of your spreadsheets. We’ll explore different scenarios where middle alignment shines, troubleshoot common issues, and even touch upon related formatting options that complement middle alignment perfectly. Get ready to take your Excel formatting skills to the next level!
Understanding Excel’s Alignment Options
Before we dive into the specifics of middle alignment, it’s crucial to understand the full spectrum of alignment options available in Excel. These options fall into two main categories: horizontal and vertical alignment.
Horizontal Alignment
Horizontal alignment controls the position of text along the width of the cell. The most common options include:
- Left Alignment: Aligns text to the left edge of the cell. This is the default alignment for text in Excel.
- Center Alignment: Centers text horizontally within the cell. This is great for headings and titles.
- Right Alignment: Aligns text to the right edge of the cell. Often used for numbers, especially when dealing with currency.
- Fill: Repeats the cell content until the cell is full. Rarely used for text but can be helpful for creating visual dividers.
- Justify: Distributes text evenly across the width of the cell, adding spaces between words as needed. Similar to how text is justified in a word processor.
- Center Across Selection: Centers text across a range of selected cells. This is a better alternative to merging cells when you want a heading to span multiple columns.
Vertical Alignment
Vertical alignment, on the other hand, controls the position of text along the height of the cell. The options are:
- Top Alignment: Aligns text to the top edge of the cell.
- Middle Alignment: Centers text vertically within the cell. This is the star of our show!
- Bottom Alignment: Aligns text to the bottom edge of the cell.
Understanding how these alignment options interact is key to creating well-formatted spreadsheets. You can combine horizontal and vertical alignment to achieve a variety of visual effects. For example, you might center a heading both horizontally and vertically for a polished look.
Step-by-Step Guide to Middle Aligning Text in Excel
Now, let’s get down to the nitty-gritty of middle aligning text in Excel. There are several ways to achieve this, each with its own advantages. We’ll cover the most common and efficient methods.
Method 1: Using the Alignment Buttons on the Ribbon
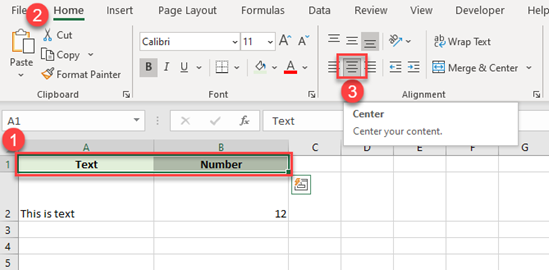
This is the most straightforward and widely used method. The alignment buttons are conveniently located on the ‘Home’ tab of the Excel ribbon.
- Select the cell(s) containing the text you want to middle align. You can select a single cell, a range of cells, an entire row, or an entire column.
- Go to the ‘Home’ tab on the Excel ribbon.
- In the ‘Alignment’ group, you’ll see six alignment buttons. The top three control vertical alignment, and the bottom three control horizontal alignment.
- Click the ‘Middle Align’ button (it looks like a horizontal line with an arrow pointing up and down). This will instantly middle align the text within the selected cell(s).
That’s it! It’s a simple and quick way to middle align text. This method is ideal for basic formatting tasks.
Method 2: Using the Format Cells Dialog Box
For more granular control over alignment and other formatting options, the ‘Format Cells’ dialog box is your best friend.
- Select the cell(s) you want to format.
- Right-click on the selected cell(s).
- Choose ‘Format Cells…’ from the context menu. This will open the ‘Format Cells’ dialog box.
- In the ‘Format Cells’ dialog box, go to the ‘Alignment’ tab.
- Under the ‘Vertical’ section, choose ‘Center’ from the dropdown menu. This is equivalent to middle aligning the text.
- You can also adjust the horizontal alignment in this dialog box if needed.
- Click ‘OK’ to apply the changes.
The ‘Format Cells’ dialog box offers more advanced options, such as controlling text orientation, wrapping text, and shrinking text to fit the cell. It’s a powerful tool for fine-tuning your spreadsheet’s appearance.
Method 3: Using Keyboard Shortcuts
For power users who prefer to keep their hands on the keyboard, Excel offers a variety of keyboard shortcuts for formatting. Unfortunately, there isn’t a direct keyboard shortcut specifically for middle alignment. However, you can create a custom shortcut or use the ‘Format Cells’ dialog box with keyboard navigation.
Here’s how to use the ‘Format Cells’ dialog box with keyboard navigation:
- Select the cell(s) you want to format.
- Press ‘Ctrl + 1’ to open the ‘Format Cells’ dialog box.
- Press ‘Ctrl + Tab’ to navigate to the ‘Alignment’ tab.
- Press ‘Alt + V’ to access the ‘Vertical’ alignment dropdown menu.
- Use the arrow keys to select ‘Center’.
- Press ‘Enter’ to confirm your selection.
- Press ‘Enter’ again to close the ‘Format Cells’ dialog box.
While this method involves more steps than using the ribbon buttons, it can be faster for users who are comfortable with keyboard navigation.
Method 4: Using VBA (Visual Basic for Applications)
For advanced users who want to automate formatting tasks, VBA (Visual Basic for Applications) provides a powerful way to control every aspect of Excel. You can write VBA code to middle align text in specific cells or ranges of cells.
Here’s a simple VBA code snippet to middle align the text in cell A1:
Sub MiddleAlignCell()
    Range("A1").VerticalAlignment = xlCenter
End Sub
To use this code:
- Press ‘Alt + F11’ to open the VBA editor.
- In the VBA editor, go to ‘Insert’ > ‘Module’.
- Paste the code into the module.
- Close the VBA editor.
- Run the macro by pressing ‘Alt + F8’, selecting ‘MiddleAlignCell’, and clicking ‘Run’.
You can modify this code to middle align text in a range of cells:
Sub MiddleAlignRange()
    Range("A1:C10").VerticalAlignment = xlCenter
End Sub
VBA is a powerful tool for automating repetitive tasks and creating custom formatting solutions. However, it requires some programming knowledge.
When to Use Middle Alignment: Best Practices and Use Cases
Middle alignment isn’t just a random formatting choice; it’s a strategic tool that can enhance the clarity and professionalism of your spreadsheets. Here are some specific scenarios where middle alignment shines:
Headings and Titles
When you have headings or titles that span multiple columns or rows, middle alignment ensures that the text is visually centered within the allocated space. This creates a balanced and professional look.
Tables with Varying Row Heights
In tables where row heights vary due to different amounts of text or data, middle alignment prevents text from clinging to the top or bottom of the cell. This makes the table easier to read and understand.
Data Entry Forms
In data entry forms, middle alignment can improve the visual consistency of the form, making it easier for users to input data accurately.
Reports and Presentations
When creating reports or presentations in Excel, middle alignment can help to create a polished and professional look. It’s a subtle detail that can make a big difference in the overall impact of your work.
Labels and Descriptions
When using labels or descriptions to annotate charts or diagrams in Excel, middle alignment can ensure that the text is clearly associated with the relevant element.
Creating Visual Balance
Sometimes, middle alignment is simply about creating visual balance and symmetry in your spreadsheet. It can help to draw the eye to important information and make the overall layout more appealing.
Troubleshooting Common Issues with Middle Alignment
While middle alignment is generally straightforward, you might encounter some issues from time to time. Here are some common problems and their solutions:
Text Still Appears at the Top or Bottom of the Cell
If you’ve applied middle alignment but the text still appears at the top or bottom of the cell, there are a few possible causes:
- Row Height: The row height might be too small to accommodate the text. Try increasing the row height to see if that fixes the issue.
- Wrap Text: If ‘Wrap Text’ is enabled, the text might be wrapping to multiple lines and pushing the vertical alignment off-center. Try disabling ‘Wrap Text’.
- Merged Cells: If the cell is merged with other cells, the alignment might be affected. Try unmerging the cells and applying middle alignment again.
- Hidden Rows or Columns: If there are hidden rows or columns affecting the alignment, unhide them to see if that resolves the issue.
Middle Alignment Doesn’t Seem to Work
In some cases, middle alignment might not seem to work at all. This could be due to:
- Incorrect Selection: Make sure you’ve selected the correct cell(s) before applying middle alignment.
- Conflicting Formatting: There might be conflicting formatting applied to the cell(s). Try clearing all formatting and applying middle alignment again.
- Excel Bug: In rare cases, there might be a bug in Excel that’s preventing middle alignment from working correctly. Try restarting Excel or updating to the latest version.
Text Overlapping Other Cells
If the text is too long to fit in the cell and is overlapping other cells, middle alignment might not be the best solution. Consider using ‘Wrap Text’ or shrinking the text to fit the cell.
Advanced Tips and Tricks for Middle Alignment
Once you’ve mastered the basics of middle alignment, you can explore some advanced tips and tricks to further enhance your spreadsheets:
Combining Middle Alignment with Other Formatting Options
Middle alignment works well with other formatting options, such as:
- Font Styles and Sizes: Experiment with different font styles and sizes to create visually appealing headings and titles.
- Cell Borders and Shading: Use cell borders and shading to highlight important data and create visual separation between sections.
- Number Formatting: Apply appropriate number formatting to ensure that numbers are displayed correctly and consistently.
- Conditional Formatting: Use conditional formatting to automatically apply different formatting based on specific criteria.
Using Middle Alignment with Sparklines
Sparklines are small charts that fit within a single cell. Middle alignment can help to position sparklines correctly within their cells, creating a visually appealing and informative display.
Creating Custom Cell Styles
If you frequently use the same formatting options, you can create custom cell styles to save time and ensure consistency. A cell style can include middle alignment, font styles, borders, shading, and other formatting options.
Using Middle Alignment in Excel Tables
Excel tables offer a variety of built-in formatting options, including the ability to apply middle alignment to specific columns or rows. This can help to create a consistent and professional look for your tables.
Automating Middle Alignment with VBA
As mentioned earlier, VBA can be used to automate middle alignment and other formatting tasks. This is particularly useful for large spreadsheets or for tasks that need to be performed repeatedly.
Alternatives to Middle Alignment
While middle alignment is a valuable formatting tool, it’s not always the best solution. In some cases, other alignment options might be more appropriate.
Top or Bottom Alignment
Top or bottom alignment might be preferred when you want to emphasize the top or bottom of the cell. For example, you might use top alignment for headings that should be closely associated with the data below them.
Wrap Text
If the text is too long to fit in the cell, ‘Wrap Text’ can be used to wrap the text to multiple lines. This can be a better option than shrinking the text to fit the cell.
Shrink Text to Fit
The ‘Shrink Text to Fit’ option automatically reduces the font size to fit the text within the cell. This can be useful for displaying long text strings without overlapping other cells.
Merging Cells
Merging cells combines multiple cells into a single cell. This can be useful for creating headings that span multiple columns or rows. However, merging cells can also create problems with sorting and filtering data, so it should be used sparingly.
Conclusion: Mastering the Art of Middle Alignment
Middle alignment is a simple yet powerful formatting tool that can significantly enhance the visual appeal and readability of your Excel spreadsheets. By understanding the different methods of middle aligning text, knowing when to use it, and troubleshooting common issues, you can take your Excel formatting skills to the next level.
Remember, formatting is not just about aesthetics; it’s about making your data accessible and understandable. Middle alignment is a key ingredient in creating spreadsheets that are both visually appealing and functionally effective. So, embrace the power of middle alignment and start creating spreadsheets that truly shine!
From basic formatting to advanced techniques using VBA, this guide has equipped you with the knowledge and skills to master middle alignment in Excel. Now, go forth and create beautifully formatted spreadsheets that impress and inform!
