

Introduction: Unleash the Power of Screen Recording on Your iPhone 12
The Apple iPhone 12, a marvel of modern technology, offers a plethora of features designed to enhance your digital life. Among these, the built-in screen recording functionality stands out as an incredibly useful tool. Whether you’re creating tutorials, capturing gameplay, documenting app glitches, or simply sharing something interesting you found online, knowing how to screen record on your iPhone 12 is a valuable skill. This comprehensive guide will walk you through every step, ensuring you can effortlessly capture your screen whenever the need arises. We’ll cover everything from enabling the feature to advanced tips and troubleshooting.
Why Screen Record on Your iPhone 12? The Myriad of Uses
Before diving into the ‘how-to,’ let’s explore the ‘why.’ Why would you want to screen record on your iPhone 12? The applications are virtually limitless:
- Creating Tutorials: Guiding someone through a process on their iPhone is much easier with a visual aid. Screen recordings allow you to create clear, step-by-step tutorials for apps, settings, or any other iPhone function.
- Capturing Gameplay: Show off your gaming skills! Record your gameplay and share it with friends, or upload it to platforms like YouTube and Twitch.
- Documenting Bugs and Glitches: Encountered a frustrating bug in an app? A screen recording can provide invaluable evidence for developers, helping them to identify and fix the issue.
- Sharing Interesting Content: See something funny or fascinating on social media? Record it and share it with your contacts.
- Preserving Fleeting Moments: Some apps, like Snapchat, are designed for ephemeral content. Screen recording allows you to preserve those fleeting moments for posterity.
- Troubleshooting Tech Issues: When explaining technical problems to support staff, a screen recording can clearly show the steps leading to the issue, making the resolution process much smoother.
Enabling Screen Recording on Your iPhone 12: Getting Started
Before you can start recording, you need to ensure that the screen recording feature is enabled in your iPhone’s Control Center. Here’s how:
Step 1: Accessing the Control Center Settings
- Open the Settings app on your iPhone 12. Look for the gray gear icon on your home screen.
- Scroll down and tap on Control Center. This section allows you to customize the controls that appear when you swipe down from the top-right corner of your screen (or swipe up from the bottom on older iPhones).
Step 2: Adding Screen Recording to the Control Center
- In the Control Center settings, you’ll see two sections: Included Controls and More Controls.
- Scroll down to the More Controls section. Look for Screen Recording. It will have a plus (+) icon next to it.
- Tap the + icon next to Screen Recording. This will add the screen recording button to your Control Center.
- You should now see Screen Recording listed under the Included Controls section. You can also rearrange the order of the controls by pressing and holding the three horizontal lines next to each item and dragging them up or down.
Initiating a Screen Recording: Lights, Camera, Action!
Now that you’ve enabled the screen recording feature, let’s learn how to start a recording:
Step 1: Accessing the Control Center
Swipe down from the top-right corner of your iPhone 12 screen to open the Control Center. If you have an older iPhone with a Home button, swipe up from the bottom of the screen instead.
Step 2: Starting the Recording
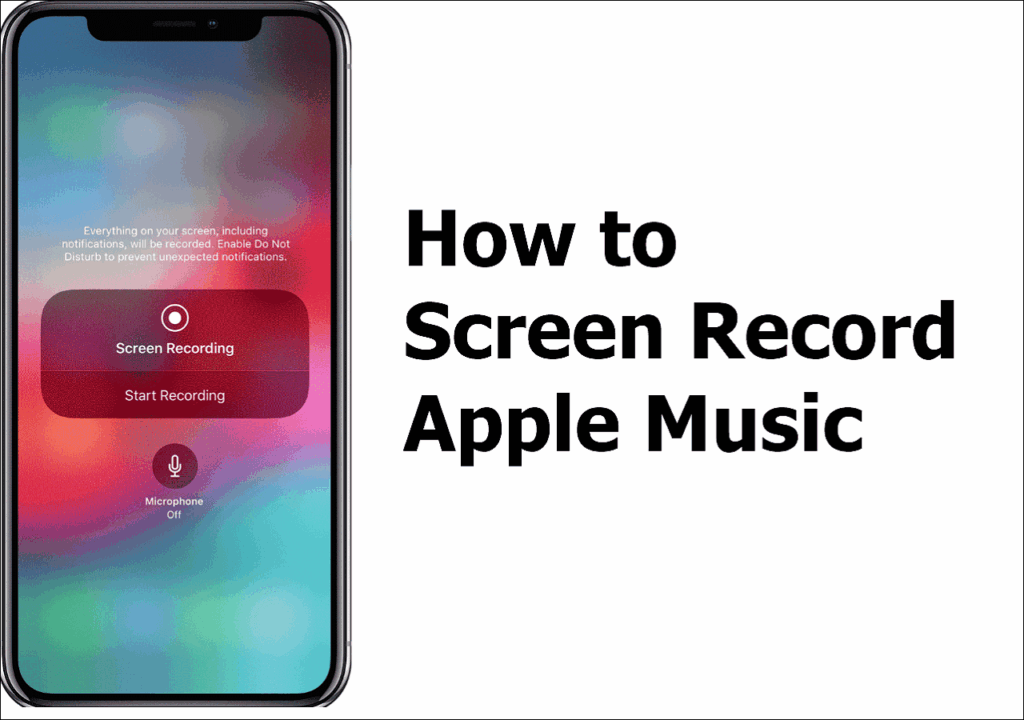
- Look for the Screen Recording icon. It’s a circle within a larger circle.
- Tap the Screen Recording icon. A countdown timer (3, 2, 1) will appear on the button, and then the icon will turn red, indicating that the recording has started. Everything you do on your screen from this point forward will be recorded.
- Optional: If you want to record your voice along with the screen recording, press and hold the Screen Recording icon. A menu will appear with the option to turn the microphone on or off. Tap the microphone icon to toggle it. Make sure it says “Microphone On” if you want to record your voice.
Step 3: Performing the Actions You Want to Record
Now that the recording has started, perform the actions you want to capture. This could involve navigating through apps, demonstrating a process, or playing a game. Remember that everything visible on your screen will be recorded, so be mindful of any sensitive information that might be displayed.
Stopping the Screen Recording: Cut!
When you’re finished recording, you have a couple of options for stopping the process:
Option 1: Tapping the Red Status Bar
- Look for the red status bar at the top of your screen. This indicates that a screen recording is in progress.
- Tap the red status bar. A confirmation message will appear asking if you want to stop the recording.
- Tap Stop to end the recording.
Option 2: Using the Control Center
- Swipe down from the top-right corner of your screen (or swipe up from the bottom on older iPhones) to open the Control Center.
- Tap the red Screen Recording icon again. This will immediately stop the recording.
Once you stop the recording, a notification will appear at the top of your screen, confirming that the screen recording has been saved to your Photos app.
Accessing and Sharing Your Screen Recordings: Showing Off Your Creations
Your screen recordings are automatically saved to the Photos app on your iPhone 12. Here’s how to access and share them:
Step 1: Opening the Photos App
Tap the Photos app icon on your home screen. It’s the icon that looks like a colorful pinwheel.
Step 2: Finding Your Screen Recording
- In the Photos app, tap on the Albums tab at the bottom of the screen.
- Scroll down to the Media Types section and tap on Screen Recordings.
- Your screen recordings will be listed here in chronological order.
- Tap on the screen recording you want to view or share.
Step 3: Sharing Your Screen Recording
- While viewing the screen recording, tap the Share icon in the bottom-left corner of the screen. It’s the icon that looks like a square with an arrow pointing upwards.
- A share sheet will appear, offering various options for sharing your screen recording. You can send it via Messages, Mail, AirDrop, or upload it to social media platforms like YouTube, Facebook, or Instagram.
- Choose your desired sharing method and follow the on-screen instructions.
Advanced Screen Recording Tips and Tricks: Level Up Your Recordings
Now that you’ve mastered the basics of screen recording, let’s explore some advanced tips and tricks to enhance your recordings:
1. Enabling “Do Not Disturb” Mode
Before starting a screen recording, it’s a good idea to enable Do Not Disturb mode. This will prevent notifications from popping up during your recording and distracting viewers. To enable Do Not Disturb, swipe down from the top-right corner of your screen to open the Control Center, and tap the crescent moon icon.
2. Cleaning Up Your Home Screen
Take a moment to tidy up your home screen before recording. Remove any unnecessary apps or widgets that might clutter the screen and distract viewers. A clean and organized home screen will make your recordings look more professional.
3. Using a Screen Recording App for Advanced Features
While the built-in screen recording feature is excellent for basic tasks, you might want to consider using a dedicated screen recording app for more advanced features, such as:
- Video Editing: Trim, crop, and add annotations to your screen recordings.
- Facecam Recording: Record your face simultaneously with the screen recording, allowing you to add a personal touch to your tutorials and gameplay videos.
- Custom Watermarks: Add a custom watermark to your screen recordings to protect your content and promote your brand.
- Higher Resolution Recording: Record your screen in higher resolutions for better video quality.
Some popular screen recording apps for iOS include DU Recorder, Record it!, and Go Record.
4. Optimizing Audio Quality
If you’re recording your voice along with the screen recording, make sure to optimize the audio quality. Find a quiet environment with minimal background noise. Speak clearly and directly into the microphone. You can also use an external microphone for even better audio quality.
5. Planning Your Recording
Before you start recording, take a moment to plan what you’re going to do. This will help you to stay focused and avoid making mistakes. Create a script or outline to guide you through the recording process. A well-planned recording will be more engaging and informative for your viewers.
Troubleshooting Common Screen Recording Issues: Fixing the Glitches
While screen recording on the iPhone 12 is generally a smooth process, you might encounter some issues from time to time. Here are some common problems and their solutions:
1. Screen Recording Icon Not Appearing in Control Center
Solution: Double-check that you’ve added the screen recording feature to the Control Center in the Settings app (as described in the “Enabling Screen Recording” section above).
2. Screen Recording Not Saving to Photos App
Solution: Make sure that you have enough storage space available on your iPhone. Screen recordings can take up a significant amount of storage space, especially if they are long or recorded in high resolution. Also, check your Photos app settings to ensure that screen recordings are being saved to the correct album.
3. No Audio Being Recorded
Solution: Ensure that the microphone is turned on when you start the screen recording. Press and hold the Screen Recording icon in the Control Center to toggle the microphone on or off. Also, check your iPhone’s microphone settings to ensure that apps have permission to access the microphone.
4. Poor Video Quality
Solution: The video quality of your screen recordings depends on several factors, including the resolution of your iPhone’s screen and the recording settings. Unfortunately, the built-in screen recorder doesn’t offer options to adjust the resolution. Consider using a third-party app for more control over video quality. Close unnecessary apps running in the background to free up system resources which can improve recording performance.
5. Screen Recording Stops Unexpectedly
Solution: This can be caused by a number of factors, including low battery, insufficient storage space, or a software glitch. Try charging your iPhone, freeing up storage space, and restarting your device. If the problem persists, consider updating to the latest version of iOS.
Alternatives to the Built-In Screen Recorder: Exploring Other Options
While the built-in screen recorder is sufficient for most users, there are alternative options available on the App Store that offer more advanced features and customization options. Here are a few popular alternatives:
- DU Recorder: A free and feature-rich screen recorder with video editing capabilities, facecam recording, and custom watermarks.
- Record it!: A simple and easy-to-use screen recorder with support for facecam recording and audio commentary.
- Go Record: A powerful screen recorder with advanced editing tools, support for multiple video formats, and the ability to add annotations and transitions.
- TechSmith Capture (formerly Snagit): A robust screen capture and recording tool ideal for professional use, offering advanced editing and sharing options.
These apps often come with premium features that require a subscription or one-time purchase, but they can be worth the investment if you need more advanced screen recording capabilities.
Conclusion: Mastering Screen Recording on Your iPhone 12
Screen recording on your Apple iPhone 12 is a simple yet powerful tool that can be used for a wide variety of purposes. By following the steps outlined in this guide, you can easily capture your screen and share your creations with the world. Whether you’re creating tutorials, recording gameplay, or documenting bugs, screen recording is a valuable skill to have in your digital toolkit. So go ahead, unleash the power of screen recording and start capturing your iPhone 12 experience today! Remember to explore the advanced tips and tricks to further enhance your recordings and consider alternative apps if you need more advanced features. With a little practice, you’ll be a screen recording pro in no time!
