

Can You Really Change Your Name on Facebook? Decoding the Mystery
In the ever-evolving landscape of social media, one thing remains constant: our desire to present ourselves in the best possible light. And sometimes, that means wanting to tweak our online identity – starting with our name on Facebook. Whether it’s a simple spelling correction, a change to reflect a new marital status, or a desire to shed an old moniker, the question remains: can you actually change your name on Facebook? The answer, thankfully, is generally yes. However, as with most things in the digital world, there are rules, restrictions, and a whole lot of nuances to navigate. This comprehensive guide will walk you through everything you need to know about changing your name on Facebook, ensuring a smooth and successful transition.
Why Would You Want to Change Your Facebook Name?
Before diving into the how-to, let’s explore the ‘why.’ The reasons for wanting to change your name on Facebook are as diverse as the platform’s user base. Here are some common scenarios:
- Marriage or Divorce: This is perhaps the most frequent reason. A new last name often signifies a significant life change, and updating your Facebook profile is a natural step.
- Spelling Correction: We all make mistakes. A typo during the initial account setup can haunt you for years unless you rectify it.
- Preferred Nickname: Maybe you’ve always gone by a nickname and want your Facebook profile to reflect that.
- Professional Reasons: Perhaps you’re rebranding yourself professionally and want your Facebook name to align with your new identity, especially if you use Facebook for networking.
- Privacy Concerns: Some individuals might want to use a slightly altered version of their name to enhance their privacy.
- Gender Transition: For transgender individuals, changing their name on Facebook is a crucial step in affirming their identity and presenting their authentic self to the world.
- Witness Protection or Safety Reasons: In very rare cases, individuals under witness protection or facing serious safety concerns might need to change their name for security reasons.
Facebook’s Name Change Policy: The Rules of the Game
Facebook isn’t a free-for-all when it comes to names. They have a specific policy in place to maintain authenticity and prevent impersonation. Understanding these rules is crucial to avoid having your name change request rejected or, worse, your account suspended. Here’s a breakdown of the key elements:
Authenticity is Key
Facebook insists on using your real, everyday name. This means no fake names, nicknames (unless they’re commonly used and recognizable variations of your real name), or made-up words. They want to ensure that people are who they say they are, fostering a sense of trust and accountability within the community.
No Symbols, Numbers, or Unusual Capitalization
Your name should consist of standard letters. Avoid using symbols, numbers, unusual capitalization, repeating characters, or random punctuation. For example, “J0hn D03” or “jOhN dOe” wouldn’t fly.
No Titles or Honorifics
Don’t include titles like “Dr.,” “Mr.,” “Ms.,” or professional designations. Your name should simply be your name, without any additional embellishments.
No Offensive or Suggestive Content
This should be obvious, but it’s worth stating explicitly. Your name cannot contain offensive, suggestive, or otherwise inappropriate language. Facebook aims to maintain a respectful and inclusive environment for all users.
Character Limit
While not explicitly stated, there’s a practical character limit for your first and last name fields. Extremely long names might be truncated or cause issues with the display.
Supporting Documentation (Sometimes Required)
In some cases, Facebook might ask you to provide documentation to verify your name change request. This is especially common if you’re making a significant change, such as switching from a nickname to your legal name or updating your name after marriage or divorce. Accepted forms of documentation include:
- Driver’s license
- Passport
- Marriage certificate
- Divorce decree
- Official name change document
The 60-Day Rule
This is a crucial point to remember. Once you change your name on Facebook, you can’t change it again for 60 days. This is to prevent users from frequently changing their names and potentially engaging in deceptive or misleading behavior. So, choose wisely!
Step-by-Step Guide: How to Change Your Name on Facebook
Now that you understand the rules, let’s get down to the nitty-gritty. Here’s a step-by-step guide on how to change your name on Facebook, whether you’re using a computer or a mobile device:
On a Computer:
- Log in to your Facebook account: Go to www.facebook.com and enter your email address or phone number and password.
- Click the dropdown arrow: In the top right corner of the page, click the downward-facing arrow.
- Select “Settings & Privacy”: From the dropdown menu, choose “Settings & Privacy.”
- Click “Settings”: In the expanded menu, click on “Settings.”
- Click “Edit” next to “Name”: In the General Account Settings section, you’ll see your name. Click the “Edit” button next to it.
- Enter your new name: Carefully enter your first name, middle name (optional), and last name in the corresponding fields. Double-check for any typos!
- Review your change: Facebook will show you a preview of how your name will appear. Choose the format you prefer.
- Enter your password: For security reasons, you’ll need to enter your Facebook password to confirm the change.
- Click “Save Changes”: Once you’ve entered your password, click the “Save Changes” button.
On a Mobile Device (iOS or Android):
- Open the Facebook app: Launch the Facebook app on your smartphone or tablet.
- Tap the menu icon: Tap the three horizontal lines (the “hamburger menu”) in the top right corner (Android) or bottom right corner (iOS).
- Scroll down and tap “Settings & Privacy”: Find and tap on “Settings & Privacy.”
- Tap “Settings”: In the expanded menu, tap on “Settings.”
- Tap “Personal and Account Information”: This option is usually at the top of the settings menu.
- Tap “Name”: You’ll see your current name displayed. Tap on it to edit.
- Enter your new name: Carefully enter your first name, middle name (optional), and last name in the corresponding fields.
- Review your change: Facebook will show you a preview of how your name will appear. Choose the format you prefer.
- Enter your password: For security reasons, you’ll need to enter your Facebook password to confirm the change.
- Tap “Save Changes”: Once you’ve entered your password, tap the “Save Changes” button.
Troubleshooting Common Issues
Even with the best instructions, things can sometimes go wrong. Here are some common issues you might encounter when changing your name on Facebook and how to troubleshoot them:
Name Change Request Rejected
This is perhaps the most frustrating scenario. If your name change request is rejected, Facebook will usually provide a reason. The most common reasons include:
- Violation of Name Policy: Your new name violates one or more of the rules outlined above (e.g., using a fake name, including symbols, etc.).
- Insufficient Information: Facebook might need more information to verify your identity or the legitimacy of your name change.
- Recent Name Change: You’ve changed your name within the past 60 days.
Solution: Carefully review Facebook’s name policy and ensure that your new name complies with all the requirements. If you believe your request was wrongly rejected, you can appeal the decision and provide supporting documentation.
Unable to Save Changes
Sometimes, you might encounter an error message when trying to save your new name. This could be due to a technical glitch or a problem with your account.
Solution: Try the following:
- Clear your browser’s cache and cookies: This can often resolve temporary technical issues.
- Try a different browser or device: See if the problem persists on another browser or device.
- Update the Facebook app: Make sure you’re using the latest version of the Facebook app.
- Contact Facebook Support: If none of the above solutions work, reach out to Facebook Support for assistance.
Forgot Your Password
You need your password to confirm the name change. If you’ve forgotten your password, you’ll need to reset it.
Solution: Click the “Forgot Password?” link on the login page and follow the instructions to reset your password. You’ll typically need to verify your identity through email or phone number.
Name Not Updating
In rare cases, your name change might be approved, but it doesn’t immediately update on your profile. This could be due to caching issues or a delay in Facebook’s system.
Solution: Try clearing your browser’s cache and cookies. You can also try logging out and logging back into your Facebook account. If the issue persists after a few hours, contact Facebook Support.
Tips for a Smooth Name Change
To minimize the chances of encountering problems, here are some tips for a smooth name change on Facebook:
- Plan Ahead: Consider your name change carefully and ensure that it aligns with Facebook’s policies.
- Gather Documentation: If you anticipate needing to provide documentation, gather it in advance.
- Double-Check for Typos: Before submitting your request, carefully review your new name for any typos or errors.
- Be Patient: The name change process can sometimes take a few hours or even a day or two. Be patient and avoid making multiple requests.
- Communicate with Your Network: If you’re making a significant name change (e.g., after marriage or divorce), consider informing your friends and family beforehand. This can help avoid confusion and ensure a smooth transition.
Facebook Name Change and Privacy
Changing your name on Facebook can have implications for your privacy. Here are some points to consider:
- Searchability: Your new name will be searchable on Facebook, making it easier for people to find you.
- Notifications: Your friends might receive notifications about your name change.
- Past Activity: Your past posts and comments will still be associated with your account, even after you change your name.
- Privacy Settings: Review your privacy settings to control who can see your profile, posts, and other information.
Alternative Options: Using a Nickname or Maiden Name
If you’re hesitant to change your full name on Facebook, you might consider using a nickname or maiden name instead. Facebook allows you to add a nickname or other name to your profile, which will be displayed alongside your real name.
How to Add a Nickname or Other Name:
- Go to your profile.
- Click “About.”
- Click “Details About You.”
- Scroll down to “Other Names” and click “Add a nickname, a birth name…”.
- Enter your nickname or other name and choose the type of name.
- Choose whether you want the name to be displayed at the top of your profile.
- Click “Save.”
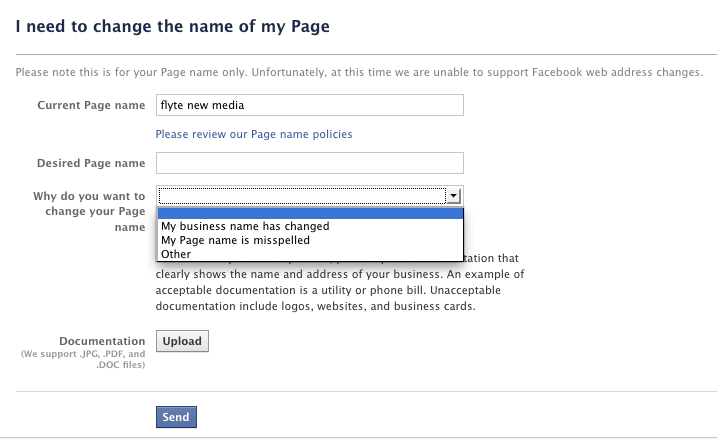
Special Considerations for Business Pages
The process for changing the name of a Facebook Business Page is different from changing your personal profile name. Facebook has stricter guidelines for Business Page names to prevent misleading or deceptive practices.
Key Considerations for Business Page Name Changes:
- Relevance: The new name must accurately reflect the business or organization.
- Accuracy: Avoid using misleading or exaggerated claims in your Page name.
- Authorization: You must be an admin of the Page to change the name.
How to Change Your Facebook Business Page Name:
- Go to your Facebook Business Page.
- Click “About” on the left side of the Page.
- Click “Edit” next to the Page name.
- Enter your new Page name and click “Continue.”
- Review the changes and click “Request Change.”
Facebook will review your request and notify you of their decision. Be prepared to provide documentation to support your name change request, such as business licenses or articles of incorporation.
The Future of Identity on Facebook
As Facebook continues to evolve, its policies regarding identity and name changes are likely to adapt as well. It’s important to stay informed about the latest guidelines and best practices to ensure a smooth and compliant experience. Facebook’s commitment to authenticity and user safety will likely continue to shape its approach to name changes in the years to come.
Conclusion: Navigating the Facebook Name Change Maze
Changing your name on Facebook is generally a straightforward process, but it’s essential to understand the platform’s policies and potential pitfalls. By following the steps outlined in this guide and being mindful of the tips and considerations discussed, you can successfully update your profile identity and present yourself in the way you desire. Whether it’s a simple correction, a reflection of a life change, or a strategic rebranding effort, changing your name on Facebook can be a powerful tool for shaping your online presence. Remember to choose wisely, be patient, and always prioritize authenticity and respect for the community.
