How to Draw a Giraffe: A Step-by-Step Guide for Beginners
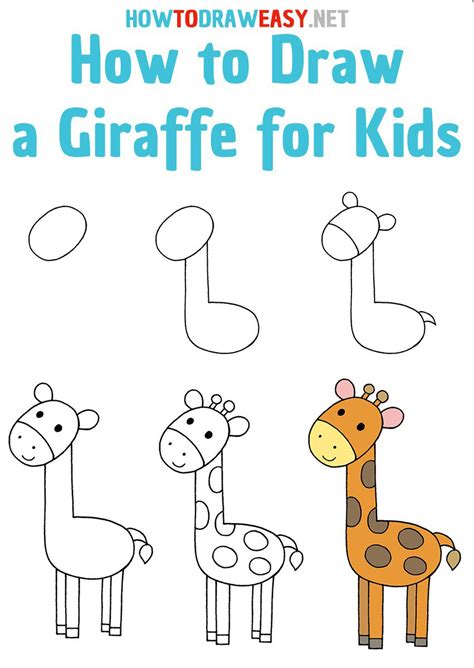
Want to learn how to draw a giraffe? This step-by-step guide will take you through the process, from basic shapes to adding intricate details. Whether you're a seasoned artist or just starting out, you'll find this tutorial helpful and fun! We'll focus on creating a realistic-looking giraffe, but feel free to add your own creative flair!
Getting Started: Materials You'll Need
Before we begin, gather your art supplies. You'll need:
- Paper: Use a drawing pad or sketchbook. Thicker paper is preferable to prevent smudging.
- Pencil: A standard HB pencil is perfect for sketching. You might also want a darker pencil (like a 2B) for shading.
- Eraser: A good quality eraser will help you correct mistakes.
- Sharpener: Keep your pencils sharp for clean lines.
- Optional: Colored pencils, crayons, or markers for adding color.
Step-by-Step Giraffe Drawing Tutorial
Let's start drawing!
Step 1: The Basic Shapes
Begin by sketching a simple oval for the giraffe's body. Below the oval, draw a slightly smaller circle for the belly. Connect these shapes with a gently curved line to create the body's contour.
Step 2: The Neck and Head
Draw a long, slender rectangle extending upwards from the body – this is the giraffe's neck. At the top of the neck, sketch a small circle for the head. Remember, giraffes have incredibly long necks!
Step 3: Legs and Hooves
Draw four long, slender legs extending downwards from the body. Each leg should slightly taper towards the hooves. Add small oval shapes at the bottom of each leg to represent the hooves.
Step 4: Refining the Head
Now let's refine the giraffe's head. Within the head circle, sketch two small circles for the eyes. Add a small, curved line for the mouth and a larger, slightly curved line for the nose. Don't forget the ears! Draw two small, leaf-like shapes on either side of the head.
Step 5: Adding the Horns (Ossicons)
Giraffes have ossicones, bony protrusions on their heads that aren't true horns. Draw two small, slightly curved bumps on top of the head to represent these ossicones.
Step 6: The Giraffe's Coat: Spots!
This is the fun part! Giraffes are known for their distinctive spots. Start by sketching irregular oval shapes of varying sizes all over the giraffe's body and legs. Don't worry about making them perfect; irregular spots look more natural.
Step 7: Tail and Final Details
Add a long, slender tail to the rear of the giraffe. It should have a tuft of hair at the end. Take some time to refine the lines of your drawing, erasing any unwanted marks. Add shading to give your giraffe depth and dimension.
Tips for a More Realistic Giraffe
- Reference Images: Looking at pictures of giraffes will help you understand their proportions and spot patterns.
- Light and Shadow: Pay attention to light and shadow to add realism to your drawing.
- Practice: The more you practice, the better you'll become at drawing giraffes!
Beyond the Basics: Adding Your Own Style
Once you've mastered the basic techniques, feel free to experiment! Try drawing your giraffe in different poses, add a background, or even give it a unique personality. The possibilities are endless!
This guide provides a solid foundation for drawing a giraffe. Remember to have fun and let your creativity shine! Keep practicing, and soon you'll be drawing beautiful giraffes with ease.
