

Unveiling the Block: How to Know if Someone Blocked You on TikTok (2024 Guide)
Ah, TikTok. The land of viral dances, lip-sync battles, and endless scrolling. It’s a place where you can connect with people from all over the world, share your creativity, and maybe even become the next internet sensation. But what happens when that connection is severed? What happens when you suspect someone has blocked you? The feeling is akin to digital rejection, a silent dismissal that leaves you wondering, “What did I do?”
Let’s face it: being blocked on social media stings. It’s a digital cold shoulder, a virtual door slammed in your face. While it’s not always personal (sometimes people just need to declutter their following list), it’s natural to want to know if someone has blocked you on TikTok. Fortunately, there are several ways to investigate. This comprehensive guide will walk you through each method, helping you decipher the clues and uncover the truth.
Why Would Someone Block You on TikTok?
Before we dive into the how-to, let’s briefly touch on the “why.” Understanding the potential reasons behind a block can help you process the situation and maybe even prevent it from happening again.
- Misunderstanding or Argument: Perhaps you had a disagreement in the comments section, and things escalated. People sometimes block others in the heat of the moment.
- Unwanted Attention: Maybe you were a bit too enthusiastic in your liking or commenting. Some users block to avoid unwanted attention or perceived harassment.
- Privacy Concerns: Certain users prefer to limit their audience to a specific group of people. It might not be personal; they could simply be curating their online experience.
- Simply Not Vibing: Sometimes, there’s no specific reason. People block others because they don’t enjoy their content or simply don’t want to see it anymore.
It’s important to remember that being blocked doesn’t necessarily reflect poorly on you. Everyone has their own reasons, and sometimes it’s best not to take it to heart. However, if you’re genuinely concerned about your behavior, it might be worth reflecting on your interactions and making adjustments.
Method 1: The Search Game – Can You Find Their Profile?
The most straightforward way to check if someone has blocked you is to search for their profile. This method is simple, but it’s not always foolproof.
- Open TikTok and tap the “Discover” icon (magnifying glass) at the bottom of the screen.
- Type the person’s username into the search bar.
- If the profile appears, great! You’re likely not blocked. However, if the profile doesn’t show up, or if you see a profile with no videos and a message like “No content,” it could be a sign that you’ve been blocked.
Important Considerations:
- Typos: Double-check that you’ve spelled the username correctly. Even a small typo can prevent the profile from appearing.
- Username Changes: The person might have changed their username. If you know their previous username, try searching for that.
- Privacy Settings: Some users have very strict privacy settings that might prevent their profile from appearing in search results, even if they haven’t blocked you.
If you’ve considered these factors and the profile still doesn’t appear, it’s more likely that you’ve been blocked. However, don’t jump to conclusions just yet. Let’s explore other methods.
Method 2: The Mutual Friends Test – Asking for Backup
This method involves asking a mutual friend to check the profile for you. If your friend can see the profile but you can’t, it’s a strong indication that you’ve been blocked.
- Contact a mutual friend who also follows the person in question.
- Ask your friend to search for the person’s profile on TikTok.
- If your friend can see the profile and its content, while you cannot, it’s highly likely that you’ve been blocked.
Why This Works:
Blocking is a one-way street. If someone blocks you, it only affects your ability to see their content. It doesn’t affect other users. Therefore, if a mutual friend can see the profile, but you can’t, the most logical explanation is that you’ve been blocked.
Considerations:
- Trust: Make sure you trust your friend to be honest with you.
- Inconvenience: Be mindful of your friend’s time and avoid asking them repeatedly.
Method 3: The Comment Graveyard – Searching for Past Interactions
This method involves searching for past comments you’ve made on the person’s videos. If the comments have disappeared, it could be a sign that you’ve been blocked.
- Think back to videos you’ve commented on that the person posted.
- Try to find those videos, either through your own profile’s “Liked” videos or by searching for related content.
- If you find the video, check the comments section. If your comment is no longer visible, it could indicate that you’ve been blocked.
Why This Works:
When someone blocks you on TikTok, your comments are typically removed from their videos. This is because they don’t want you to interact with their content in any way.
Important Notes:
- Video Deletion: The video itself might have been deleted. If the video is gone, you won’t be able to find your comment, regardless of whether you’ve been blocked.
- Comment Deletion: The person might have simply deleted your comment, without blocking you. This is possible if your comment was offensive or violated TikTok’s community guidelines.
- Scrolling Fatigue: Finding old comments can be time-consuming, especially if you’ve commented on many videos.
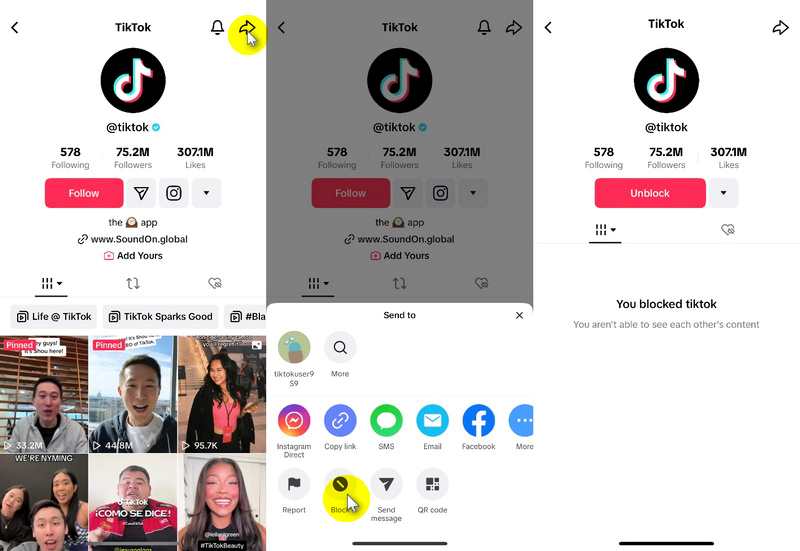
Method 4: The Direct Message Dilemma – Sending a Message
This method involves trying to send the person a direct message. If you can’t send a message, it could be a sign that you’ve been blocked.
- Go to your inbox and try to find a previous conversation with the person.
- If you can’t find a previous conversation, try searching for their username in the search bar within your inbox.
- If you can find the conversation (or attempt to start a new one), type a message and try to send it.
- If the message doesn’t send, or if you see an error message indicating that you can’t message this person, it could be a sign that you’ve been blocked.
Caveats:
- Privacy Settings: The person might have their privacy settings set so that only people they follow can message them. This could prevent you from sending a message, even if you haven’t been blocked.
- Technical Glitches: Sometimes, TikTok experiences technical glitches that can prevent messages from sending.
Method 5: The Follow/Unfollow Tango – Observing the Follow Button
This method is a bit more subtle and involves observing the “Follow” button on the person’s profile (if you can find it). It’s less reliable than other methods, but it can provide additional clues.
- If you can find the person’s profile (even if it’s empty), look for the “Follow” button.
- Tap the “Follow” button.
- If the button immediately reverts back to “Follow,” and you can’t successfully follow the person, it could be a sign that you’ve been blocked.
Why This Might Work:
When someone blocks you, TikTok typically prevents you from following them. The “Follow” button might appear, but it won’t function properly.
Limitations:
- Account Issues: There could be issues with your own account that are preventing you from following people.
- TikTok Glitches: As with messaging, TikTok glitches can sometimes interfere with the follow/unfollow process.
Putting It All Together: Interpreting the Signs
No single method is foolproof. It’s best to combine multiple methods to get a more accurate picture. If you’ve tried several of these methods and consistently get results that indicate you’ve been blocked, it’s likely that you have.
Here’s a summary of the key indicators:
- Profile Doesn’t Appear in Search: The person’s profile is nowhere to be found when you search for their username.
- Mutual Friend Can See the Profile: A mutual friend can see the profile and its content, while you cannot.
- Comments Have Disappeared: Your past comments on the person’s videos are no longer visible.
- Can’t Send Direct Messages: You’re unable to send the person a direct message.
- Follow Button Doesn’t Work: The “Follow” button immediately reverts back to “Follow” when you try to tap it.
What to Do If You’ve Been Blocked
So, you’ve confirmed that you’ve been blocked. Now what? Here are a few options:
- Respect Their Decision: The most important thing is to respect the person’s decision to block you. Continuously trying to contact them or create new accounts to bypass the block is likely to backfire and could even be considered harassment.
- Reflect on Your Behavior: Take some time to reflect on your interactions with the person. Did you say or do anything that might have offended them? Could you have been too persistent or intrusive?
- Move On: Sometimes, the best thing to do is to simply move on. There are plenty of other people to connect with on TikTok. Focus on building positive relationships and creating content that you enjoy.
- Consider Creating New Content: Focus on creating content that is engaging and authentic. This can attract new followers and help you build a positive online presence.
The Psychology of Blocking: Understanding the Digital Divide
Blocking is a common feature on social media platforms, and it serves several purposes. For some, it’s a way to protect themselves from harassment or unwanted attention. For others, it’s a way to curate their online experience and control who they interact with. Understanding the psychology behind blocking can help you take it less personally.
Here are some common psychological factors that contribute to blocking:
- Boundary Setting: Blocking allows individuals to set clear boundaries and protect their personal space in the digital world.
- Emotional Regulation: Blocking can be a way to manage emotions and avoid potentially triggering interactions.
- Control: Blocking gives individuals a sense of control over their online environment and who they interact with.
- Privacy: Blocking can enhance privacy by limiting who can view their content and contact them.
Preventing Future Blocks: Building Positive Online Relationships
While you can’t control other people’s actions, you can take steps to build positive online relationships and minimize the risk of being blocked.
Here are some tips:
- Be Respectful: Treat others with respect, even if you disagree with them. Avoid personal attacks, insults, and offensive language.
- Be Mindful of Your Tone: Remember that written communication can be easily misinterpreted. Be mindful of your tone and avoid sarcasm or passive-aggressive comments.
- Avoid Spamming: Don’t bombard people with excessive likes, comments, or messages.
- Respect Boundaries: If someone indicates that they don’t want to interact with you, respect their wishes.
- Be Authentic: Be yourself and share content that you’re passionate about. Authenticity is often appreciated and can help you build genuine connections.
Alternative Actions Besides Blocking
It’s essential to recognize that blocking isn’t the only option available to TikTok users for managing their interactions. Other actions can address concerns without resorting to a complete cutoff.
- Muting: Muting a user allows you to remove their content from your feed without them knowing. This can be a good option if you want to avoid seeing their posts but don’t want to completely sever ties.
- Restricting: Restricting a user limits their interactions with you. Their comments will only be visible to them unless you approve them, and they won’t be able to see when you’re online.
- Reporting: If a user is violating TikTok’s community guidelines, you can report them. This can lead to their account being suspended or banned.
Staying Positive on TikTok: Maintaining Your Mental Well-being
Social media can have a significant impact on mental well-being. It’s essential to take steps to protect your mental health while using platforms like TikTok.
Here are some tips for staying positive:
- Limit Your Time: Set limits on how much time you spend on TikTok each day.
- Focus on Positive Content: Follow accounts that inspire you and make you feel good.
- Take Breaks: Take regular breaks from TikTok to avoid feeling overwhelmed.
- Connect with Real-Life Friends: Don’t let social media replace real-life relationships. Make time to connect with friends and family in person.
- Seek Support: If you’re struggling with your mental health, don’t hesitate to seek support from a therapist or counselor.
Conclusion: Navigating the Digital Landscape
Being blocked on TikTok can be a frustrating experience, but it’s important to remember that it’s not always personal. By understanding the reasons behind blocking and learning how to interpret the signs, you can navigate the digital landscape with more confidence and resilience. Focus on building positive online relationships, creating engaging content, and prioritizing your mental well-being. And remember, there’s a whole world of TikTok content out there waiting to be discovered. Don’t let one block hold you back from enjoying the platform.
