How High to Hang Pictures: The Ultimate Guide to Perfect Placement
Hanging pictures perfectly can transform a room. Too high, and they feel lost; too low, and they overwhelm the space. This guide provides a foolproof method for achieving picture-perfect placement every time, regardless of your art's size or the room's style.
The Goldilocks Rule: Finding the "Just Right" Height
Forget arbitrary rules; the ideal hanging height depends on your furniture and the overall aesthetic you’re aiming for. The key is to create a visually pleasing balance. We'll focus on two primary methods:
1. The Eye-Level Method (Most Common)
This classic approach centers the artwork at eye level for the average viewer. However, "eye level" isn't a fixed height; it depends on who's viewing it. Consider:
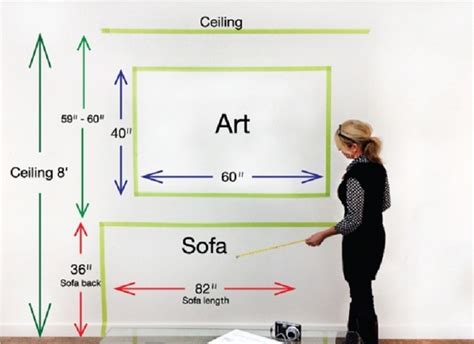
- Average Viewing Height: Aim for approximately 57-60 inches from the floor to the center of the artwork. This is a good starting point for most living rooms and hallways.
- Furniture Influence: If the artwork hangs above a sofa, mantel, or sideboard, its center should be roughly 8-10 inches above the furniture piece. This creates visual harmony and prevents the artwork from feeling dwarfed.
- Room Height: In rooms with high ceilings, you may need to hang the piece slightly higher to avoid it looking too low. Conversely, in rooms with low ceilings, a slightly lower placement might work better.
2. The "Gallery Wall" Approach (For Multiple Pieces)
Hanging multiple pictures requires a more strategic approach:
- Consistent Spacing: Maintain a consistent vertical and horizontal distance between frames for a clean, cohesive look. Aim for 2-3 inches between frames.
- Visual Center: Rather than focusing solely on individual eye levels, consider the entire gallery wall as a unit. Determine the central point and arrange the artwork around it, creating a unified visual composition.
- Playful Asymmetry: Don't be afraid to experiment! Sometimes, breaking the rules creates a more dynamic and engaging arrangement. Slight asymmetry can add visual interest.
Tools and Techniques for Accurate Hanging
Precision is key to avoid crooked pictures! Here are some helpful tips:
- Measure Twice, Hang Once: This is crucial! Measure the artwork's dimensions and the wall space before making any marks.
- Use a Level: Avoid crooked pictures by using a level to ensure your hanging points are perfectly horizontal.
- Picture Hanging Kits: Utilize picture hanging kits to ensure the correct placement and weight support for your artwork.
- Painter's Tape: Use painter's tape to mark the hanging points on the wall before drilling any holes, allowing for adjustments before committing.
Considering Different Types of Artwork
The ideal hanging height can vary depending on the type of artwork:
- Large Statement Pieces: These often benefit from being hung slightly lower, drawing the eye and creating a focal point.
- Small Prints or Photos: These can be grouped together to create a gallery wall or hung individually at a slightly higher height.
- Sculptures or Three-Dimensional Art: The hanging height will depend on the piece's size and shape, so consider its overall dimensions and visual impact.
Conclusion: Let Your Art Shine
By following these guidelines, you can confidently hang your pictures at the perfect height, creating a stunning display that complements your home decor. Remember, the key is balance, careful measurement, and a dash of creativity. Don't be afraid to experiment until you find the perfect arrangement! Your home deserves nothing less.
