How to Roll a Joint: A Step-by-Step Guide
Rolling a perfect joint might seem daunting at first, but with a little practice and the right technique, you'll be creating smooth-smoking masterpieces in no time. This guide will walk you through the process, covering everything from choosing your materials to perfecting the final roll.
Gathering Your Supplies
Before you begin, make sure you have all the necessary materials:
- Ground Cannabis: The quality of your cannabis will significantly impact the smoking experience. Ensure it's finely ground for an even burn.
- Rolling Papers: Choose papers that suit your preference. There are various sizes, thicknesses, and materials available, each impacting the burn and taste.
- Crutch/Filter: This prevents burning your lips and creates a smoother draw. You can use a pre-made filter tip or create one from cardstock.
- Grinder (Optional): A grinder helps ensure your cannabis is evenly ground, leading to a more consistent burn.
Step-by-Step Rolling Instructions
Step 1: Preparing the Crutch
If you're using a pre-made filter, skip this step. To make your own, cut a small rectangular piece of cardstock (approximately 1/2 inch by 1.5 inches). Roll it tightly into a cylinder shape and flatten one end slightly.
Step 2: Positioning the Crutch and Papers
Place the crutch about a half-inch from one end of the rolling paper.
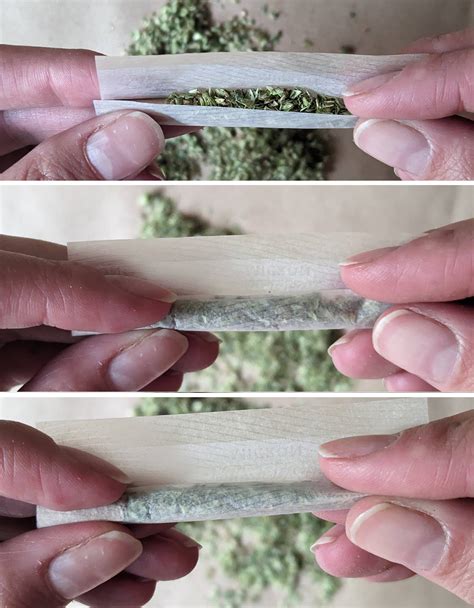
Step 3: Adding the Cannabis
Gently sprinkle your ground cannabis onto the paper, creating an even line along the crutch. Avoid overfilling; a tightly packed joint burns better.
Step 4: The Initial Roll
Using your thumbs and index fingers, carefully roll the paper over the cannabis, forming a loose cylinder. Do not press too hard at this stage.
Step 5: The Tightening and Shaping
Starting from the end opposite the crutch, begin to gently tighten the roll by pressing and rolling between your fingers. This is where practice makes perfect—aim for an even consistency without crushing the cannabis.
Step 6: Licking and Sealing
Once you've achieved a firm, even roll, lightly lick the adhesive strip on the rolling paper. Gently press to seal the joint completely.
Step 7: The Finishing Touches
Carefully shape the ends of the joint, ensuring they are even and neatly packed. This helps create a clean and controlled burn.
Tips for a Perfect Roll
- Practice Makes Perfect: Don't get discouraged if your first few attempts aren't flawless. Keep practicing, and you'll quickly improve your technique.
- Even Distribution: An even distribution of cannabis is crucial for a smooth burn.
- Proper Moisture: If your cannabis is too dry, it will burn too quickly. If it's too wet, it will burn unevenly. Find the right balance.
- Experiment with Papers: Different rolling papers offer different experiences. Experiment to find your favorites.
Conclusion
Rolling a joint is a skill that develops over time. With patience and practice, you can master this technique and enjoy a more satisfying smoking experience. Remember, consistency is key! Start with small amounts of cannabis until you become comfortable with the process and the amount that's perfect for you.
