How to Add a Column in Excel: A Comprehensive Guide
Adding columns in Excel is a fundamental task, crucial for organizing and managing your data effectively. Whether you're a seasoned spreadsheet user or just starting out, understanding the different methods for adding columns will streamline your workflow. This guide provides a step-by-step approach to adding columns in Excel, covering various scenarios and offering tips for efficient data management.
Methods for Adding Columns in Excel
There are several ways to insert a new column in your Excel spreadsheet. The best method depends on where you need the column and how many you're adding.
Method 1: Using the Insert Function (Most Common)
This is the most straightforward method, perfect for adding a single column or a few adjacent columns.
-
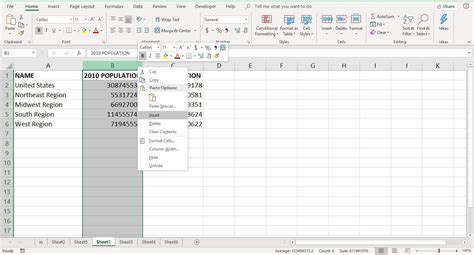
Select the column: Click on the column header (the letter at the top of the column) where you want to insert the new column. For example, if you want to add a column before column B, click on the 'B' header.
-
Right-click: Right-click on the selected column header.
-
Select "Insert": A context menu will appear. Choose the "Insert" option.
-
New column added: A new, blank column will be inserted to the left of the selected column. Your data will automatically shift to the right.
Pro Tip: Need multiple columns? Select multiple column headers before right-clicking and selecting "Insert." This will insert the same number of blank columns to the left of your selection.
Method 2: Using the "Insert" Menu Option (Alternative Method)
This approach works similarly to the right-click method but uses the Excel ribbon.
-
Select the column: As before, click the header of the column where you want to insert the new column.
-
Navigate to the "Home" tab: Locate the "Home" tab in the Excel ribbon at the top of the screen.
-
Click "Insert": In the "Cells" group, click the "Insert" button. This will insert a new column to the left of the selected column.
Method 3: Keyboard Shortcut (For Speed)
For experienced users, keyboard shortcuts can significantly speed up the process.
-
Select the column: Click the header of the column where you need to insert a new column.
-
Press Alt + I + C: This keyboard shortcut will instantly insert a new column to the left of the selected column.
Adding Columns Strategically: Best Practices
-
Planning Ahead: Before starting your spreadsheet, consider your data structure and anticipate the need for future columns. This prevents the need for constant column insertion, which can disrupt data organization.
-
Consistent Naming: Use clear and consistent names for your column headers. This makes your spreadsheet more readable and easier to understand.
-
Data Validation: After adding columns, consider using data validation features to ensure data accuracy and consistency. This helps prevent errors and keeps your spreadsheet clean.
Troubleshooting Common Issues
-
Data Loss: If you accidentally delete or move data, Excel's "Undo" function (Ctrl+Z or Cmd+Z) can quickly revert your changes.
-
Frozen Panes: If you have many rows or columns, consider using Excel's "Freeze Panes" feature to keep column headers visible while scrolling through data.
By mastering these methods and incorporating best practices, you'll confidently manage your Excel spreadsheets and ensure your data remains organized and easily accessible. Remember to save your work frequently to prevent data loss.
