How To Apply Blush: A Guide to a Flawless Flush
Blush. That magical makeup product that can instantly brighten your face, add a touch of color, and make you look healthier and more youthful. But knowing how to apply blush correctly can be the difference between a radiant glow and a clownish mishap. This guide will walk you through everything you need to know to master the art of blush application, regardless of your skill level.
Understanding Your Face Shape and Blush Placement
The key to flawless blush application lies in understanding your face shape and choosing the right placement. Different placements enhance different features, so let's break it down:
For Round Faces: Apply blush along the hollows of your cheeks, sweeping upwards towards your temples. This creates a slimming effect. Think of it as drawing a long, narrow "line" of color.
For Oval Faces: You're lucky! Most blush placements work well with oval faces. Apply blush to the apples of your cheeks and blend upwards and outwards. This placement enhances your natural features without altering the face shape significantly.
For Square Faces: Soften your angles by applying blush along the apples of your cheeks and blending outwards towards your temples, focusing slightly higher than the apples. Avoid harsh lines.
For Heart-Shaped Faces: Apply blush to the apples of your cheeks and blend gently downwards. This helps balance the wider forehead.
For Long Faces: Apply blush horizontally across the widest part of your cheeks to create the illusion of width.
Choosing the Right Blush Type and Shade
The type of blush you choose significantly impacts the final look. Here's a breakdown:
Cream Blush: Provides a dewy, natural finish, ideal for dry skin types. It’s easily blended, but you need to set it with powder for longevity.
Powder Blush: Offers a matte finish, providing buildable coverage and a versatile option for most skin types.
Liquid Blush: Delivers a buildable, natural-looking flush that’s best for all skin types. Its long-lasting nature makes it a popular choice.
Stick Blush: Offers a quick and easy application, perfect for on-the-go touch-ups. Blends effortlessly, giving a natural and subtle finish.
Selecting the right shade is equally important. Consider your undertones:
- Cool Undertones: Opt for pink, rose, or mauve shades.
- Warm Undertones: Choose peach, coral, or bronze shades.
- Neutral Undertones: You can experiment with a wide range of shades!
Step-by-Step Guide to Applying Blush
- Prep Your Skin: Ensure your skin is clean, moisturized, and primed before applying any makeup.
- Apply Foundation (optional): Foundation provides a smooth base for the blush.
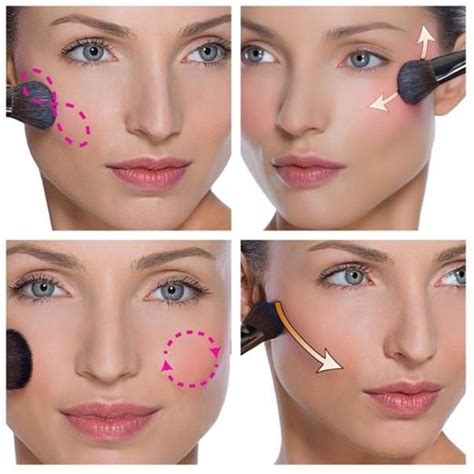
- Smile: This naturally reveals the apples of your cheeks – the perfect starting point for most blush applications.
- Apply Blush: Using a blush brush (fluffy is best), apply your chosen blush to the apples of your cheeks (adjust placement based on your face shape, as outlined above).
- Blend: Gently blend the blush outwards and upwards, ensuring there are no harsh lines. The goal is a seamless transition.
- Set (optional): If using cream or liquid blush, set with a translucent powder to extend its wear.
- Assess and Adjust: Take a step back and assess your look. Is the color too intense? Do you need to blend more? Adjust as needed.
Tips for Perfect Blush Application
- Use a clean brush: This ensures even application and prevents bacterial contamination.
- Start with a small amount: It's easier to add more blush than to remove excess.
- Blend, blend, blend: This is the key to a natural-looking flush.
- Don’t be afraid to experiment: Find the shades and placements that work best for your unique features.
- Practice makes perfect: Don't get discouraged if your first few attempts aren't perfect. Keep practicing, and you'll become a blush pro in no time.
By following these tips and techniques, you'll be well on your way to achieving a flawless, radiant blush application that perfectly complements your features. Remember, confidence is key – so embrace your unique beauty and have fun experimenting!
