How to Block Emails in Gmail: A Comprehensive Guide
Tired of unwanted emails cluttering your inbox? This comprehensive guide will walk you through various methods to effectively block emails in Gmail, ensuring a cleaner and more organized email experience. We'll cover blocking individual senders, blocking entire domains, and using filters for more advanced control.
Blocking Individual Senders in Gmail
This is the most straightforward method for dealing with pesky emails from specific individuals.
Steps:
- Open the unwanted email: Locate the email you wish to block in your Gmail inbox.
- Locate the sender's information: Look at the header of the email, usually at the top, to identify the sender's email address.
- Click the three vertical dots: In the upper right corner of the email, you'll find a menu represented by three vertical dots. Click on this.
- Select "Block "[Sender's Name/Email]": A menu will appear. Choose the option to block the sender. Gmail will confirm the action.
Important Note: Blocking a sender prevents future emails from that specific address from reaching your inbox. They will likely end up in your spam folder.
Blocking Entire Domains in Gmail
If you're receiving numerous unwanted emails from a particular domain (e.g., example.com), blocking the entire domain is a more efficient approach.
This method prevents emails from any address at that domain from reaching your inbox.
This is more effective than individual blocking if you consistently get spam from a variety of addresses under the same domain.
Unfortunately, Gmail doesn't offer a direct "block domain" feature like the individual sender block. Instead, we leverage filters.
Using Filters to Block Emails (Including Domains)
Gmail Filters offer the most powerful and versatile way to manage unwanted emails, including blocking by domain, specific keywords in the subject or body, or even sender attributes.
Steps:
- Navigate to Gmail Settings: Click on the gear icon in the upper right corner of your Gmail inbox and select "See all settings."
- Go to the "Filters and Blocked Addresses" tab: Find and click this tab.
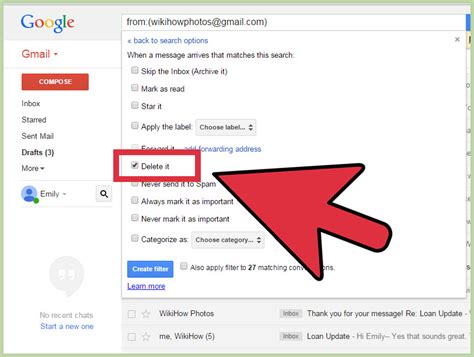
- Click "Create a new filter": This will open a new window.
- Specify your criteria: This is where you define what emails you want to filter. For blocking a domain:
- From: Enter the domain name (e.g., example.com)
- Choose your action: After setting your criteria, scroll down. Select the action you want to take. For blocking, choose:
- Delete it: This permanently deletes emails matching the criteria.
- Mark as read: Marks the emails as read upon arrival.
- Apply the label: Assign the emails to a specific label for review later. You can create a label like "Blocked Emails" for easy management.
- Click "Create filter": Gmail will now apply your filter to incoming emails.
Beyond Blocking: Managing Unwanted Emails
Blocking is just one part of managing unwanted emails. Consider these additional strategies:
- Unsubscribe: Many legitimate emails offer an unsubscribe link. Use it!
- Mark as Spam: Reporting spam helps Gmail's algorithms identify and filter future unwanted emails.
- Strengthen your email security: Use strong passwords, enable two-factor authentication, and be cautious about phishing emails.
By combining these techniques, you can significantly reduce the amount of unwanted emails in your inbox, reclaiming your time and improving your email organization. Remember to regularly review your filters and blocked addresses to ensure they remain effective.
