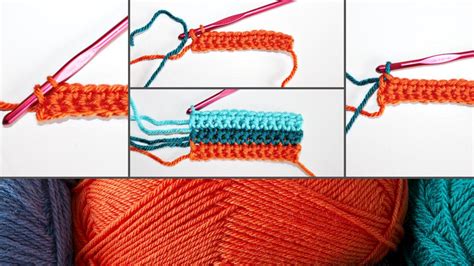
How to Change Colors in Crochet: A Beginner's Guide to Seamless Colorwork
Changing colors in crochet can seem daunting at first, but with a little practice, it becomes second nature! This guide will walk you through several techniques for creating beautiful, seamless color changes in your crochet projects. Whether you're a beginner or an experienced crocheter looking to refine your skills, you'll find valuable tips and tricks here. This guide focuses on achieving clean color transitions without any unsightly gaps or bumps.
Understanding the Basics: Essential Tools and Techniques
Before diving into different methods, let's cover the essentials:
- Yarn: Having your yarns readily accessible and organized will streamline the process. Consider using yarn bowls or containers to prevent tangles.
- Crochet Hook: Choose a hook size appropriate for your yarn weight. Using the wrong size can affect the overall look and feel of your finished project.
- Scissors: Sharp scissors are crucial for neatly trimming your yarn ends.
Key Color Change Methods:
There are several ways to change colors in crochet, each with its own advantages:
1. The Simple (or "Invisible") Join: This method is perfect for beginners and creates a virtually seamless transition.
- The Process: Complete your last stitch in the old color. Cut the yarn, leaving a tail of about 6 inches. With your new color, yarn over and pull through a loop. Now you've joined the new color and have a loop ready for your next stitch!
2. The Carried Join: This method involves carrying your old color up the side of your work, thus avoiding any noticeable color change point and minimizing yarn ends.
- The Process: When switching colors, simply carry your old yarn color along the back side of your work, behind the next several stitches (at least 3-4 for a good hold), and then cut the old color yarn tail. The old color is essentially carried and is only cut when needed to avoid excess yarn.
3. The Magic Knot: This method creates a virtually invisible join. While it’s more complex initially, the result is exceptionally clean and ideal for detailed work or delicate projects.
- The Process: It involves intertwining the old and new yarn strands to create a knot that sits flat and smoothly integrates within the crochet fabric. Numerous tutorials are available online that visually demonstrate this technique.
4. The Slip Knot Method: Similar to the simple join, but the knot is formed using a slip knot, this method is great for quick transitions and is often chosen for speed and ease rather than perfect invisibility.
- The Process: Complete a stitch in the old color, create a slip knot with your new color yarn, hook into the loop on your hook, pull through, and continue crocheting.
Choosing the Right Method: Factors to Consider
The best method for you will depend on your project and personal preference.
- Yarn Weight: For thicker yarns, the simple join or carried join might be sufficient. Finer yarns may benefit from the magic knot or a similar method to keep the join inconspicuous.
- Project Complexity: Intricate patterns often benefit from the magic knot for its clean, seamless finish, while simpler projects might not require such precise techniques.
- Personal Preference: Experiment with different methods to find the one that feels most comfortable and efficient for you.
Tips for Success:
- Practice: Practice your chosen color change method on a scrap of yarn before starting your main project. This will help you to refine your technique and avoid costly mistakes.
- Weaving in Ends: Securely weave in any loose ends to maintain a clean and professional finish. Use a yarn needle for ease.
- Color Combinations: Experiment with different color combinations to create striking and visually appealing projects.
Changing colors in crochet doesn't have to be intimidating. With these techniques and a bit of practice, you'll be creating stunning multicolored projects in no time! Remember, the most important thing is to find a method you're comfortable with and to have fun. Happy crocheting!
