How to Check a Relay: A Comprehensive Guide
Relays are essential components in many electrical systems, acting as electrically operated switches. Understanding how to check a relay is crucial for troubleshooting electrical problems in vehicles, appliances, and other equipment. This guide provides a step-by-step approach to testing relays, covering both visual inspection and electrical testing methods.
Understanding Relays and Their Function
Before diving into testing, let's briefly understand what a relay does. A relay is a switch that's activated by an electromagnetic coil. When a small current flows through the coil, it creates a magnetic field that closes the switch, allowing a larger current to flow through the relay's contacts. This allows a low-power signal to control a higher-power circuit. They're used extensively because they isolate the high-power circuit from the control circuit, increasing safety and reliability.
Tools You'll Need
To effectively check a relay, you'll need a few basic tools:
- Multimeter: This is essential for testing the relay's continuity and voltage. A digital multimeter is recommended for its accuracy.
- Test Leads: These connect the multimeter to the relay's terminals.
- Screwdriver (appropriate size): For removing the relay from its socket.
- Relay Diagram (Optional but Helpful): A diagram showing the relay's pin configuration can simplify the testing process.
Visual Inspection: The First Step
Before applying electrical tests, always start with a visual inspection:
- Check for Physical Damage: Look for any obvious signs of damage, such as cracks, burns, or loose connections.
- Examine the Socket: Ensure the relay is securely seated in its socket and that there's no corrosion or damage to the socket itself.
- Inspect the Wires: Check the wires connected to the relay for any damage, fraying, or loose connections.
Electrical Testing: Methods and Procedures
There are several ways to test a relay electrically, depending on what you suspect is wrong and the tools available.
Method 1: Continuity Test (Checking the Contacts)
This test verifies whether the relay's contacts are closing correctly.
- Disconnect the Relay: Remove the relay from its socket.
- Set the Multimeter: Set your multimeter to the continuity test setting (usually symbolized by a diode or a tone).
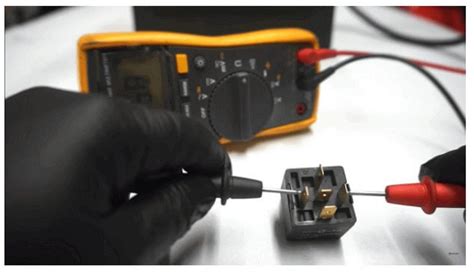
- Test the Contacts: Touch the multimeter probes to the appropriate contact pins on the relay (refer to the relay diagram if needed). The specific pins will depend on your relay type. Generally, there are two main contacts; you'll test for continuity after energizing the coil.
- Energize the Coil: Apply 12V (or the appropriate voltage for your relay) to the coil terminals. If you don't have a power source, you can use a battery. You should hear a click if the relay is functioning correctly.
- Check for Continuity: With the coil energized, test the continuity between the normally open (NO) contacts. You should get a continuity beep (or a reading near zero ohms). Release the voltage to the coil; the continuity should disappear.
- Test Normally Closed (NC) Contacts (if applicable): Repeat the process for normally closed contacts. These should show continuity before energizing the coil and lose continuity after energizing the coil.
Method 2: Voltage Test (Checking the Coil)
This method checks if the coil is receiving power and functioning correctly.
- Set the Multimeter: Set your multimeter to measure voltage (DC volts).
- Connect the Probes: Connect the probes to the coil terminals of the relay.
- Apply Power: Apply power to the circuit that normally energizes the relay.
- Measure the Voltage: Observe the voltage reading. If the voltage is close to the relay's specified voltage, the coil is receiving power. A lack of voltage indicates a problem in the circuit supplying power to the relay.
Interpreting the Results
- Continuity Test: If you don't get continuity when the coil is energized, the relay's contacts may be faulty.
- Voltage Test: If you don't get the expected voltage at the coil, there's a problem in the circuit supplying the relay. This could be a blown fuse, a faulty wire, or a problem with the control circuit.
Troubleshooting Tips
- Always disconnect the power before handling relays or any electrical components.
- Consult a relay diagram or datasheet for pin configuration if unsure.
- If you're not comfortable working with electricity, seek professional help.
By carefully following these steps and understanding the results, you'll be able to effectively check a relay and diagnose electrical problems more efficiently. Remember safety first!
