How to Check Continuity with a Multimeter: A Comprehensive Guide
Checking continuity with a multimeter is a fundamental skill for electricians, electronics enthusiasts, and DIYers alike. It allows you to quickly determine if there's a complete, unbroken path for electricity to flow through a circuit. This guide will walk you through the process, explaining the different types of multimeters and troubleshooting common issues.
Understanding Continuity
Continuity testing verifies the presence of a conductive path between two points. A closed circuit, or one with continuous conductivity, will show continuity. An open circuit, lacking a complete path, will not. This is crucial for identifying broken wires, faulty components, or shorts in electrical systems.
What You'll Need:
- Multimeter: This is the essential tool. Digital multimeters (DMMs) are widely preferred for their accuracy and ease of use. Analog multimeters also work but require more interpretation.
- Test Leads: These are the probes that connect to your multimeter and the circuit under test.
- The Circuit Under Test: This could be anything from a simple wire to a complex electrical component.
Using a Multimeter to Check Continuity: A Step-by-Step Guide
Step 1: Selecting the Continuity Test Mode:
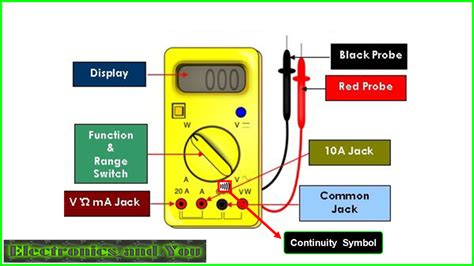
On your multimeter, locate the continuity symbol, usually depicted as a diode symbol (a triangle with a line) or sometimes a simple "continuity" label. Select this mode by rotating the dial or using the function buttons.
Step 2: Connecting the Test Leads:
Connect the red and black test leads to the appropriate jacks on your multimeter. The specific jack locations might vary depending on the multimeter model, but the manual will clearly indicate them.
Step 3: Preparing the Circuit:
Power off the circuit you're testing. This is crucial for safety. Working with live circuits can be dangerous and could damage your equipment.
Step 4: Testing for Continuity:
- Touch the probes to the two points you want to test. For example, if checking a wire for breaks, touch one probe to each end of the wire.
- Observe the Multimeter's Response: If continuity exists, the multimeter will typically beep and display "0" ohms or a very low resistance value (close to zero). If there is a break in the circuit, there will be no beep and the multimeter will display "OL" (overload) or a very high resistance value (approaching infinity).
Step 5: Interpreting the Results:
- Beep and low resistance (near 0 ohms): Continuity exists. The circuit is closed and conductive.
- No beep and high resistance (OL or a very high number): No continuity. The circuit is open, and there's a break in the path.
Troubleshooting Common Issues:
- No Beep, Even with a Good Connection: Check the multimeter's battery. Low battery can affect continuity readings. Also, ensure the dial is correctly set to the continuity setting.
- Erratic Readings: Try cleaning the probes' tips. Dirty probes can interfere with accurate continuity testing.
- Inconsistency Between Readings: Make sure the connections are secure. Poor connections can lead to inaccurate results.
Beyond Basic Continuity Testing:
While this primarily focuses on basic continuity, multimeters can be utilized for more advanced checks including diode testing and resistance measurements, which offer a deeper understanding of a circuit's functionality.
Keyword Optimization:
This article is optimized for keywords like: "check continuity," "multimeter continuity test," "how to test continuity," "continuity test with multimeter," "multimeter continuity," "testing continuity," "continuity testing," and related long-tail keywords.
This comprehensive guide should help you confidently check continuity using your multimeter. Remember, safety is paramount. Always power down circuits before testing, and refer to your multimeter's manual for specific instructions.
