How to Connect a Light Switch: A Step-by-Step Guide for Beginners
Connecting a light switch might seem daunting, but with the right instructions and a bit of patience, it's a manageable DIY project. This guide provides a comprehensive, step-by-step process for safely and effectively connecting a light switch, empowering you to tackle this common home improvement task. Remember, safety is paramount. Always turn off the power at the breaker box before starting any electrical work.
Tools and Materials You'll Need:
- New Light Switch: Choose a switch that matches your existing setup (single-pole, three-way, etc.).
- Screwdrivers: Phillips head and flathead are essential.
- Wire Strippers/Cutters: For cleanly stripping the wire insulation.
- Voltage Tester: Crucial for verifying power is OFF before and after working on the switch. Never rely solely on the breaker.
- Electrical Tape: For securely insulating wire connections.
- Wire Nuts (Wire Connectors): To connect wires safely. Choose the correct size for your wire gauge.
Step-by-Step Guide to Connecting a Light Switch:
1. Turn Off the Power:
This is the most crucial step. Locate your breaker box and switch off the breaker controlling the circuit for the light you're working on. Double-check with a voltage tester that the power is OFF at the switch location.
2. Remove the Old Light Switch:
- Remove the switch plate: Unscrew and carefully remove the decorative faceplate covering the switch.
- Loosen the switch screws: Use a screwdriver to remove the screws holding the switch to the electrical box.
- Carefully remove the switch: Gently pull the switch away from the wall, taking note of how the wires are connected. Take a picture if it helps!
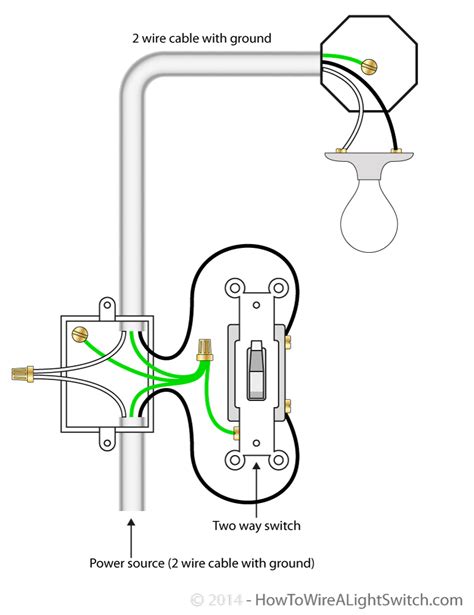
3. Identify the Wires:
Typically, you'll encounter two wires:
- Hot Wire (Usually Black or Red): This carries the electrical current to the switch.
- Neutral Wire (Usually White): This completes the circuit. It should NOT be connected to the switch. It usually goes straight through to the light fixture.
- Ground Wire (Usually Bare Copper or Green): This provides a safety ground.
Important Note: If you encounter more than two wires (common with three-way switches), consult a qualified electrician or a more advanced wiring guide.
4. Prepare the New Light Switch:
Loosen the screws on the terminals of your new light switch. These terminals are where you'll connect the wires.
5. Connect the Wires:
- Connect the Hot Wire: Securely connect the hot wire from the old switch to the corresponding terminal on the new switch using a wire nut.
- Connect the Ground Wire (if applicable): If your old switch had a ground wire, connect it to the ground terminal on the new switch using a wire nut or a screw-down terminal (depending on the switch).
- Leave the Neutral Wire Alone: Remember, the neutral wire should not be connected to the switch. It's simply passed through.
6. Secure the New Switch:
Carefully tuck the wires into the electrical box and mount the new switch using the screws provided.
7. Test and Reinstall:
- Turn the Power Back On: Turn the breaker back on at the breaker box.
- Test the Switch: Turn the switch on and off to verify that the light works correctly.
- Reinstall the Faceplate: Once everything is working properly, reinstall the switch plate.
Troubleshooting:
- Light Doesn't Work: Double-check all wire connections and ensure the power is correctly switched on at the breaker.
- Switch Feels Hot: This is a sign of a potential electrical problem. Turn off the power immediately and call a qualified electrician.
By following these steps carefully, you can confidently connect a new light switch. However, if you're uncomfortable working with electricity, it's always best to consult a qualified electrician. Your safety should always be the top priority. Remember to always turn off the power before starting any electrical work!
