

Introduction: Why Say Goodbye to X?
In the ever-evolving landscape of social media, platforms rise and fall, and user preferences shift like the sands of a digital desert. Once a haven for real-time updates and trending topics, Twitter, now known as X, has undergone significant changes that have left some users questioning their presence on the platform. Whether it’s concerns about policy changes, a desire to reclaim your digital privacy, or simply a need to disconnect from the constant stream of information, deleting your X account might be the right move for you. This comprehensive guide will walk you through the process step-by-step, ensuring a smooth and informed exit.
Before we dive in, let’s acknowledge the emotional aspect of this decision. For many, X has been a virtual home, a place to connect with friends, share thoughts, and engage in lively debates. Saying goodbye can feel like closing a chapter. But sometimes, closing one chapter is necessary to open another. If you’ve weighed the pros and cons and decided that deleting your account is the best course of action, then let’s proceed.
Understanding the Implications of Deleting Your X Account
Before you hit that final delete button, it’s crucial to understand what you’re signing up for. Deleting your X account is a permanent action. Once your account is deleted, it’s gone. Poof! Here’s a breakdown of what that means:
- Your Username is Up for Grabs: After a waiting period (usually 30 days), your username becomes available for anyone to claim. So, if you have a particularly catchy or valuable username, be aware that someone else might snag it.
- Your Tweets Vanish: All your tweets, retweets, likes, and media will be permanently removed from the X platform. They will no longer be searchable or accessible to anyone, including you.
- Third-Party Apps Lose Access: Any third-party applications you’ve connected to your X account will lose access. You’ll need to reauthorize them if you decide to use them with a different X account in the future.
- No Going Back: This is the big one. Once the deletion process is complete, there’s no turning back. Your account and all its data are irretrievable.
Important Note: X offers a deactivation option, which is different from deletion. Deactivation temporarily suspends your account, making it invisible to others. You can reactivate your account at any time during the deactivation period. Deletion, on the other hand, is permanent. Make sure you understand the difference before proceeding.
Step-by-Step Guide: Deleting Your X Account
Alright, let’s get down to the nitty-gritty. Here’s a step-by-step guide on how to delete your X account:
Step 1: Back Up Your Data (Optional but Highly Recommended)
Before you delete your account, consider downloading an archive of your tweets. This will give you a record of everything you’ve shared on the platform. It’s like creating a digital scrapbook of your X journey.
- Go to Your Account Settings: Log in to your X account on a web browser (this feature isn’t available on the mobile app). Click on “More” in the left-hand menu, then select “Settings and privacy.”
- Request Your Archive: Click on “Your account,” then “Download an archive of your data.”
- Verify Your Identity: X will likely ask you to verify your identity by entering your password or sending a verification code to your email address or phone number.
- Download Your Archive: Once your identity is verified, click the “Request archive” button. X will then compile your data into a downloadable ZIP file. This process can take anywhere from a few minutes to several hours, depending on the size of your archive. You’ll receive an email notification when your archive is ready.
- Unzip and Explore: Once you receive the email, download the ZIP file and extract its contents. You’ll find your tweets, media, and account information organized into various files.
Step 2: Initiate the Deletion Process
Now that you’ve (optionally) backed up your data, it’s time to start the deletion process.
- Navigate to Deactivation Settings: In your X account settings (accessed through “More” -> “Settings and privacy”), click on “Your account,” then “Deactivate your account.” Remember, deactivation is the first step towards permanent deletion.
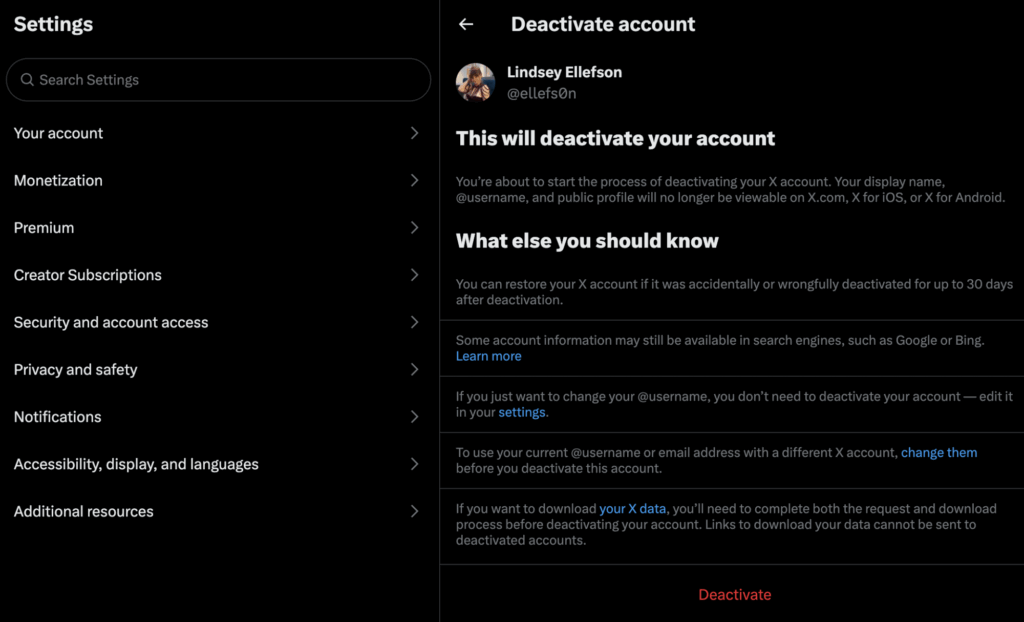
- Read the Deactivation Information Carefully: X will present you with a warning message explaining what deactivation entails. Read this information carefully to ensure you understand the implications.
- Deactivate Your Account: Click the “Deactivate” button at the bottom of the page.
- Enter Your Password: X will prompt you to enter your password to confirm your decision.
- Confirm Deactivation: Click the “Deactivate account” button to finalize the deactivation process.
Step 3: Wait for the Deletion Period (30 Days)
After deactivating your account, X initiates a 30-day waiting period. During this time, your account is deactivated, meaning it’s no longer visible to other users. However, your account isn’t permanently deleted yet. You have 30 days to reactivate your account if you change your mind.
Important Note: If you log in to your X account during the 30-day deactivation period, your account will be reactivated, and the deletion process will be cancelled. So, resist the urge to log in!
Step 4: Permanent Deletion (After 30 Days)
After the 30-day deactivation period has elapsed, your account will be permanently deleted. This process happens automatically. You don’t need to take any further action. After deletion, your username will become available for others to use, and your tweets will be permanently removed from the X platform.
Deleting Your X Account on Mobile (Android and iOS)
While the process is largely the same, accessing the deactivation settings on the mobile app is slightly different. Here’s how to delete your X account on your smartphone:
- Open the X App: Launch the X app on your Android or iOS device.
- Access the Menu: Tap on your profile icon in the top-left corner of the screen to open the main menu.
- Go to Settings and Support: Scroll down and tap on “Settings and support.”
- Select Settings and Privacy: Tap on “Settings and privacy.”
- Navigate to Your Account: Tap on “Your account.”
- Deactivate Your Account: Tap on “Deactivate your account.”
- Follow the Prompts: Read the deactivation information carefully, then tap the “Deactivate” button. Enter your password when prompted, and confirm your decision to deactivate your account.
After deactivating your account on the mobile app, the 30-day waiting period will begin, just as it does on the web browser. Remember not to log back in during this period if you want your account to be permanently deleted.
Troubleshooting Common Issues
Sometimes, things don’t go exactly as planned. Here are some common issues you might encounter when deleting your X account and how to troubleshoot them:
- Can’t Find the Deactivation Option: Make sure you’re logged in to the correct X account. Also, ensure you’re accessing the settings through a web browser or the official X app. Third-party apps might not offer the deactivation option.
- Forgot Your Password: If you’ve forgotten your password, click on the “Forgot password?” link on the login page. X will guide you through the process of resetting your password.
- Account Reactivated Accidentally: If you accidentally logged back into your account during the 30-day deactivation period, the deletion process will be cancelled. You’ll need to start the deactivation process again from scratch.
- Username Still Available: It can take some time for your username to become available after your account is deleted. Be patient and check again after a few days.
- Data Archive Not Downloading: If your data archive is not downloading, ensure you have a stable internet connection. You can also try requesting the archive again. If the problem persists, contact X support.
Alternatives to Deleting Your Account
Deleting your X account is a drastic step. Before you take the plunge, consider these alternatives:
- Deactivating Your Account: As mentioned earlier, deactivation temporarily suspends your account, making it invisible to others. You can reactivate it at any time.
- Unfollowing Accounts: If you’re overwhelmed by the constant stream of information, try unfollowing accounts that are contributing to your stress or anxiety.
- Muting Accounts: Muting an account prevents you from seeing their tweets without unfollowing them. This is a good option if you want to maintain a connection with someone but don’t want to see their content regularly.
- Adjusting Your Notifications: Customize your notification settings to reduce the number of notifications you receive.
- Using Third-Party Apps: Explore third-party apps that offer features like tweet scheduling, analytics, and content filtering.
- Taking a Break: Sometimes, the best solution is to simply take a break from X. Log out of your account and focus on other activities.
The Emotional Impact of Leaving X
Leaving a social media platform, especially one you’ve been using for a long time, can have an emotional impact. You might experience feelings of relief, sadness, or even a sense of loss. It’s important to acknowledge these feelings and allow yourself time to adjust to life without X.
Here are some tips for coping with the emotional impact of leaving X:
- Connect with Friends and Family Offline: Spend more time with the people you care about in the real world.
- Engage in Hobbies and Activities: Pursue activities that you enjoy and that bring you joy.
- Limit Your Social Media Use: Avoid replacing X with another social media platform. Give yourself time to disconnect from the digital world.
- Practice Mindfulness: Focus on the present moment and cultivate a sense of gratitude.
- Seek Support: If you’re struggling to cope with the emotional impact of leaving X, consider talking to a therapist or counselor.
Data Privacy Considerations
Deleting your X account is a good step towards protecting your digital privacy, but it’s not the only step. Here are some additional data privacy considerations:
- Review Your Privacy Settings on Other Social Media Platforms: Take the time to review your privacy settings on other social media platforms you use.
- Use a Virtual Private Network (VPN): A VPN encrypts your internet traffic and protects your online activity from being tracked.
- Use Strong Passwords: Use strong, unique passwords for all your online accounts.
- Enable Two-Factor Authentication: Two-factor authentication adds an extra layer of security to your accounts by requiring you to enter a code from your phone or email address in addition to your password.
- Be Mindful of What You Share Online: Think carefully about what you share online and who you’re sharing it with.
- Review App Permissions: Regularly review the permissions you’ve granted to apps on your smartphone and computer. Revoke access to apps that you no longer use or that you don’t trust.
- Consider Using a Privacy-Focused Browser: Some web browsers are designed with privacy in mind and offer features like tracker blocking and private browsing mode.
Life After X: Reclaiming Your Digital Space
Deleting your X account is not an end, but a beginning. It’s an opportunity to reclaim your digital space and create a more intentional and fulfilling online experience. Here are some ways to do that:
- Focus on Meaningful Connections: Cultivate deeper connections with the people you care about.
- Engage in Activities That Bring You Joy: Spend time doing things that you enjoy and that make you feel good.
- Learn New Skills: Use your newfound free time to learn new skills or pursue new interests.
- Create Content: Instead of consuming content passively, create your own content and share it with the world.
- Advocate for Causes You Believe In: Use your voice to advocate for causes that you care about.
- Take Care of Your Mental and Physical Health: Prioritize your mental and physical health.
- Be Present: Focus on the present moment and appreciate the beauty of the world around you.
Conclusion: Taking Control of Your Digital Footprint
Deleting your X account is a significant decision, one that should be made thoughtfully and with a clear understanding of the implications. By following the steps outlined in this guide, you can ensure a smooth and informed exit from the platform. Remember to back up your data, understand the deactivation and deletion process, and take steps to protect your digital privacy. Leaving X is not an act of defeat, but an act of empowerment. It’s about taking control of your digital footprint and creating a more intentional and fulfilling online experience. So, take a deep breath, click that delete button, and embrace the possibilities that lie ahead.
