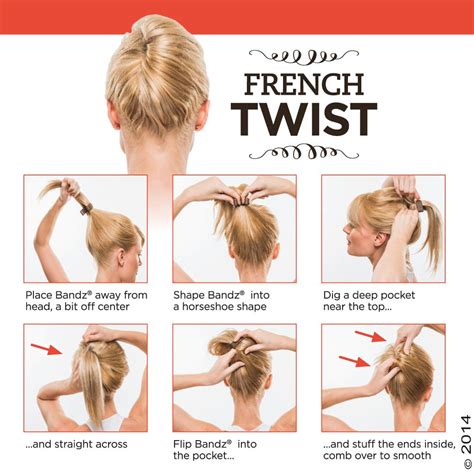
How To Do a French Twist: A Step-by-Step Guide for Effortless Elegance
The French twist is a classic hairstyle that exudes sophistication and elegance. Whether you're heading to a formal event or simply want to look polished for a day out, this versatile hairstyle is a perfect choice. This guide will walk you through the steps to achieve a flawless French twist, no matter your hair type or length.
Preparing Your Hair for the Perfect French Twist
Before you begin, ensure your hair is properly prepared. This will significantly impact the final look and hold of your twist.
Essential Tools:
- Hairbrush: A good quality brush will help detangle your hair and create a smooth base.
- Hairspray: Choose a strong-hold hairspray to keep your twist in place all day long.
- Bobby pins: Plenty of bobby pins are essential for securing the twist. Opt for matching your hair color for a seamless look.
- Optional: Hair serum or mousse: Adding a small amount of serum or mousse can help control frizz and add shine.
Step 1: Prep Your Hair
Start with clean, dry hair. If your hair is naturally straight, you might want to add some texture with a curling iron or texturizing spray for better grip. For those with very fine hair, adding some volume at the roots can help the twist hold better.
Mastering the French Twist: A Step-by-Step Tutorial
Now, let's get started on the actual twist! These steps are designed to help even beginners achieve a beautiful French twist.
Step 2: Gather Your Hair
Gather all your hair at the nape of your neck, as if you were preparing for a low ponytail.
Step 3: Begin the Twist
Begin twisting your hair towards the direction you want the twist to go (usually upwards and towards the head). Keep the twist tight and neat as you go. As you twist, gradually incorporate more hair into the twist from the sides. This creates the classic "French" effect.
Step 4: Securing the Twist
Once you've twisted all your hair, carefully tuck the end of the twist under itself, creating a neat bun-like shape at the base of your neck.
Step 5: Pinning it in Place
Use several bobby pins to secure the twist in place. Begin by pinning the ends of the twist, then use additional pins to secure the twist to your scalp. Overlapping the pins adds extra security.
Step 6: The Finishing Touches
Finish with a generous mist of hairspray to hold the style in place. You can also add decorative accessories, such as a jeweled barrette or a pretty flower, for extra flair.
Troubleshooting Common French Twist Problems
- Hair too slippery: Use a texturizing spray or dry shampoo to add grip.
- Twist too loose: Twist tighter and use more bobby pins to secure it.
- Bobby pins slipping: Use enough bobby pins and try to angle them strategically for better hold.
Variations on the French Twist
Once you've mastered the classic French twist, experiment with different variations:
- High French Twist: Create the twist higher on the head for a more dramatic look.
- Side French Twist: Twist your hair to one side for a more playful style.
- Loose French Twist: For a more relaxed and bohemian vibe, leave the twist slightly loose and less structured.
With practice, you'll be able to create a perfect French twist every time. Remember, the key is to be patient and persistent. Soon enough, this elegant hairstyle will be a staple in your hair routine!
