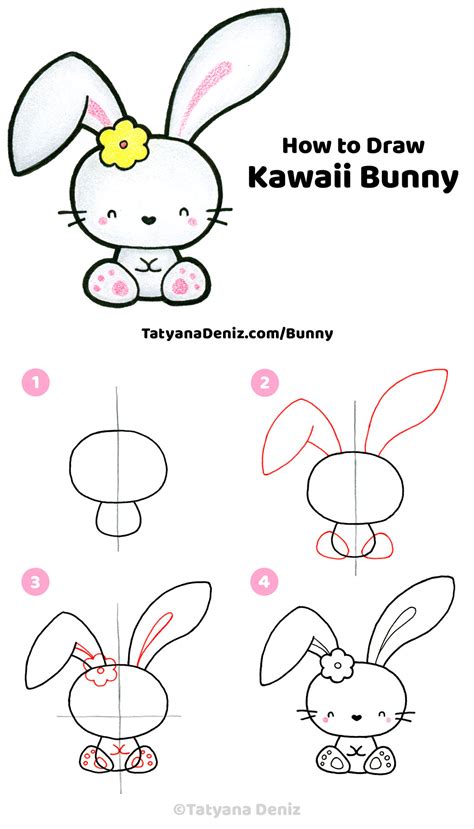
How To Draw A Bunny: A Step-by-Step Guide for Beginners
Learning to draw can be a rewarding experience, and what better subject to start with than an adorable bunny? This guide provides a simple, step-by-step approach, perfect for beginners of all ages. We'll focus on creating a cute, cartoonish bunny, but with a little practice, you can adapt these techniques to draw more realistic bunnies too.
Getting Started: Gathering Your Supplies
Before we begin hopping into the drawing process, let's gather our art supplies. You won't need anything fancy!
- Paper: Any kind of paper will do, but thicker paper is preferable to prevent bleed-through, especially if you're using markers or watercolors.
- Pencil: A regular HB pencil is perfect for sketching. You'll want something that's easy to erase.
- Eraser: A good eraser is crucial for fixing mistakes and refining your drawing.
- Optional: Colored pencils, crayons, markers, or paints for adding color to your finished bunny.
Step-by-Step Bunny Drawing Instructions
Let's start drawing our cute bunny! Follow these steps carefully, and don't worry about making it perfect on the first try. Practice makes perfect!
Step 1: Drawing the Bunny's Head
Start by drawing a circle. This will be the bunny's head. Don't worry about making it perfectly round; a slightly irregular circle adds character.
Step 2: Adding the Bunny's Ears
Draw two long, oval shapes on top of the circle. These are the bunny's ears. Make them slightly pointed at the top.
Step 3: Sketching the Bunny's Face
Inside the circle, draw two small circles for the eyes. Add two small, curved lines below the eyes for the bunny's nose. Finally, draw a small, curved line below the nose for the mouth. You can add a little upward curve to give your bunny a happy expression.
Step 4: Shaping the Bunny's Body
Draw a slightly elongated oval shape below the head. This will be the bunny's body. Make sure it connects smoothly to the head.
Step 5: Adding the Bunny's Legs
Draw four small, oval shapes underneath the body. These are the bunny's legs. You can add little circles at the bottom for the feet.
Step 6: Adding the Bunny's Tail
Draw a small, fluffy-looking circle at the bottom of the body for the bunny's tail.
Step 7: Refining the Drawing
Now it's time to refine your sketch. Use your eraser to gently erase any unnecessary lines or smudges. Add details like whiskers, fur texture, or shading to make your bunny more realistic or expressive.
Step 8: Adding Color (Optional)
Once you're happy with your pencil sketch, you can add color using your preferred medium. Use different shades to add depth and dimension to your bunny.
Tips for Drawing a Perfect Bunny
- Practice makes perfect: Don't be discouraged if your first attempt isn't perfect. Keep practicing, and you'll see improvement over time.
- Use light pencil strokes: This allows you to easily erase and adjust your drawing as you go.
- Reference images: Looking at pictures of real bunnies or cartoon bunnies can help you understand their proportions and features.
- Have fun! Drawing should be an enjoyable experience. Relax, let your creativity flow, and enjoy the process.
Conclusion: Your Adorable Bunny Awaits!
You've now learned how to draw a cute bunny! With practice and experimentation, you can create many unique bunny drawings. Remember to share your creations and inspire others to pick up a pencil and start drawing. Happy creating!
