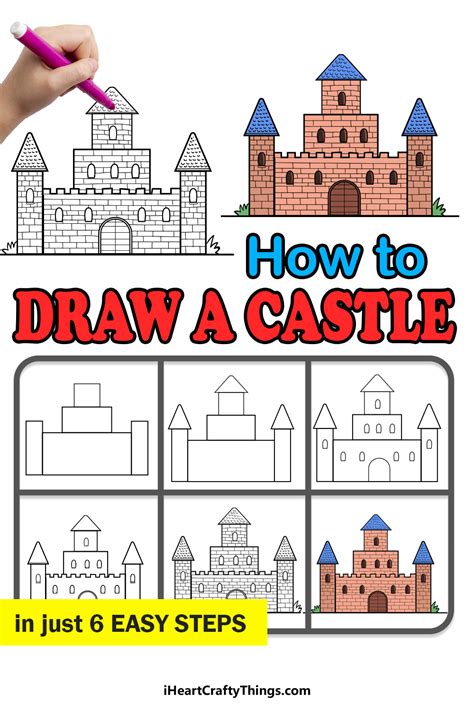
How To Draw A Castle: A Step-by-Step Guide for Beginners and Beyond
Drawing a castle might seem daunting, but with a little guidance and practice, you can create a magnificent, majestic structure on paper. This guide breaks down the process into manageable steps, perfect for both beginners picking up a pencil for the first time and more experienced artists looking to refine their technique. We'll cover everything from basic shapes to adding intricate details, ensuring your castle drawing is truly impressive.
Getting Started: Materials and Basic Shapes
Before you begin your artistic journey, gather your materials. You'll need:
- Paper: Choose a paper size and weight that suits your preference. Thicker paper is generally better for detail work and preventing smudging.
- Pencils: A range of pencils (e.g., HB, 2B, 4B) will allow you to vary line weight and shading. A good eraser is also essential.
- Ruler (Optional): A ruler can be helpful for creating straight lines, especially for the castle walls.
Let's start with the foundation – basic shapes. Think of your castle as a combination of simple geometric forms:
- Rectangles and Squares: These form the base of the walls and towers.
- Triangles: These are ideal for creating pointed roofs and battlements.
- Circles and Semi-circles: These can be used for towers and arched doorways.
Lightly sketch these shapes onto your paper, arranging them to create the overall layout of your castle. Don't worry about perfection at this stage; it's just a blueprint.
Building the Walls and Towers
Now it's time to connect those basic shapes and build the walls and towers of your castle.
The Main Structure:
- Connect the rectangles and squares: Use smooth, confident lines to connect the basic shapes, creating the main body of the castle. Remember to vary the heights and widths of the walls to add visual interest.
- Add battlements: Create the classic castle silhouette by adding a series of alternating triangular shapes along the top of the walls. These are the battlements, providing defensive protection.
The Towers:
- Develop the tower shapes: Refine the circles and semi-circles into fully realized towers. Some towers can be tall and slender, others short and stout.
- Add details to the towers: Consider adding windows, small doors, and decorative elements like arched entrances or crenellations (decorative indentations) to the tower walls.
Adding Details and Shading
With the basic structure complete, let's add the finishing touches that will bring your castle to life.
Doors and Windows:
- Create realistic doors and windows: Add arched doorways, rectangular windows, and small arrow slits for a more realistic look. Vary their sizes and placements for added visual appeal.
Shading and Texture:
- Use shading to create depth and dimension: Use darker pencil tones to shade the areas that would be in shadow, creating a sense of depth and volume in your drawing. Pay attention to the light source to determine where shadows should fall.
- Add texture to the stone: Use short, hatched lines or stippling to simulate the texture of stone, creating a more realistic appearance. Experiment with different techniques to achieve the desired effect.
Finishing Touches: Landscape and Atmosphere
To enhance your castle drawing, consider adding a surrounding landscape:
- Draw a moat: Add a surrounding moat to increase the castle's defensive capabilities and add a dramatic element.
- Include trees and foliage: Planting trees and shrubs around the castle adds a sense of scale and brings life to the drawing.
- Add a sky: Include a simple sky to complete the composition.
Practice Makes Perfect
Remember, the key to improving your drawing skills is practice. Don't be afraid to experiment, make mistakes, and try different techniques. The more you draw, the better you'll become at creating detailed and impressive castle drawings. Keep practicing, and soon you'll be creating stunning castles of your own design!
