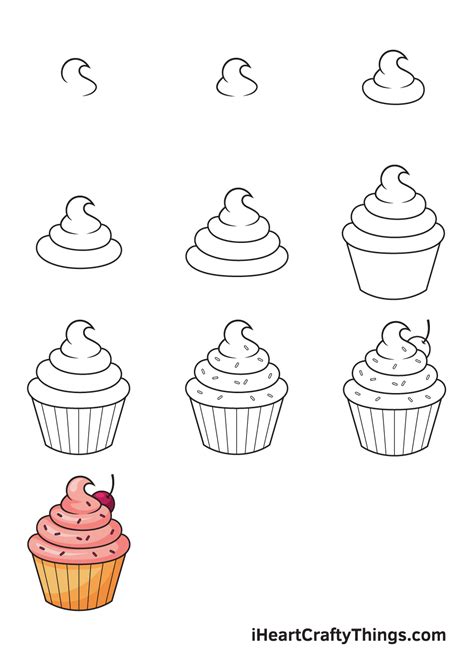
How to Draw a Delicious Cupcake: A Step-by-Step Guide
Want to draw an adorable cupcake that looks good enough to eat? This guide will walk you through the process, step-by-step, no matter your skill level. We'll cover everything from basic shapes to adding delightful details, ensuring your cupcake drawing is picture-perfect!
Getting Started: Gathering Your Supplies
Before we begin our baking… I mean, drawing adventure, let's gather our supplies:
- Paper: Any kind of paper will do, but thicker paper is preferable to prevent smudging. Sketch paper or drawing paper work best.
- Pencils: A regular #2 pencil is perfect for sketching, and a darker pencil (like a 2B or 4B) is great for adding shadows and details. An eraser is crucial for fixing mistakes.
- Optional: Colored pencils, markers, or crayons to add vibrant color to your delicious creation!
Step 1: Sketching the Cupcake Liner
Start by drawing a slightly squashed circle. This will form the base of your cupcake liner. Don't worry about making it perfect; we're just sketching!
Step 2: Adding the Cupcake
Draw a slightly larger, slightly taller circle on top of the liner circle. This will be the body of your cupcake. Leave a little space between the two circles to show the liner.
Step 3: Shaping the Frosting
Now for the fun part! Draw a rounded mound of frosting on top of the cupcake. You can make it swirly, peaked, or completely flat – it's your cupcake, so get creative!
Step 4: Adding Details to the Frosting
Depending on your desired style, you can add details to the frosting:
- Swirls: Use curved lines to create elegant swirls on the frosting.
- Texture: Add small bumps or lines to give the frosting a more realistic texture.
- Simple Peak: A single, smooth peak is also a classic and easy option.
Step 5: Drawing the Sprinkle Fun!
Sprinkles are the cherry on top (pun intended!). Add small dots, squiggles, or tiny shapes scattered across the frosting. Get playful with different shapes and sizes for a fun, vibrant look.
Step 6: Adding Shadows and Highlights (Optional)
For a more realistic look, add shading. Use your darker pencil to add shadows to the sides of the cupcake and under the frosting. Lightly shade the liner to give it depth. You can also add highlights with an eraser to brighten certain areas.
Step 7: Coloring Your Masterpiece (Optional)
This is where your creativity truly shines! Use colored pencils, markers, or crayons to add color to your cupcake. Choose your favorite colors for the liner, cake, and frosting.
Tips for a Perfect Cupcake Drawing
- Practice makes perfect: Don't be discouraged if your first attempt isn't perfect. Keep practicing, and you'll improve quickly.
- Reference images: Look at pictures of real cupcakes for inspiration.
- Experiment with different styles: Try drawing cupcakes in different styles, such as cartoonish, realistic, or abstract.
- Have fun! The most important thing is to enjoy the process of creating your cupcake drawing.
By following these steps, you’ll be well on your way to creating a delicious-looking cupcake drawing! Remember to share your artwork – we’d love to see your creations! Use the hashtag #CupcakeDrawing on social media to show off your skills.
