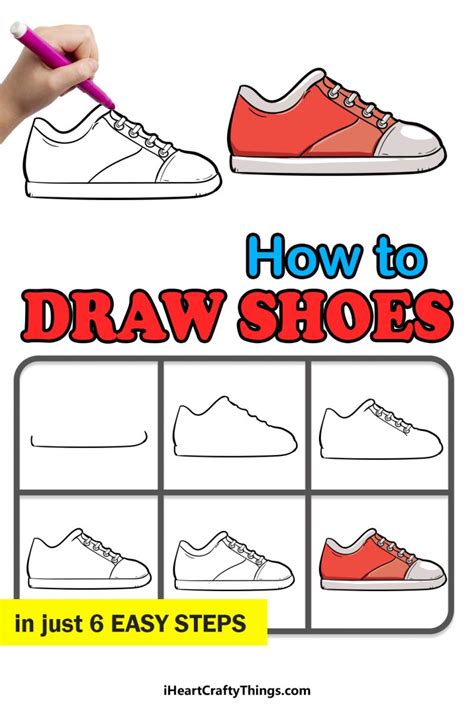
How To Draw A Shoe: A Step-by-Step Guide for Beginners
Drawing shoes might seem intimidating, but with a little practice and the right techniques, you can create realistic and stylish footwear illustrations. This guide will walk you through a simple method, perfect for beginners. We'll focus on drawing a basic sneaker, but the principles can be applied to other shoe types.
Gathering Your Supplies
Before we begin, gather your art supplies. You'll need:
- Pencil: A standard HB pencil is ideal for sketching.
- Eraser: A good quality eraser is essential for correcting mistakes.
- Paper: Use smooth, white paper for best results.
- Optional: Colored pencils, markers, or paints for adding color after sketching.
Step-by-Step Drawing Process
Let's start drawing!
Step 1: Sketching the Basic Shape
Begin by lightly sketching the overall shape of the shoe. Think of it as a slightly elongated, curved rectangle. Don't worry about perfection at this stage; just get the basic form down. Imagine the shoe from a slightly angled perspective for a more dynamic look.
Step 2: Defining the Sole
Now, define the sole of the shoe. Sketch a slightly thicker line at the bottom, curving it gently to follow the overall shape of the shoe. Consider adding subtle texture lines to suggest the sole's material.
Step 3: Adding the Upper
Next, sketch the upper part of the shoe. This is the section above the sole. Think about the shape and curves. For a sneaker, this will usually be a smooth curve that connects to the sole. You can add subtle curves to suggest the laces' position.
Step 4: Detailing the Laces and Tongue
Now add details like the laces and tongue. Sketch simple lines to represent the laces, keeping them relatively straight but slightly curved to show depth. The tongue is a flap of material at the top of the shoe; give it a simple, slightly curved shape.
Step 5: Adding the Heel and Toe Cap
Pay attention to the heel and toe cap – the reinforced parts at the back and front of the shoe. These areas often have a different shape and texture than the rest of the shoe. Add subtle shading or lines to suggest this.
Step 6: Refining the Lines
Once you're happy with the basic shapes, carefully refine your lines. Erase unnecessary sketch lines and darken the lines that define the final shape of the shoe.
Step 7: Adding Shadows and Highlights
To give your drawing more depth and realism, add shadows and highlights. Observe how light interacts with a real shoe – where the shadows fall and where the light reflects. Use light shading to indicate shadows and leave brighter areas for highlights. This will make the shoe look three-dimensional.
Step 8: Adding Color (Optional)
If you're using colored pencils, markers, or paints, add color to your shoe drawing. Consider using different shades to create depth and texture.
Tips for Success
- Start with simple shapes: Don’t get bogged down in details initially. Focus on the basic forms first.
- Use light pencil strokes: This makes it easy to erase mistakes.
- Observe real shoes: Look at real shoes for reference. Pay attention to their shapes, textures, and how light falls on them.
- Practice regularly: The more you practice, the better you'll become.
Expanding Your Skills
Once you've mastered the basics, try drawing different types of shoes – boots, sandals, high heels, etc. Experiment with different perspectives and styles. Don't be afraid to try different techniques and add your personal touch. You'll find that with practice, drawing shoes becomes a fun and rewarding experience. Happy drawing!
