How To Factory Reset Windows 11: A Complete Guide
Facing a sluggish Windows 11 system or persistent software issues? A factory reset can often breathe new life into your computer. This comprehensive guide will walk you through the process, explaining different methods and helping you choose the best option for your situation. We'll cover both preserving your personal files and performing a clean wipe.
Understanding Factory Reset Options in Windows 11
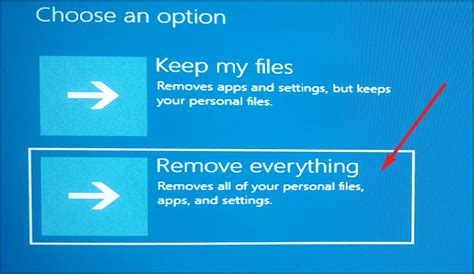
Before diving in, it's crucial to understand the two main types of factory resets available in Windows 11:
-
Keep my files: This option reinstalls Windows 11, keeping your personal files (documents, pictures, videos, etc.) intact. However, it will remove all installed apps and drivers, reverting your system to its initial state. This is ideal for troubleshooting software problems without losing valuable data.
-
Remove everything: This is a more thorough reset. It erases all your personal files, apps, and system settings, completely wiping your hard drive. This option is recommended before selling or donating your computer to ensure complete data privacy.
Method 1: Resetting Windows 11 via Settings
This is the most straightforward method and is recommended for most users.
Step 1: Open Settings: Click the Windows Start button and select the gear icon (Settings).
Step 2: Navigate to Recovery: In the Settings app, click on "System," then "Recovery."
Step 3: Choose your Reset option: Under "Reset this PC," you'll see the two options explained above: "Keep my files" and "Remove everything." Carefully select the option that aligns with your needs.
Step 4: Confirm and proceed: Windows 11 will present a confirmation screen detailing what will happen. Review this carefully before clicking "Next." The process might take some time, depending on your hard drive speed and the amount of data.
Step 5: Restart: Once the reset is complete, your computer will restart and boot into the freshly installed Windows 11 system.
Method 2: Resetting Windows 11 from the Recovery Environment
This method is useful if Windows 11 is experiencing significant boot problems.
Step 1: Access the Recovery Environment: Restart your computer and repeatedly press the F11 or Shift + F8 key during startup. The exact key may vary depending on your computer manufacturer. This should bring up the Windows Recovery Environment (WinRE).
Step 2: Troubleshoot: In WinRE, select "Troubleshoot," then "Reset this PC."
Step 3: Follow steps 3-5 from Method 1: From here, the process is identical to Method 1. Choose your preferred reset option ("Keep my files" or "Remove everything"), confirm your choice, and let the process run to completion.
Choosing the Right Reset Method
When to use "Keep my files":
- Troubleshooting software issues: If you're experiencing problems with specific apps or drivers.
- Improving system performance: If your computer is running slowly due to accumulated temporary files or software conflicts.
When to use "Remove everything":
- Selling or donating your computer: To ensure complete data privacy before transferring ownership.
- Severe system corruption: If other troubleshooting steps have failed to resolve major issues.
Important Considerations Before Resetting
- Back up critical data: While "Keep my files" aims to preserve your data, it's always best practice to create a backup of crucial files before performing a factory reset. This safeguards against unforeseen issues.
- Product keys: Note down your Windows product key and any other essential software keys before proceeding, as they might be removed during the reset.
- Drivers: After the reset, you might need to reinstall certain drivers for peripherals like printers and scanners.
By following these steps, you can effectively factory reset your Windows 11 computer and restore it to a functional state. Remember to choose the reset option that best suits your situation and always back up important data beforehand. This guide provides a comprehensive approach to troubleshooting and restoring your Windows 11 system.
