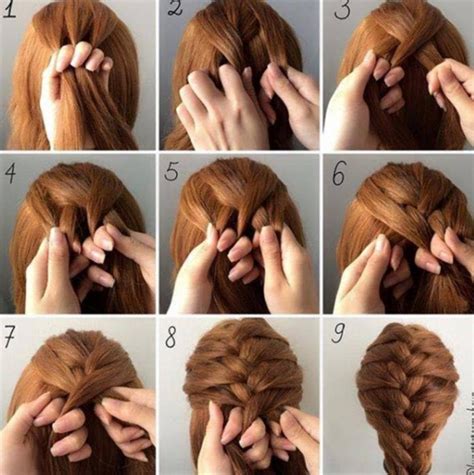
How To French Braid: A Step-by-Step Guide for Beginners
Learning how to French braid might seem daunting at first, but with a little patience and practice, you'll be creating beautiful, intricate braids in no time. This comprehensive guide breaks down the process into simple, easy-to-follow steps, perfect for beginners. We'll cover everything from prepping your hair to mastering the technique, ensuring you achieve that perfect French braid every time.
Getting Started: Preparing Your Hair
Before you begin your French braiding journey, ensure your hair is properly prepared. This will significantly impact the ease and success of your braid.
1. Brush Out Tangles:
Begin by thoroughly brushing your hair to remove any knots or tangles. This will prevent snags and make the braiding process much smoother. A wide-tooth comb is ideal for detangling longer hair.
2. Lightly Dampen Your Hair (Optional):
While not strictly necessary, slightly damp hair can be easier to manage, especially if your hair is naturally thick or unruly. Avoid soaking wet hair, as this can make braiding difficult.
3. Gather Your Tools:
You'll only need a few simple tools: a hairbrush or comb, and possibly some hair ties or clips to secure the braid once complete. Consider using a mirror for easier visualization, especially when starting out.
Step-by-Step French Braiding Tutorial
Now for the main event! Follow these steps carefully to master the art of the French braid.
1. Begin with a Three-Strand Braid:
Start by sectioning off a relatively large piece of hair at the crown of your head. Divide this section into three equal strands, just like you would for a regular three-strand braid.
2. Cross the Right Strand Over the Middle:
Take the right strand and cross it over the middle strand, placing it in the center position.
3. Cross the Left Strand Over the New Middle:
Now, take the left strand and cross it over the new middle strand (which was originally the right strand).
4. Adding Hair to the Braid:
This is where the French braiding magic happens. Before you cross the right strand again, pick up a small section of hair from the right side of your head and add it to the right strand before crossing it over the middle.
5. Repeat Step 4 on the Left Side:
Similarly, before crossing the left strand over the middle, add a small section of hair from the left side of your head to the left strand.
6. Continue Braiding and Adding Hair:
Repeat steps 4 and 5, continuously adding small sections of hair from both sides of your head with each cross. Make sure to keep the added hair sections relatively small and even for a neat braid.
7. Completing the Braid:
Once you've reached the nape of your neck, continue braiding normally as a regular three-strand braid. Secure the end of your braid with a hair tie.
Tips and Tricks for Perfect French Braids
- Practice Makes Perfect: Don't get discouraged if your first few attempts aren't flawless. Keep practicing, and you'll see improvement quickly.
- Smaller Sections = Tighter Braid: Using smaller sections of hair when adding to the braid will result in a tighter, more intricate braid.
- Use a Mirror: A mirror is incredibly helpful, especially for beginners. It allows you to see what you're doing and helps ensure evenness.
- Experiment with Variations: Once you've mastered the basic French braid, try different variations, such as a Dutch braid (braiding under instead of over) or a fishtail braid.
Mastering the Art of French Braiding
With consistent practice and attention to detail, you'll become proficient in French braiding. Remember to start slowly, focus on your technique, and most importantly, have fun! The more you practice, the easier and more natural the process will become. Soon, you'll be creating stunning French braids effortlessly.
