How to Insert Endnotes in Word: A Comprehensive Guide
Adding endnotes to your Word document can significantly enhance its academic credibility and allow for smoother reading flow. This guide provides a step-by-step walkthrough, covering various aspects of endnote insertion and management, ensuring your document is both informative and professionally presented.
Understanding Endnotes vs. Footnotes
Before diving into the insertion process, let's clarify the difference between endnotes and footnotes. Both are used to cite sources or provide additional information, but their placement differs:
- Footnotes: Appear at the bottom of the same page where the reference is made.
- Endnotes: Appear at the end of the document, typically on a separate page labeled "Endnotes."
This guide focuses on Endnotes. Choosing between endnotes and footnotes often depends on personal preference and the style guide you're following (e.g., MLA, Chicago).
Inserting Endnotes in Microsoft Word
Here's how to effortlessly insert endnotes into your Word document:
Step 1: Navigate to the References Tab
Open your Word document and locate the "References" tab on the ribbon at the top.
Step 2: Locate the Footnote/ Endnote Group
Within the "References" tab, you'll find a group of options related to footnotes and endnotes.
Step 3: Select "Insert Endnote"
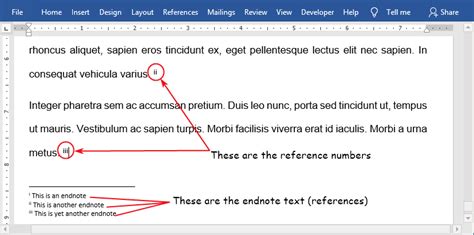
Click on the "Insert Endnote" button. This will automatically insert a numbered endnote marker in your text and jump to the end of your document, creating a new endnote section.
Step 4: Entering Your Endnote Information
Type your endnote information in the space provided. Remember to maintain consistency in your citation style (e.g., MLA, APA, Chicago). Ensure you accurately reflect the source material.
Step 5: Returning to Your Document
After completing your endnote, simply click anywhere in the main body of your document to return to your text. Word automatically numbers the endnotes sequentially.
Managing and Formatting Your Endnotes
Once you've inserted your endnotes, you can customize their appearance and behavior:
Changing Endnote Numbering
Word automatically numbers endnotes consecutively. However, you can change the numbering format if required:
- Go to the "References" tab.
- Click on the small arrow at the bottom right of the "Footnotes" group. This opens the "Footnotes and Endnotes" dialog box.
- Choose your desired numbering style from the "Number format" dropdown menu.
Formatting Endnotes
You can modify the formatting of your endnotes (font, size, spacing) through the same "Footnotes and Endnotes" dialog box mentioned above.
Deleting Endnotes
To delete an endnote, simply delete the corresponding text in the endnote section. The marker in the main text will disappear automatically.
Converting Footnotes to Endnotes (and Vice Versa)
Need to switch between footnotes and endnotes? This is easily accomplished using the "Convert" option within the "Footnotes and Endnotes" dialog box.
Tips for Effective Endnote Usage
- Consistency: Maintain a consistent citation style throughout your document.
- Accuracy: Double-check all your endnote information for accuracy.
- Clarity: Write clear and concise endnotes.
- Brevity: Avoid excessively long endnotes.
By following these steps, you can effectively use endnotes to enhance your Word documents and present your information professionally. Remember to always double-check your citations and maintain consistency for an impeccable final product.
