How to Make a Zine: A Beginner's Guide to Self-Publishing
So you want to make a zine? Awesome! Zines are a fantastic way to express yourself creatively, share your ideas, and connect with a community. This guide will walk you through the process, from initial concept to finished product, ensuring your zine is ready to share with the world.
Step 1: Brainstorming and Planning Your Zine
Before diving into the design and creation, it's crucial to plan your zine's content. Consider these key aspects:
Defining Your Zine's Focus:
- Theme: What's the central topic or theme of your zine? Will it be a collection of poems, short stories, artwork, or a combination? A strong theme will give your zine focus and coherence.
- Target Audience: Who are you making this zine for? Knowing your audience will help you tailor your content and style.
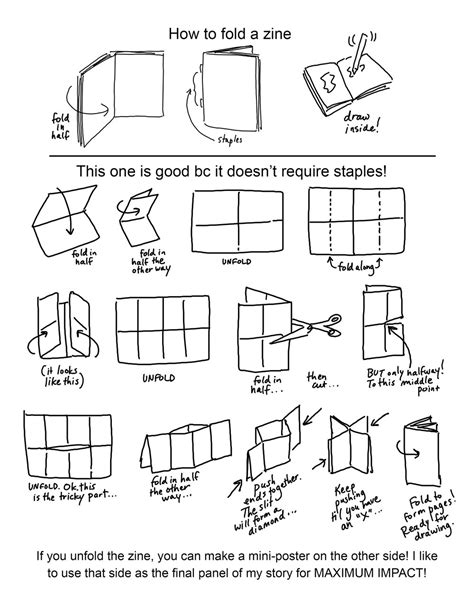
- Length and Format: How many pages will your zine have? Will it be a mini-zine (a smaller, often folded format), a standard size, or something else? Consider the scope of your content.
Content Creation:
- Gather your materials: This could include writing, drawings, photographs, comics, or any other creative medium you want to include.
- Organize your content: Arrange your content in a logical order that flows well. Consider using a mind map or outline to structure your zine.
- Write compelling content: Whether you're writing stories, poems, or articles, make sure your writing is engaging and easy to read.
Step 2: Design and Layout
Now for the fun part – designing your zine!
Choosing Your Software:
You have several options for designing your zine:
- Word Processors: Programs like Microsoft Word or Google Docs can be used for simple zines, but they might lack advanced design features.
- Page Layout Software: InDesign is a professional choice, but it has a steeper learning curve. Canva is a user-friendly alternative with many templates.
- Free Online Tools: Several free online tools allow for easy zine creation. Search for "free online zine maker" to explore your options.
Designing Your Pages:
- Visual Appeal: Pay attention to your zine's overall visual appeal. Use whitespace effectively, choose appropriate fonts, and consider adding images or illustrations.
- Page Numbers: Include page numbers for easy navigation.
- Margins: Leave enough margins to avoid text being too close to the edges.
Step 3: Printing and Binding Your Zine
Printing Your Zine:
- Home Printer: For small runs, a home printer will suffice. Ensure you use high-quality paper for a professional look.
- Print Shop: For larger runs, consider using a local print shop or online printing service. They can offer better quality and a wider range of paper options.
Binding Your Zine:
There are various binding methods:
- Staple Binding: The simplest method, ideal for shorter zines.
- Saddle Stitch Binding: Pages are folded in half and stapled down the center.
- Perfect Binding: Pages are glued together along the spine. This is more suitable for longer zines.
Step 4: Promoting Your Zine
Once your zine is ready, it's time to share it!
Distribution Strategies:
- Online Platforms: Share your zine online through platforms like Issuu or your own website.
- Social Media: Promote your zine on social media platforms like Instagram, Twitter, and Tumblr.
- Local Events: Sell or distribute your zine at local events, markets, or festivals.
- Zine Fests: Participate in zine fests to connect with other zine makers and readers.
Creating a zine is a rewarding experience. By following these steps, you can bring your creative vision to life and share it with the world. Remember, the most important thing is to have fun and let your personality shine through!
