How To Make Envelopes: A Step-by-Step Guide
Want to add a personal touch to your correspondence or craft unique stationery? Making your own envelopes is easier than you think! This guide provides a simple, step-by-step process for creating beautiful, handmade envelopes, perfect for letters, invitations, or small gifts. We'll cover different methods, from using readily available materials to getting creative with unique papers and designs.
Materials You'll Need:
Before you begin, gather these essential supplies:
- Paper: This is the most crucial element. You can use any type of paper – cardstock, scrapbook paper, even decorative wrapping paper! Thicker paper is generally preferred for sturdier envelopes.
- Ruler: Essential for accurate measurements and clean cuts.
- Pencil: For lightly marking your cutting lines.
- Scissors or Paper Cutter: Sharp scissors are a must for precise cuts. A paper cutter can be helpful for larger quantities or perfectly straight lines.
- Glue Stick or Double-Sided Tape: To secure the envelope flaps. Avoid using liquid glue, as it can wrinkle the paper.
- Optional: Embellishments: Ribbons, stickers, stamps, or other decorative elements can personalize your envelopes.
Method 1: The Classic Envelope
This method is perfect for beginners and produces a standard, reliable envelope.
Step 1: Measure and Cut
- Decide on your desired envelope size. A common size is 4.5 inches x 6 inches for a standard letter. Cut your paper to a square or rectangle slightly larger than your desired finished size, allowing extra for the flaps. Example: For a 4.5 x 6 inch envelope, start with a piece of paper roughly 5 x 7 inches.
- Important: The exact dimensions depend on your chosen flap design. Experiment!
Step 2: Score and Fold
- Lightly score the paper along the lines where you'll fold. This creates clean, crisp folds. You can use a bone folder or the blunt edge of a butter knife.
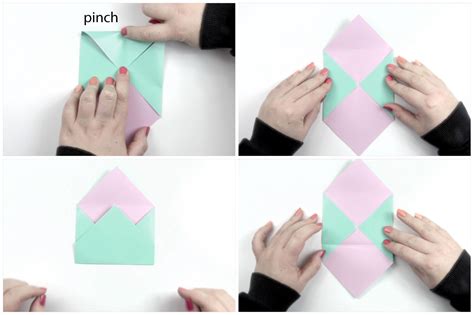
- Fold the top and bottom edges to meet in the center. Crease firmly.
- Fold one side flap inwards, meeting the center crease. Crease firmly.
- Repeat with the other side flap.
Step 3: Glue and Seal
- Apply glue or double-sided tape to the overlapping flap edges.
- Carefully press the flaps together, ensuring a secure seal. Hold for a few seconds to allow the adhesive to set.
Method 2: The Triangle Flap Envelope
This method creates a unique, visually appealing envelope with a triangular flap.
Step 1: Cut the Paper
Cut your paper into a square. The size will determine the final envelope size.
Step 2: Fold and Create the Flap
- Fold the square in half diagonally to create a triangle, then unfold.
- Fold each of the two lower corners to meet the center crease you just made.
- Fold the top point of the triangle down to meet the bottom edge, creating your triangular flap.
Step 3: Glue and Seal
Apply glue or double-sided tape to the bottom edges of the triangular flap and press firmly to seal.
Tips for Success:
- Practice makes perfect: Don't be discouraged if your first few attempts aren't flawless. Keep practicing, and you'll soon be creating beautiful envelopes with ease.
- Experiment with different papers: Explore different textures, colors, and patterns to create unique envelopes.
- Add embellishments: Personalize your envelopes with ribbons, stamps, stickers, or other decorative elements.
Conclusion:
Making your own envelopes is a rewarding craft that adds a personal touch to any correspondence. By following these simple steps and experimenting with different techniques and materials, you can create beautiful, unique envelopes that reflect your personality and style. So grab your paper and scissors and start creating!
