How to Create a Professional Email Signature in Outlook
Creating a professional email signature in Outlook is easier than you think! A well-crafted signature enhances your brand image and provides crucial contact information. This guide will walk you through the process, covering everything from simple signatures to more advanced options.
Why Use an Email Signature?
Before diving into the "how-to," let's understand why you should use an email signature. A well-designed signature is more than just your name and contact details; it's a mini-marketing tool.
- Professionalism: A consistent signature presents a polished image, building credibility and trust.
- Branding: Incorporate your logo and company colors to reinforce brand recognition.
- Contact Information: Easily provide multiple ways for recipients to connect with you.
- Call to Action: Include links to your website, social media profiles, or other relevant resources.
- Legal Compliance: Add disclaimers or copyright notices as needed.
Creating Your Outlook Email Signature:
The steps may vary slightly depending on your Outlook version (Outlook 365, Outlook 2019, etc.), but the core process remains the same.
Step 1: Accessing Signature Settings
- Open Outlook and go to File.
- Select Options.
- Click on Mail.
- Scroll down to the Signatures section.
Step 2: Creating a New Signature
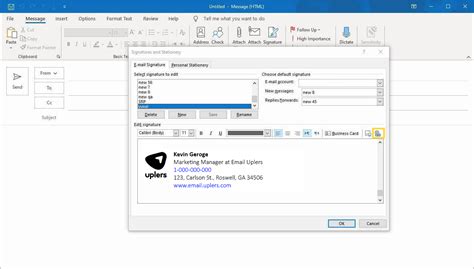
- Click New. Give your signature a name (e.g., "Main Signature").
- Edit Signature: This is where the magic happens. You can type your name, title, company, contact information, and more.
Step 3: Adding Visual Elements (Optional)
Outlook allows you to add more than just text to your signature.
-
Adding a Logo: Click the Image button in the signature editor and browse to your logo file. Resize as needed to maintain a professional appearance. Important: Keep your logo small and avoid oversized images that disrupt email formatting.
-
Adding Links: Type the text you want to be linked (e.g., "Visit our website") and then highlight it. Click the Hyperlink button and paste the URL.
-
Formatting: Use Outlook's formatting tools (bold, italics, font size, color) to style your text for readability and visual appeal. Consistency is key - choose a font and style that aligns with your branding.
Step 4: Assigning Your Signature
-
Under "Choose default signature," select the signature you just created from the drop-down menu. You can choose to use it for new messages only, replies and forwards, or both.
-
Click OK to save your changes.
Tips for a Great Email Signature:
- Keep it concise: Avoid overly long signatures. Aim for a balance between providing sufficient information and respecting your recipient's time.
- Test your signature: Before sending emails, preview your signature to ensure it looks correct on different email clients.
- Mobile Optimization: Your signature should look good on desktops and mobile devices. Avoid excessively large images or complex formatting.
- Regular Updates: Periodically review and update your signature to reflect any changes in your contact information or branding.
Advanced Signature Techniques (for power users):
- HTML Signatures: For more advanced customization and better control over layout, explore creating an HTML signature. This requires a basic understanding of HTML, but it unlocks more design possibilities. Many online tools can help you generate HTML signatures. However, be cautious as some email clients may not render HTML correctly.
- Using a Signature Management Tool: Consider dedicated email signature management tools (though not linked here directly) for managing signatures across multiple email accounts.
By following these steps, you can easily create a professional and effective email signature in Outlook. Remember to prioritize clarity, consistency, and brand alignment for a signature that leaves a lasting positive impression.
