How To Make Stained Glass: A Beginner's Guide to the Art of Light and Color
Stained glass. The very words evoke images of breathtaking cathedral windows, shimmering jewels catching the light, and a timeless art form. But creating your own stained glass pieces isn't as daunting as you might think. This beginner's guide will walk you through the process, equipping you with the knowledge and confidence to embark on your own creative journey.
Gathering Your Supplies: The Foundation of Your Stained Glass Project
Before diving into the vibrant world of stained glass creation, you'll need to gather the necessary tools and materials. This initial investment will serve you well for many future projects.
Essential Tools:
- Glass Cutter: This is arguably the most important tool. Choose a quality cutter for cleaner cuts and less frustration. Practice on scrap glass before tackling your project.
- Running Pliers: Used to snap the glass along the scored line.
- Grozing Pliers: These help refine the edges of your glass pieces after cutting.
- Glass Grinder: For smoothing rough edges and achieving a polished finish.
- Safety Glasses: Crucial for protecting your eyes from flying glass shards.
- Gloves: Protect your hands from sharp edges and glass dust.
- Metal Ruler: Essential for accurate measuring and scoring.
- Sharpie or Glass Marker: For marking your cutting lines.
Essential Materials:
- Glass: Start with readily available, pre-cut glass sheets or smaller pieces. Experiment with different colors and textures to develop your style. Consider clear glass for more intricate designs.
- Lead Came: This is the traditional metal used to join glass pieces. It comes in various widths.
- Solder: Used to secure the lead came joints, creating a strong and durable structure. Choose a lead-free solder for safer working conditions.
- Flux: A paste that helps the solder flow smoothly and adhere properly to the lead.
- Soldering Iron: Essential for melting and applying the solder.
The Creative Process: From Design to Finished Piece
Creating a stained glass piece is a multi-step process, requiring patience and attention to detail. Each step contributes to the overall beauty and longevity of your finished work.
Step 1: Design Your Masterpiece
Start with a sketch or pattern. Consider the overall design, color palette, and the complexity of the shapes. Simple designs are ideal for beginners. You can find countless free patterns online, or let your own creativity guide you!
Step 2: Cut the Glass
This is where your glass cutter and running pliers come into play. Score the glass along your marked lines using a firm, even pressure. Then, use the running pliers to carefully snap the glass along the score line. Practice makes perfect! Don't be discouraged by initial imperfections – it’s a learning process.
Step 3: Grind and Smooth the Edges
Once you've cut all your glass pieces, use your glass grinder to smooth any rough or sharp edges. This is important for safety and the overall aesthetic appeal of the finished piece.
Step 4: Assembling the Came
Carefully arrange your glass pieces according to your design. Apply the lead came, ensuring a tight fit between each piece of glass. This requires precision and patience.
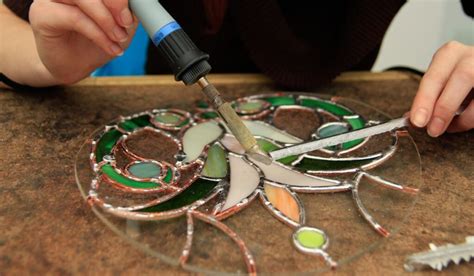
Step 5: Soldering the Joints
Apply flux to the lead came joints and then use your soldering iron to melt and apply the solder. This creates a strong bond between the glass pieces and the lead came, ensuring the integrity of your artwork.
Step 6: Cleaning and Finishing
Once the solder has cooled, carefully clean your piece with a damp cloth to remove any flux residue. You can then apply a patina to enhance the appearance of the lead came (optional).
Tips for Success: Mastering the Art of Stained Glass
- Practice makes perfect: Don't be afraid to experiment with scrap glass before tackling your main project.
- Safety first: Always wear safety glasses and gloves.
- Patience is key: Stained glass creation takes time and precision.
- Start small: Begin with simpler designs before moving on to more complex projects.
- Seek inspiration: Look at existing stained glass pieces for ideas and inspiration.
Creating stained glass is a rewarding experience. With practice and patience, you can transform your creative vision into stunning works of art that will bring beauty and light into your life (and home!). So gather your supplies, unleash your creativity, and begin your stained glass journey today!
