

Introduction: The Slime Craze and Your Kid’s Video Dream
Let’s face it: slime is everywhere. From classrooms to birthday parties, this squishy, gooey substance has captivated kids of all ages. And with the rise of YouTube and other video platforms, many children dream of becoming the next big slime sensation. But creating a successful slime video isn’t just about mixing ingredients; it’s about crafting an engaging, entertaining, and shareable experience. This comprehensive guide will walk you through everything you need to know to help your child create slime videos that stand out from the crowd.
We’ll cover everything from the essential ingredients and safety precautions to filming techniques, editing tips, and strategies for promoting your child’s videos. Whether you’re a seasoned content creator or a complete beginner, this guide will provide you with the knowledge and tools you need to turn your child’s slime passion into a fun and rewarding online venture. Get ready to unleash your inner slime artist and embark on a journey of creativity, learning, and maybe even a little bit of viral fame!
Understanding Your Audience: What Kids Want to See in Slime Videos
Before you even gather your ingredients, it’s crucial to understand what kids are looking for in slime videos. What types of slime are popular? What kind of personalities resonate with young viewers? Here’s a breakdown:
Popular Slime Types:
- Fluffy Slime: This slime is light, airy, and often made with shaving cream. Kids love its soft texture and cloud-like appearance.
- Clear Slime: Made with clear glue, this slime is transparent and often decorated with glitter, beads, or other embellishments. The clarity allows for visually stunning effects.
- Butter Slime: Known for its smooth, spreadable texture, butter slime is often made with clay or model magic. It’s incredibly satisfying to play with.
- Crunchy Slime: This slime incorporates ingredients like foam beads, bingsu beads, or instant snow to create a satisfying crunch when squeezed or stretched.
- Magnetic Slime: Infused with iron oxide powder, this slime can be manipulated with a magnet. It’s a fascinating and educational option.
- Glow-in-the-Dark Slime: This slime is created using glow-in-the-dark paint or powder, making it perfect for nighttime play.
Engaging Video Elements:
- Satisfying Sounds: ASMR (Autonomous Sensory Meridian Response) is a huge draw for slime videos. Kids love the sounds of slime stretching, poking, and squishing.
- Creative Mixing: Watching someone mix ingredients and create a new slime is incredibly captivating. Show the entire process from start to finish.
- Unique Textures: Experiment with different ingredients to create unique and interesting textures. Focus on showing the tactile qualities of the slime.
- Colorful Combinations: Use vibrant colors and interesting combinations to make your slime visually appealing.
- Fun Add-Ins: Glitter, beads, charms, and other add-ins can make your slime more exciting and personalized.
- Relatable Personalities: Kids connect with YouTubers who are authentic, enthusiastic, and relatable. Encourage your child to be themselves and let their personality shine.
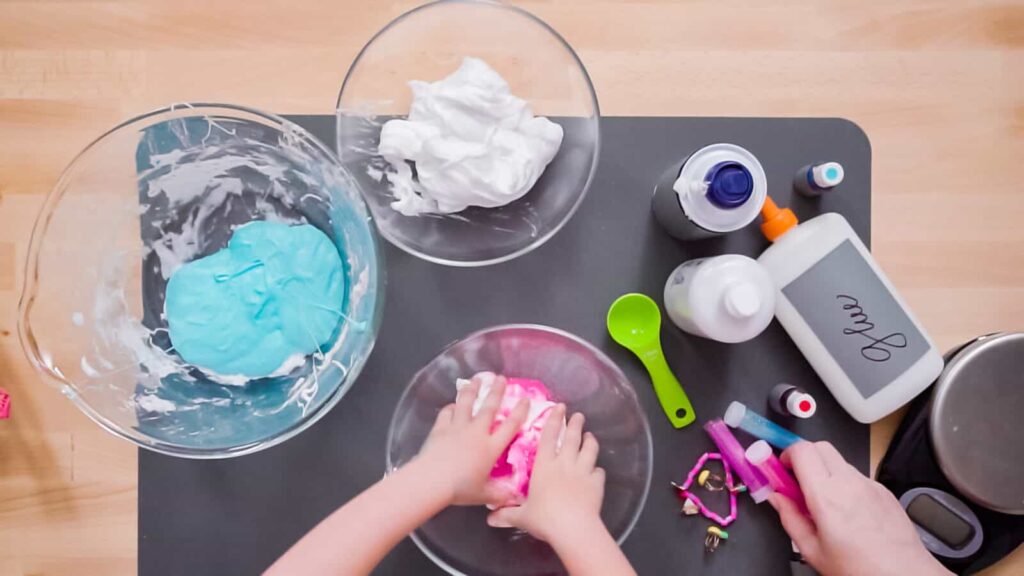
Essential Ingredients and Safety Precautions for Making Slime
Before you start mixing, it’s crucial to gather your ingredients and prioritize safety. Here’s a list of essential ingredients and important safety tips:
Essential Ingredients:
- Glue: White school glue (PVA glue) and clear glue are the most common types of glue used for making slime.
- Activator: Borax powder dissolved in water, liquid starch, and contact lens solution (containing boric acid and sodium borate) are common activators. Always supervise children when using activators.
- Shaving Cream: Used to make fluffy slime.
- Baking Soda: Often used in conjunction with contact lens solution as an activator.
- Food Coloring: Gel food coloring is recommended for vibrant colors.
- Glitter, Beads, and Other Add-Ins: For adding texture and visual appeal.
- Bowls and Spoons: For mixing ingredients.
- Storage Containers: For storing your finished slime.
Safety Precautions:
- Supervision: Always supervise children when making slime, especially when using activators.
- Borax Safety: Borax can be irritating to the skin and eyes. Avoid direct contact and wash hands thoroughly after use. Consider using contact lens solution as a safer alternative.
- No Ingestion: Slime is not edible. Make sure children understand that they should not put slime in their mouths.
- Allergies: Be aware of any allergies your child or their viewers may have. Avoid using ingredients that could trigger an allergic reaction.
- Cleanliness: Keep your workspace clean and organized to prevent accidents.
- Wash Hands: Always wash hands before and after making slime.
- Adult Assistance: Have an adult handle the activators at all times, especially when working with younger children. This ensures proper mixing and minimizes the risk of irritation.
Filming Your Slime Video: Tips and Techniques for Captivating Content
Now that you have your ingredients and safety measures in place, it’s time to start filming! Here are some tips and techniques for creating captivating slime videos:
Equipment:
- Camera: You don’t need a fancy camera to start. A smartphone or tablet with a good camera will work perfectly.
- Tripod: A tripod will help you keep your shots steady and avoid shaky footage.
- Lighting: Good lighting is essential for creating visually appealing videos. Natural light is best, but you can also use artificial lighting such as a ring light or softbox.
- Microphone: If you want to record clear audio, consider using an external microphone.
Filming Techniques:
- Plan Your Shots: Before you start filming, plan out the shots you want to capture. Think about the different angles, close-ups, and action shots you want to include.
- Use Good Lighting: Make sure your subject is well-lit. Avoid filming in dark or dimly lit areas.
- Keep Your Shots Steady: Use a tripod to keep your shots steady. If you’re filming handheld, try to keep your hands as still as possible.
- Focus on the Slime: The slime should be the star of the show. Keep the camera focused on the slime and its textures.
- Capture Satisfying Sounds: Use a microphone to capture the satisfying sounds of slime stretching, poking, and squishing.
- Show the Mixing Process: Film the entire mixing process from start to finish. This is one of the most popular elements of slime videos.
- Experiment with Different Angles: Try filming from different angles to add visual interest. Use close-ups to highlight the texture of the slime.
- Keep it Short and Sweet: Attention spans are short, so keep your videos concise and engaging. Aim for videos that are between 3-5 minutes long.
- Clean Background: Ensure the background is free from clutter and distractions to keep the focus on the slime.
- Engage with the Camera: Encourage your child to talk to the camera, explaining what they are doing and sharing their enthusiasm.
Editing Your Slime Video: Polishing Your Content for Maximum Impact
Once you’ve finished filming, it’s time to edit your video. Editing can help you polish your content, remove mistakes, and add visual effects. Here are some tips for editing your slime videos:
Editing Software:
- iMovie (iOS/macOS): A free and user-friendly editing software for Apple devices.
- FilmoraGo (iOS/Android): A mobile editing app with a variety of features.
- KineMaster (iOS/Android): Another mobile editing app with advanced features.
- DaVinci Resolve (Windows/macOS/Linux): A professional-grade editing software that is free to use.
Editing Tips:
- Cut Out Mistakes: Remove any mistakes or awkward pauses from your video.
- Add Transitions: Use transitions to smoothly connect different clips.
- Add Text and Graphics: Add text and graphics to add information or visual interest.
- Adjust Audio Levels: Make sure the audio levels are consistent throughout the video.
- Add Music: Add background music to create a more engaging atmosphere. Be mindful of copyright restrictions.
- Speed Up or Slow Down Footage: Use speed ramping to highlight specific moments or create a more dynamic effect.
- Add Visual Effects: Experiment with visual effects to add visual flair to your video.
- Keep it Concise: Cut out any unnecessary footage to keep your video concise and engaging.
- Color Correction: Adjust the colors to make the slime look more vibrant and appealing.
- Add a Watermark: Include a watermark with your child’s channel name to promote their brand.
Promoting Your Slime Video: Getting Views and Building an Audience
Creating a great slime video is only half the battle. You also need to promote your video to get views and build an audience. Here are some strategies for promoting your slime videos:
YouTube Optimization:
- Compelling Title: Create a title that is both informative and engaging. Include relevant keywords that people are likely to search for. Examples: “DIY Fluffy Slime Tutorial”, “Best Clear Slime Recipe”, “Satisfying Crunchy Slime ASMR”.
- Detailed Description: Write a detailed description that includes relevant keywords, links to your other videos, and a call to action.
- Relevant Tags: Add relevant tags to help people find your video. Use a mix of broad and specific tags.
- Eye-Catching Thumbnail: Create a thumbnail that is visually appealing and accurately represents your video. Use bright colors and clear images.
- End Screens and Cards: Use end screens and cards to promote your other videos and encourage viewers to subscribe.
- Playlists: Organize your videos into playlists to make it easier for viewers to find related content.
- Captions: Add captions to make your videos accessible to a wider audience.
Social Media Promotion:
- Share on Social Media: Share your video on social media platforms like Instagram, TikTok, Facebook, and Twitter.
- Engage with Your Audience: Respond to comments and messages from your viewers. Ask them questions and encourage them to share their own slime creations.
- Collaborate with Other YouTubers: Collaborate with other slime YouTubers to reach a wider audience.
- Run Contests and Giveaways: Run contests and giveaways to incentivize viewers to subscribe and share your videos.
- Use Relevant Hashtags: Use relevant hashtags to increase the visibility of your posts.
- Create Short Teasers: Create short, attention-grabbing teasers for your videos and share them on social media.
- Cross-Promote: Cross-promote your YouTube channel on your other social media platforms and vice versa.
Engaging with the Community:
- Respond to Comments: Take the time to read and respond to comments on your videos. Show your viewers that you appreciate their feedback.
- Ask for Feedback: Ask your viewers for feedback on your videos. What do they like? What could you improve?
- Create a Community: Create a community around your channel. Encourage viewers to interact with each other and share their own slime creations.
- Participate in Challenges: Participate in slime challenges to gain exposure and connect with other slime enthusiasts.
Monetizing Your Slime Video Channel: Turning Passion into Profit
Once you’ve built a significant audience, you can start thinking about monetizing your slime video channel. Here are some ways to turn your passion into profit:
- YouTube AdSense: Earn money by displaying ads on your videos. You’ll need to meet YouTube’s eligibility requirements to monetize your channel.
- Affiliate Marketing: Promote slime-related products and earn a commission on sales.
- Sponsored Videos: Partner with brands to create sponsored videos.
- Merchandise: Sell slime-related merchandise, such as slime kits, containers, and accessories.
- Patreon: Create a Patreon account and offer exclusive content to your patrons.
- Slime Sales: Sell your own handmade slime through an online store or at local events.
Important Note: Remember to comply with YouTube’s monetization policies and disclose any sponsored content or affiliate links.
Troubleshooting Common Slime Problems: Tips for Perfecting Your Recipes
Even with the best recipes and techniques, you may encounter some common slime problems. Here are some troubleshooting tips:
- Slime is Too Sticky: Add more activator, a little at a time, until the slime reaches the desired consistency.
- Slime is Too Hard: Add a few drops of lotion or water to soften the slime.
- Slime is Not Stretchy: Add a few drops of glycerin or clear glue to improve the stretchiness.
- Slime is Not Fluffy: Add more shaving cream to make the slime fluffier.
- Slime is Crumbly: Add a few drops of water or lotion to hydrate the slime.
- Slime is Melting: Store the slime in an airtight container in a cool, dry place.
- Slime is Separating: Mix the slime thoroughly to re-combine the ingredients.
- Slime Smells Bad: Add a few drops of essential oil or fragrance to freshen up the slime.
Staying Creative and Inspired: Keeping Your Slime Videos Fresh and Engaging
To keep your slime videos fresh and engaging, it’s important to stay creative and inspired. Here are some tips:
- Experiment with New Recipes: Try out new slime recipes and techniques.
- Add Unique Add-Ins: Use unique add-ins to create interesting textures and visual effects.
- Create Themed Slime: Create slime that is themed around holidays, movies, or other popular topics.
- Collaborate with Other YouTubers: Collaborate with other YouTubers to create unique and exciting content.
- Watch Other Slime Videos: Watch other slime videos to get inspiration and learn new techniques.
- Engage with Your Audience: Ask your audience for suggestions and ideas.
- Stay Up-to-Date: Stay up-to-date on the latest slime trends and techniques.
- Review Other Slimes: Review other popular slimes and give your unique perspective.
- Slime Challenges: Participate in slime challenges to keep your content dynamic and exciting.
Conclusion: Unleashing Your Child’s Inner Slime Superstar
Creating slime videos can be a fun and rewarding experience for both you and your child. By following the tips and techniques outlined in this guide, you can help your child create captivating content, build an audience, and even turn their passion into profit. Remember to prioritize safety, stay creative, and most importantly, have fun! With dedication and hard work, your child could be the next big slime superstar!
Encourage experimentation and learning. Remember that every video is a chance to improve and connect with an audience. Most importantly, have fun and let your child’s creativity shine through!
