How To Screen Record on iPad: A Comprehensive Guide
Screen recording on your iPad is easier than you might think! Whether you need to capture gameplay, create a tutorial, or record a video call, this guide will walk you through the different methods available, ensuring you get the perfect screen recording every time.
Method 1: Using the Built-in Screen Recording Feature (iOS 11 and later)
This is the simplest method and requires no third-party apps. Here's how to do it:
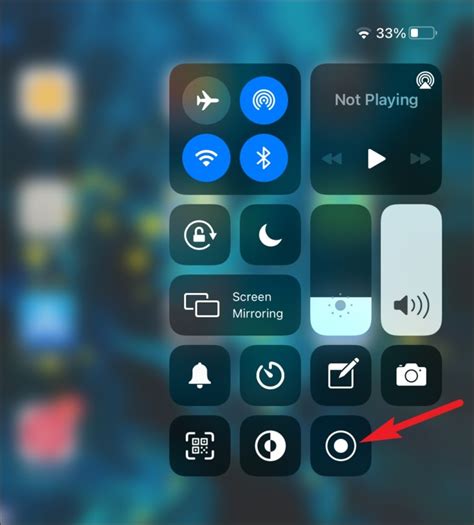
1. Access Control Center: Swipe down from the top-right corner of your iPad screen (or swipe up from the bottom on older models) to open Control Center.
2. Add Screen Recording: If you don't already see the screen recording button (a circle with a white dot inside), you'll need to add it. Go to Settings > Control Center > Customize Controls and tap the green "+" button next to "Screen Recording."
3. Start Recording: In Control Center, long-press the screen recording button. You'll see options to include microphone audio (to capture your voice) or start recording immediately. Choose your preference. A three-second countdown will begin before recording starts.
4. Stop Recording: To stop recording, tap the red bar at the top of the screen or tap the screen recording button again in Control Center. Your recording will be saved to your Photos app.
5. Locate Your Recording: Find your screen recording in the Photos app. You can easily edit it within the Photos app’s editing tools.
Method 2: Using QuickTime Player (For Mac Users)
If you need to record your iPad screen onto your Mac, QuickTime Player offers a straightforward solution. This method requires a wired connection between your iPad and Mac.
1. Connect your iPad: Connect your iPad to your Mac using a USB cable.
2. Open QuickTime Player: Launch QuickTime Player on your Mac.
3. Choose "New Movie Recording": In QuickTime Player, select "File" > "New Movie Recording."
4. Select iPad as the Camera Source: Click the small arrow next to the record button and select your iPad from the "Camera" dropdown menu. This will allow you to choose your iPad's screen as the recording source.
5. Start Recording: Click the record button to begin recording your iPad screen.
6. Stop Recording: Click the stop button in QuickTime Player when finished. Your recording will be saved as a QuickTime file on your Mac.
Tips for High-Quality Screen Recordings
- Optimize your iPad's brightness: A brighter screen will result in a clearer recording.
- Minimize distractions: Close unnecessary apps and notifications to avoid clutter in your recording.
- Use a stable connection: If recording wirelessly, ensure a strong Wi-Fi connection to avoid interruptions.
- Plan your recording: Outline what you want to capture beforehand to create a smoother, more professional recording.
- Edit your recordings: Use the built-in editing tools in your Photos app (or a dedicated video editor) to trim unnecessary sections and enhance your recordings.
Troubleshooting Common Issues
- Screen recording button missing: Ensure you've added the screen recording button to your Control Center settings.
- No audio in recording: Make sure you’ve enabled microphone audio in the screen recording settings.
- Poor video quality: Check your iPad's brightness and ensure a stable internet connection (if recording wirelessly).
By following these steps and tips, you’ll be creating professional-looking iPad screen recordings in no time! Remember to experiment with both methods to find what works best for your needs.
