

Mastering Outlook: A Comprehensive Guide on How to Set Up and Customize Your Signature
In today’s fast-paced digital world, effective communication is more crucial than ever. Whether you’re sending emails to colleagues, clients, or potential employers, a professional email signature can make a lasting impression. Microsoft Outlook, being one of the most widely used email clients, offers robust features for creating and managing email signatures. This comprehensive guide will walk you through the process of setting up, customizing, and troubleshooting your Outlook signature, ensuring your emails always convey the right message.
Why is an Email Signature Important?
Before diving into the technical aspects, let’s understand why an email signature is essential.
- Professionalism: A well-crafted signature adds a touch of professionalism to your emails, showing recipients that you pay attention to detail.
- Branding: For businesses, a signature is an extension of your brand. It reinforces your company’s identity with consistent use of logos, colors, and fonts.
- Contact Information: It provides recipients with all the necessary contact details, such as your name, title, phone number, website, and social media links, making it easy for them to reach you.
- Legal Compliance: In some industries, including disclaimers in email signatures is a legal requirement.
- Marketing: A signature can be used to promote upcoming events, special offers, or new content, turning every email into a marketing opportunity.
Setting Up Your Signature in Outlook: A Step-by-Step Guide
Setting up a signature in Outlook is a straightforward process. Here’s how to do it:
Step 1: Open Outlook and Access Signature Settings
First, launch the Outlook application on your computer. Once it’s open, navigate to the “File” tab located in the top left corner of the Outlook window. Click on “File,” and a menu will appear on the left side of the screen. From this menu, select “Options.”
The Outlook Options window will pop up. In this window, find and click on “Mail” in the left-hand navigation pane. This section contains various settings related to email composition, sending, and receiving. Look for the “Compose messages” section, and you’ll see a button labeled “Signatures…” Click this button to open the Signatures and Stationery window.
Step 2: Create a New Signature
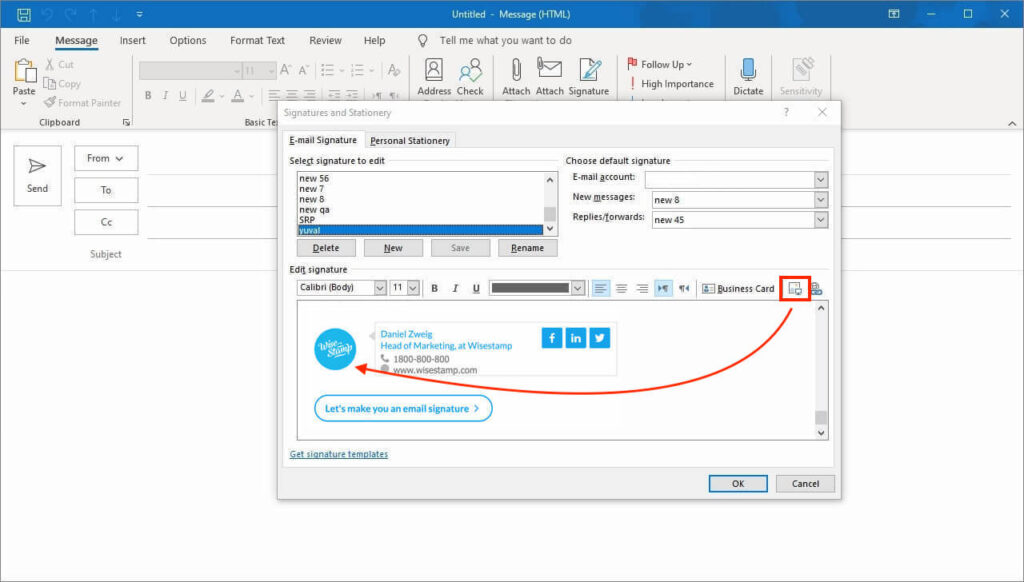
In the Signatures and Stationery window, you’ll see a list of existing signatures (if any) and options to create new ones. To create a new signature, click on the “New” button on the right side of the window. A small dialog box will appear, prompting you to enter a name for your signature. Choose a descriptive name that will help you identify the signature later, such as “Professional Signature” or “Personal Signature.” After typing the name, click “OK.”
Step 3: Design Your Signature
Now comes the creative part: designing your signature. In the “Edit signature” section, you’ll find a text editor where you can type and format your signature. You can include your name, title, company, contact information, and any other details you want to add. Use the formatting options above the text editor to customize the font, size, color, and alignment of your text. You can also insert images, such as your company logo or a professional headshot, by clicking the “Picture” icon.
When designing your signature, keep these tips in mind:
- Keep it concise: Avoid overwhelming your recipients with too much information. Stick to the essentials.
- Use a professional font: Choose a font that is easy to read and reflects your brand. Common choices include Arial, Calibri, and Times New Roman.
- Maintain consistent formatting: Use the same font, size, and color throughout your signature to create a cohesive look.
- Include a call to action: Consider adding a brief call to action, such as “Visit our website” or “Follow us on social media.”
Step 4: Set Default Signature Options
After designing your signature, you need to set the default options for when it should be used. In the “Choose default signature” section, you’ll see two dropdown menus: “New messages” and “Replies/forwards.” These menus allow you to specify which signature should be automatically added to new emails and replies/forwards, respectively.
If you want your signature to be included in all new emails, select the signature you just created from the “New messages” dropdown. Similarly, if you want your signature to be included in all replies and forwards, select it from the “Replies/forwards” dropdown. If you prefer not to automatically include a signature, you can select “(none)” from either or both of these menus. You can always manually insert a signature into an email, even if it’s not set as the default.
Step 5: Save Your Signature
Once you’ve designed your signature and set the default options, click “OK” to save your changes and close the Signatures and Stationery window. Your new signature is now ready to use!
Customizing Your Outlook Signature: Advanced Tips and Tricks
While the basic steps above will get you started, Outlook offers several advanced options for customizing your signature and making it even more effective.
Using HTML for Advanced Formatting
For more advanced formatting options, you can use HTML to create your signature. To do this, create your signature in an HTML editor (such as Notepad++ or Sublime Text) and save it as an HTML file. Then, in the Signatures and Stationery window, click the “New” button, give your signature a name, and click “OK.” Instead of typing your signature in the text editor, click the “Browse” button and select the HTML file you created. Outlook will import the HTML code and display your signature with all the formatting you specified.
Using HTML allows you to create more complex layouts, use custom fonts, and embed interactive elements, such as clickable buttons and animated GIFs. However, it’s important to ensure that your HTML code is clean and well-formatted to avoid compatibility issues with different email clients.
Adding Social Media Icons
Including social media icons in your signature is a great way to promote your online presence and encourage recipients to connect with you on social media. To add social media icons, first find high-quality icons for the platforms you want to include (such as Facebook, Twitter, LinkedIn, and Instagram). Save these icons as image files (preferably in PNG format) and upload them to a web server or image hosting service. Then, in your signature, insert the images and link them to your social media profiles.
Here’s an example of how to add social media icons using HTML:
<a href="https://www.facebook.com/yourpage"><img src="https://www.example.com/facebook.png" alt="Facebook"></a>
<a href="https://www.twitter.com/yourhandle"><img src="https://www.example.com/twitter.png" alt="Twitter"></a>
<a href="https://www.linkedin.com/in/yourprofile"><img src="https://www.example.com/linkedin.png" alt="LinkedIn"></a>
Replace the URLs with your actual social media profiles and the image sources with the actual URLs of your social media icons.
Using Different Signatures for Different Accounts
If you use multiple email accounts in Outlook, you can create different signatures for each account. In the Signatures and Stationery window, select the email account you want to create a signature for from the “Email account” dropdown menu. Then, create and customize your signature as described above. Repeat this process for each email account you use.
This feature is particularly useful if you have separate email accounts for work and personal use, or if you manage multiple businesses with different branding.
Creating a Plain Text Signature
While HTML signatures offer more formatting options, some email clients may not display them correctly. To ensure that your signature is always visible, it’s a good idea to create a plain text version of your signature as well. In the Signatures and Stationery window, click the “Plain Text” tab. Then, type your signature in plain text format, without any formatting or images. When you send an email to someone whose email client doesn’t support HTML, Outlook will automatically use the plain text version of your signature.
Troubleshooting Common Signature Issues
Even with the best planning, you may encounter issues with your Outlook signature. Here are some common problems and how to fix them:
Signature Not Appearing in Emails
If your signature is not appearing in your emails, the first thing to check is whether you have set the default signature options correctly. Go to the Signatures and Stationery window and make sure that your signature is selected in the “New messages” and “Replies/forwards” dropdown menus. Also, make sure that you haven’t accidentally deleted your signature or created a new signature with the same name.
If the default signature options are set correctly, try restarting Outlook. Sometimes, a simple restart can resolve minor glitches that may be preventing your signature from appearing.
Signature Formatting Issues
If your signature appears with incorrect formatting, the problem may be with your HTML code. Make sure that your HTML code is clean and well-formatted, and that you’re using supported HTML tags and attributes. Also, keep in mind that some email clients may strip out certain HTML elements for security reasons, so it’s best to keep your HTML code as simple as possible.
If you’re using images in your signature, make sure that the image URLs are correct and that the images are accessible from the web. Also, make sure that the images are not too large, as this can cause your emails to load slowly.
Signature Not Saving
If you’re having trouble saving your signature, the problem may be with Outlook’s configuration files. Try closing Outlook and deleting the “Signatures” folder in your Outlook profile. This folder contains all of your signature files, and deleting it will force Outlook to recreate the folder with default settings. To find the “Signatures” folder, open File Explorer and type “%appdata%MicrosoftSignatures” in the address bar. Then, delete all the files and folders in the “Signatures” folder and restart Outlook.
Best Practices for Email Signatures
To make the most of your Outlook signature, keep these best practices in mind:
- Keep it short and sweet: Avoid overwhelming your recipients with too much information. Stick to the essentials, such as your name, title, company, and contact information.
- Use a professional font: Choose a font that is easy to read and reflects your brand. Common choices include Arial, Calibri, and Times New Roman.
- Maintain consistent formatting: Use the same font, size, and color throughout your signature to create a cohesive look.
- Include a call to action: Consider adding a brief call to action, such as “Visit our website” or “Follow us on social media.”
- Use images sparingly: While images can add visual appeal to your signature, they can also increase the size of your emails and slow down loading times. Use images sparingly and optimize them for web use.
- Test your signature: Before using your signature in your emails, send a test email to yourself or a colleague to make sure that it appears correctly in different email clients.
- Update your signature regularly: Review your signature periodically to make sure that the information is still accurate and up-to-date.
The Future of Email Signatures
As technology evolves, so too will the role of email signatures. We can anticipate seeing more dynamic and interactive signatures in the future, with features such as embedded videos, live social media feeds, and personalized content. AI-powered tools may also emerge to help users create and optimize their signatures based on their specific goals and audience. In the meantime, mastering the art of creating a professional and effective Outlook signature is a valuable skill that can help you make a lasting impression in the digital world.
Conclusion
Setting up a signature in Outlook is more than just adding your name to an email. It’s about creating a professional, informative, and brand-consistent representation of yourself or your company. By following this comprehensive guide, you can create a signature that not only looks great but also enhances your communication and helps you achieve your goals. Whether you’re a business professional, a freelancer, or a student, a well-crafted email signature is an essential tool for success in today’s digital age. So take the time to create a signature that reflects your unique identity and makes a lasting impression on everyone you communicate with.
