How To Take Acrylic Nails Off At Home Safely and Effectively
Removing acrylic nails at home might seem daunting, but with the right techniques and tools, you can do it safely and effectively without damaging your natural nails. This guide provides a step-by-step process, ensuring you achieve salon-quality results in the comfort of your own home.
What You'll Need:
Before you begin, gather these essential supplies:
- Nail clippers: To shorten the length of your acrylic nails.
- Coarse nail file or electric file (optional): To gently file down the surface of the acrylic. Be cautious with electric files if you're inexperienced.
- 100% Acetone: This is the key ingredient for dissolving acrylic. Avoid nail polish remover that contains other ingredients.
- Cotton balls: To soak the nails.
- Aluminum foil: To wrap the cotton balls around your nails.
- Cuticle pusher or orangewood stick: To gently push back cuticles and remove softened acrylic.
- Nail buffer: To smooth your natural nails after removal.
- Cuticle oil: To moisturize and nourish your nails.
- Nail strengthener (optional): To help your natural nails recover.
Step-by-Step Acrylic Nail Removal:
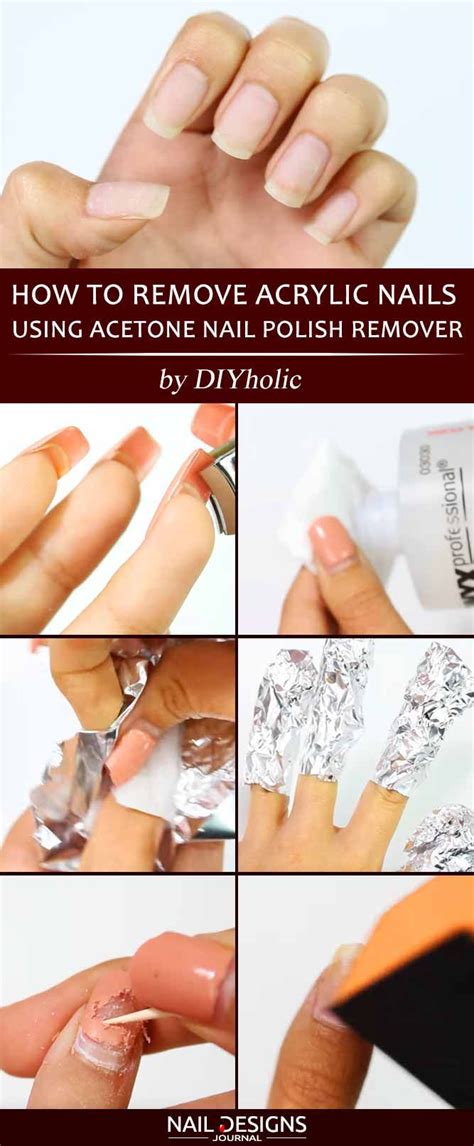
1. Shorten Your Nails: Use nail clippers to carefully shorten the length of your acrylic nails as much as possible. This will significantly reduce the soaking time.
2. Gently File the Surface: (Optional, but recommended) Use a coarse nail file or electric file to gently file down the top layer of the acrylic. This creates more surface area for the acetone to penetrate. Be extremely gentle to avoid damaging your natural nails.
3. Soak Your Nails: Soak cotton balls in 100% acetone. Place a soaked cotton ball on each acrylic nail, ensuring it covers the entire nail surface. Wrap each fingertip tightly with aluminum foil to keep the cotton balls in place and maintain moisture.
4. Wait and Check: Let the nails soak for at least 20-30 minutes. You may need to soak for longer depending on the thickness of your acrylics. Check periodically to see if the acrylic is softening. If it’s still firmly attached, soak for another 10-15 minutes.
5. Gently Remove the Acrylic: Once the acrylic is soft and pliable, carefully peel it away from your natural nail using a cuticle pusher or orangewood stick. Work slowly and gently to avoid tearing or damaging your natural nails.
6. Cleanse and Buff: After removing all the acrylic, use a nail buffer to smooth any rough edges on your natural nails.
7. Moisturize and Nourish: Apply cuticle oil generously to hydrate and strengthen your nails. Consider using a nail strengthener to help them recover from the removal process.
Important Tips for Success:
- Patience is key: The process takes time. Don't rush it, or you risk damaging your nails.
- Avoid harsh scrubbing: Gentle pressure is sufficient; avoid aggressive scrubbing.
- Proper ventilation: Work in a well-ventilated area as acetone fumes can be strong.
- Protect your skin: Acetone can dry out your skin. Apply a moisturizer to your hands and cuticles after the removal process.
- Consider professional removal: If you're unsure or uncomfortable performing this process yourself, it’s always best to see a professional nail technician.
By following these steps and tips, you can successfully remove your acrylic nails at home while preserving the health of your natural nails. Remember to prioritize safety and patience for the best results.
