How To Take Your Blood Pressure At Home: A Comprehensive Guide
Taking your blood pressure at home can empower you to better manage your health. Regular monitoring allows you to catch potential problems early and work closely with your doctor to maintain optimal cardiovascular health. This guide will walk you through the process, ensuring you get accurate readings and understand what they mean.
What You'll Need:
-
A home blood pressure monitor: There are two main types: aneroid (using a dial) and digital (electronic). Digital monitors are generally easier to use, but both are accurate if used correctly. Choose a monitor validated by an organization like the American Heart Association or British Hypertension Society. Look for one with a large, easy-to-read display.
-
A comfortable chair: Find a quiet spot where you can sit comfortably for at least five minutes before taking your reading.
-
Pen and paper: To record your readings. Many digital monitors have memory to store readings, but writing them down helps track trends.
Getting Ready:
Before you begin, it's crucial to follow these steps for the most accurate reading:
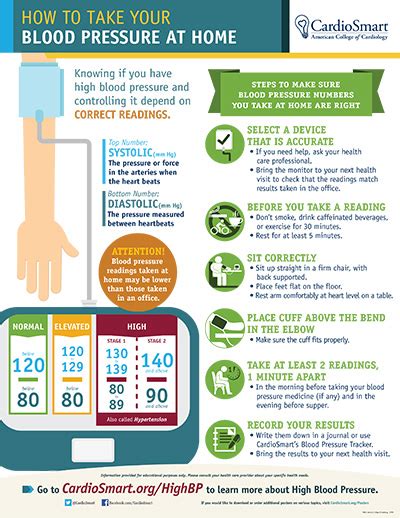
- Rest: Sit quietly for at least 5 minutes before taking your blood pressure. Avoid strenuous activity, caffeine, or smoking beforehand.
- Comfortable Position: Sit with your back supported and your feet flat on the floor. Your arm should be supported at heart level.
- Proper Arm Position: Rest your arm on a table or chair armrest, ensuring it's at the same level as your heart. Avoid talking or moving during the measurement.
- Clothing: Remove tight clothing from your upper arm. The cuff needs to fit snugly but not too tightly.
How To Use a Digital Blood Pressure Monitor:
- Sit comfortably: Follow the preparation steps above.
- Place the cuff: Wrap the cuff snugly around your bare upper arm, about an inch above your elbow, ensuring the tubing is facing outwards. The arrow on the cuff should align with your brachial artery (the inner part of your elbow).
- Turn on the monitor: Follow the manufacturer's instructions to turn on the device.
- Wait for the reading: Remain still and let the monitor complete the measurement. This typically takes a few seconds.
- Record the reading: Note down both the systolic (top) and diastolic (bottom) numbers. Also, note the date and time.
Understanding Your Blood Pressure Reading:
Your blood pressure reading will show two numbers:
- Systolic pressure (top number): The pressure in your arteries when your heart beats.
- Diastolic pressure (bottom number): The pressure in your arteries when your heart rests between beats.
Blood pressure is classified into different categories. It’s crucial to consult your doctor for interpretation of your readings and advice on management. They can provide personalized recommendations based on your individual health profile. A single reading doesn't define your blood pressure; consistent monitoring is key.
Maintaining Accuracy:
- Regular Calibration (for aneroid monitors): Aneroid monitors need periodic calibration by a healthcare professional.
- Cuff Size: Ensure the cuff size is appropriate for your arm circumference. An incorrectly sized cuff can lead to inaccurate readings.
- Multiple Readings: Take multiple readings at different times of the day and average them. This helps give a more comprehensive picture of your blood pressure.
Remember: This guide is for informational purposes only and should not replace professional medical advice. Always consult your doctor or healthcare provider for diagnosis and treatment of any health concerns, including blood pressure management.
