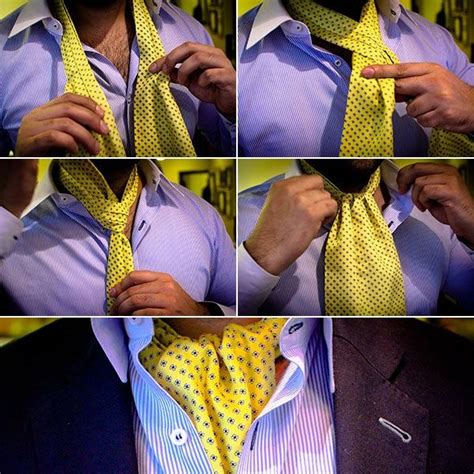
How To Tie An Ascot: A Gentleman's Guide to Effortless Elegance
The ascot, a symbol of refined style and timeless sophistication, adds a touch of old-world charm to any ensemble. While it might seem intimidating at first, mastering the art of tying an ascot is surprisingly straightforward. This guide will walk you through different methods, ensuring you can confidently sport this elegant accessory.
Understanding Ascot Types & Fabrics
Before diving into the tying techniques, it's crucial to understand the different types of ascots available. This impacts both the tying method and the overall look.
Types of Ascots:
- Woven Ascots: These are typically made from silk, wool, or other fine fabrics, offering a more structured and formal look.
- Printed Ascots: Featuring vibrant patterns and designs, these add a touch of personality and flair.
- Knitted Ascots: These offer a more casual and relaxed feel, perfect for less formal occasions.
Choosing the Right Fabric:
The fabric significantly affects the drape and overall appearance of your ascot. Silk ascots are known for their luxurious sheen and smooth texture, ideal for formal events. Wool ascots offer warmth and a more textured look, suitable for cooler seasons.
Methods for Tying an Ascot
There are several ways to tie an ascot, each offering a slightly different aesthetic. Here are two popular and relatively easy methods:
The Simple Knot
This method is perfect for beginners and creates a neat, classic look.
- Lay the ascot: Lay the ascot flat around your neck, with the wider end on your right and the narrower end on your left. The longer end should be significantly longer than the shorter end.
- Cross the ends: Cross the right end (wider) over the left end (narrower).
- Tuck and loop: Tuck the right end under the left end, creating a loop.
- Pull through: Pull the right end through the loop you just created.
- Adjust: Adjust the knot to your desired tightness and position. Ensure the knot sits comfortably and is centered on your neck.
The Four-in-Hand Knot (Modified)
This method offers a slightly more complex but equally elegant look. It's a variation of the classic four-in-hand knot used for neckties.
- Start with a longer end: Begin with the ascot draped around your neck, ensuring the right (longer) end is significantly longer than the left.
- Cross the ends: Cross the right end over the left.
- Wrap and tuck: Wrap the right end around the back of the left end and bring it forward.
- Create the knot: Tuck the right end up and through the loop created between the crossing ends.
- Adjust and secure: Tighten and adjust the knot for a snug and polished look. Ensure the knot sits comfortably and is centered.
Tips for Mastering the Ascot
- Practice makes perfect: Don't be discouraged if your first few attempts aren't flawless. Practice in front of a mirror to get a feel for the process.
- Experiment with different fabrics: Explore various fabrics and patterns to discover which styles best suit your personality and wardrobe.
- Consider the occasion: Choose an ascot appropriate for the event. A silk ascot is suitable for formal occasions, while a knitted ascot is better suited for more casual events.
- Pair with the right outfit: Ascots complement a variety of outfits, from suits to more casual blazers.
Conclusion
The ascot is a versatile and stylish accessory that can elevate any outfit. By mastering these simple techniques, you can confidently incorporate this timeless piece into your wardrobe and project an air of sophisticated elegance. Remember to experiment and find the method and style that best suits you. So, grab your favorite ascot and start practicing – you'll be turning heads in no time!
