How to Tie a Necktie: The Ultimate Guide for Beginners and Beyond
Tying a necktie might seem daunting at first, but with a little practice and the right instructions, you'll be knotting like a pro in no time. This comprehensive guide covers various knot styles, offering tips and tricks for a perfect knot every time. Whether you're a student preparing for your first job interview or a seasoned professional looking to expand your knot repertoire, this guide is for you.
Choosing the Right Tie and Knot
Before we dive into the tying techniques, let's talk about choosing the right tie and knot for your occasion and body type.
Tie Selection:
- Fabric: Consider the occasion. Silk ties are classic for formal events, while cotton or linen ties are more suitable for casual settings.
- Pattern and Color: Match your tie to your shirt and suit. A subtle pattern works well with a solid-colored shirt, while a bold pattern might suit a more casual look.
- Width: The width of your tie should be proportionate to your build. Thinner ties generally suit slimmer builds, while wider ties can work better for those with broader shoulders.
Knot Selection:
The knot you choose will depend on your collar style and personal preference. Here are a few popular options:
- Four-in-Hand: This is a classic, easy-to-tie knot that’s perfect for beginners and works well with a variety of collars. It creates a slightly asymmetrical, casual look.
- Half-Windsor: This knot is slightly more complex but creates a symmetrical, balanced look that's suitable for both formal and informal occasions. It works well with spread collars.
- Full Windsor: This knot is the most formal and creates a large, symmetrical knot. It’s best suited for spread collars and formal occasions. It requires a bit more practice.
- Pratt (Shelby): A more complex knot, excellent for thicker ties, resulting in a symmetrical, elegant knot.
Step-by-Step Guide: The Four-in-Hand Knot
This is the easiest knot to master and a great starting point for anyone learning to tie a tie.
- Start: Begin with the wide end of the tie on your right, hanging significantly lower than the narrow end.
- Cross: Cross the wide end over the narrow end.
- Wrap Around: Bring the wide end up and around the narrow end, tucking it under and through the loop around your neck.
- Bring Through: Pull the wide end down and through the loop formed in front.
- Tighten: Gently tighten the knot by pulling both ends simultaneously. Adjust the knot to sit comfortably at the base of your collar.
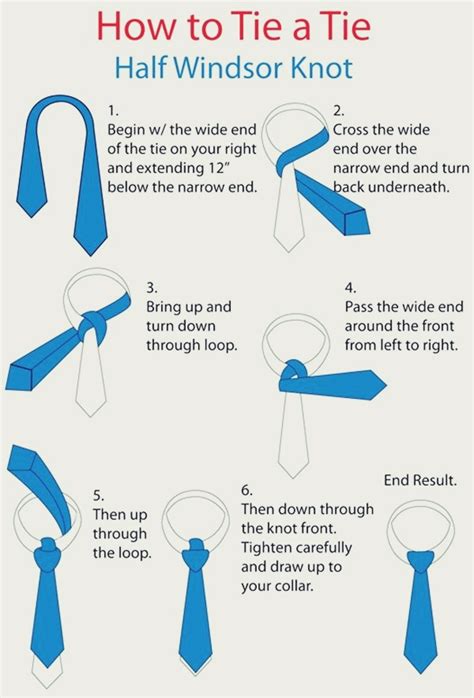
Step-by-Step Guide: The Half-Windsor Knot
The Half-Windsor is a slightly more complex but still manageable knot, offering a more formal appearance.
- Start: Begin with the wide end of the tie on your right, significantly lower than the narrow end.
- Cross: Cross the wide end over the narrow end.
- Wrap Around: Bring the wide end up and around the narrow end, then bring it down through the loop around your neck.
- Cross Again: Cross the wide end over itself, forming an "X".
- Tuck Through: Tuck the wide end up and through the loop formed around your neck.
- Tighten: Gently tighten the knot by pulling both ends simultaneously. Adjust the knot to sit comfortably at the base of your collar.
Tips for a Perfect Tie Knot Every Time:
- Practice Makes Perfect: Don't get discouraged if your first few attempts aren't perfect. Practice regularly until you feel comfortable and confident.
- Mirror, Mirror: Use a mirror to help you visualize the steps and ensure your knot is tied correctly.
- Tie Weight: The weight of your tie influences the knot’s shape; a heavier tie will create a fuller knot.
- Collar Type: Consider your shirt collar style. Spread collars work well with most knots, while point collars are better suited to slimmer knots.
Beyond the Basics: Exploring Other Knots
Once you've mastered the Four-in-Hand and Half-Windsor, consider exploring other knots like the Full Windsor or Pratt knot to diversify your style. Numerous online tutorials can guide you through these more advanced techniques.
Mastering the art of tying a necktie is a valuable skill that adds to your overall appearance and confidence. With consistent practice and attention to detail, you'll be tying perfect knots every time.
