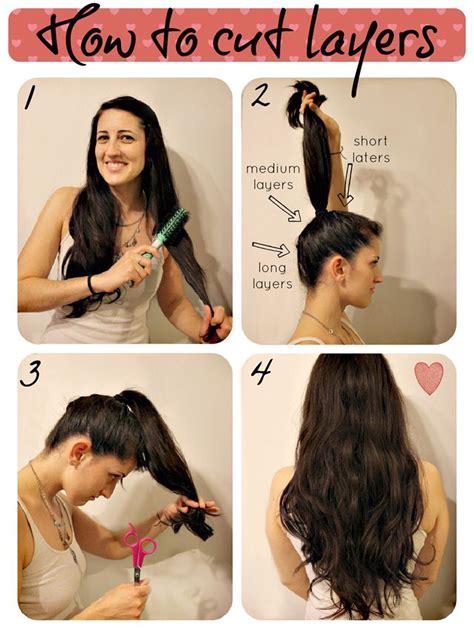
How To Trim Your Own Hair: A Beginner's Guide to a Perfect DIY Haircut
Trimming your own hair might seem daunting, but with the right tools and techniques, you can achieve a surprisingly professional-looking result. This guide provides a step-by-step approach, perfect for those looking to maintain their current style or experiment with subtle changes. Remember, patience is key!
Assessing Your Hair & Tools Needed
Before you even pick up a pair of scissors, take a good look at your hair. What's its texture? (Fine, medium, thick) What's its length? Understanding your hair type will help you choose the right tools and techniques.
Essential Tools:
- Sharp Hair Cutting Scissors: These are crucial. Dull scissors will cause split ends and an uneven cut. Invest in a good pair designed specifically for hair. Don't use household scissors!
- Hair Clips: Useful for sectioning your hair.
- Wide-Toothed Comb: For detangling and creating clean sections.
- Spray Bottle: Filled with water to keep your hair damp and manageable.
- Handheld Mirror (optional but helpful): For viewing the back of your head.
Step-by-Step Guide to Trimming Your Own Hair
This guide focuses on trimming the ends, ideal for maintaining a consistent style. For more significant changes, it's best to consult a professional hairstylist.
Step 1: Prepare Your Hair
Wash and condition your hair. Once it’s towel-dried, comb it thoroughly to remove any tangles. Lightly dampen your hair with a spray bottle; this makes it easier to manage.
Step 2: Section Your Hair
This is incredibly important for an even trim. Use hair clips to divide your hair into manageable sections. For long hair, you might need multiple sections. Consider parting your hair down the middle and then into sections from ear to ear.
Step 3: Begin Trimming
Start with a small section. Hold the hair taut between your fingers, using your index and middle fingers to determine the length you want to remove. Trim only small amounts at a time (1/4 inch or less). It's much easier to take off more hair than to put it back! Use small, controlled snips, aiming to cut straight across.
Step 4: Repeat Across All Sections
Continue section by section, following the same technique. Regularly check your work in a mirror to ensure evenness. If you're unsure, it's always better to err on the side of caution and trim less.
Step 5: The Finishing Touches
Once you've trimmed all sections, gently comb your hair and check for any uneven spots. Make any necessary minor adjustments. Avoid over-trimming at this stage.
Tips for Different Hair Types
- Fine Hair: Be extra cautious, trimming less to avoid thinning your hair.
- Thick Hair: You might need to take smaller sections to ensure a clean cut.
- Curly Hair: Trimming curly hair requires a different approach. It's best to trim it while it's dry to see the natural curl pattern and avoid removing too much length.
When To Seek Professional Help
While trimming your own hair can be convenient, some situations necessitate a professional:
- Significant Style Changes: Major haircuts, like bangs or layers, should be done by a professional hairstylist.
- Complex Cuts: If your hair is layered or styled in a complex way, DIY trimming is likely to lead to uneven results.
- Unsure of Your Skills: If you're not confident in your ability to trim your hair evenly, it's best to leave it to the experts.
By following these steps and practicing patience, you can successfully trim your own hair at home, saving money and time. Remember, perfect results take practice, so don't get discouraged if your first attempt isn't flawless.
