How to Turn Off Windows Defender: A Comprehensive Guide
Windows Defender is Microsoft's built-in antivirus, offering essential protection against malware. While generally reliable, there might be situations where you need to temporarily disable it. However, we strongly advise against permanently disabling Windows Defender. Leaving your system unprotected significantly increases your risk of malware infection. This guide details how to temporarily disable Windows Defender for specific situations, emphasizing the importance of re-enabling it afterward.
Understanding the Risks of Disabling Windows Defender
Before proceeding, it's crucial to understand the risks associated with disabling your antivirus software. Without real-time protection, your system becomes vulnerable to:
- Viruses: Malicious programs designed to damage your system or steal data.
- Spyware: Software that secretly monitors your online activity and gathers personal information.
- Ransomware: Software that encrypts your files and demands a ransom for their release.
- Trojans: Programs disguised as legitimate software that can perform malicious actions.
Disabling Windows Defender should only be considered a temporary measure for specific troubleshooting or software compatibility issues. Always re-enable it as soon as possible.
Methods for Temporarily Disabling Windows Defender
There are several ways to temporarily disable Windows Defender, depending on your Windows version and needs:
Method 1: Using the Windows Security App (Windows 10 and 11)
This is the recommended method for most users.
- Open Windows Security: Search for "Windows Security" in the Windows search bar and open the app.
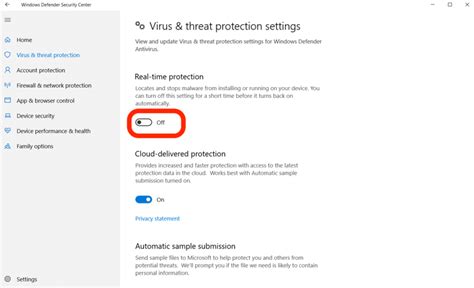
- Navigate to Virus & threat protection: Click on "Virus & threat protection."
- Manage settings: Click on "Virus & threat protection settings."
- Turn off real-time protection: Toggle the switch for "Real-time protection" to the "Off" position. You'll likely be prompted to confirm.
To re-enable: Simply toggle the switch back to the "On" position.
Method 2: Using the Group Policy Editor (Windows Pro/Enterprise Editions)
This method is more advanced and only available on Windows Professional and Enterprise editions.
- Open Group Policy Editor: Press
Win + R, typegpedit.msc, and press Enter. - Navigate to Windows Defender: Go to
Computer Configuration > Administrative Templates > Windows Components > Windows Defender Antivirus. - Disable Real-time Protection: Double-click on "Turn off Windows Defender Antivirus." Select "Enabled" and click "OK."
To re-enable: Return to the same location and select "Not Configured" or "Disabled," then click "OK."
Method 3: Using the Registry Editor (Advanced Users Only)
This method is for advanced users only and carries a higher risk of system instability if not done correctly. Proceed with caution.
(This method is not recommended and should only be attempted by experienced users. Incorrectly modifying the registry can lead to serious system problems.)
Important Considerations
- Alternative Antivirus: If you disable Windows Defender, consider installing a reputable third-party antivirus program to maintain protection.
- Re-enable Immediately: As soon as you've finished the task requiring Windows Defender to be disabled, re-enable it immediately.
- System Updates: Keeping your Windows operating system updated is crucial for security. Regular updates often include important security patches.
This comprehensive guide provides multiple methods for temporarily disabling Windows Defender. Remember to prioritize your system's security and re-enable the protection as soon as possible after completing your task. Ignoring these precautions leaves your computer exposed to significant risks.
