

Introduction: Vanishing Act – Taking Control of Your Instagram Presence
In today’s hyper-connected world, the desire for privacy can feel like a luxury. Even on social media platforms designed for sharing, there are times when you’d rather observe than be observed. Instagram, with its vibrant video content and real-time updates, is no exception. The active status feature, while helpful for knowing when friends are online, can also feel like a constant spotlight, broadcasting your presence to everyone in your network. But what if you could slip into the shadows, browse reels, and watch stories without anyone knowing you’re online? The good news is, you can! This comprehensive guide will walk you through the simple steps to turn off your active status on Instagram video, allowing you to enjoy the platform with a newfound sense of privacy.
We’ll explore why you might want to hide your activity, the different ways to disable the active status feature, and answer some frequently asked questions to ensure you have complete control over your online presence. Whether you’re looking to avoid unwanted interactions, maintain a low profile, or simply enjoy some quiet browsing, mastering this feature will empower you to curate your Instagram experience on your own terms.
Why Go Invisible? The Benefits of Turning Off Active Status
Before diving into the how-to, let’s consider the ‘why.’ Why would someone want to hide their active status on Instagram? The reasons are varied and often personal:
- Avoiding Unwanted Interactions: Sometimes, you just want to scroll through Instagram without being bombarded with messages. Turning off your active status can prevent people from knowing you’re online and feeling obligated to start a conversation.
- Maintaining Privacy: Not everyone needs to know when you’re online. Perhaps you’re using Instagram for research or simply enjoying some downtime, and you don’t want to broadcast your availability to everyone.
- Avoiding Pressure to Respond: Seeing that someone is online can create an expectation of immediate response. By hiding your active status, you can respond to messages at your own pace, without feeling pressured to reply instantly.
- Reducing Social Anxiety: For some, the constant awareness of being observed online can be anxiety-inducing. Turning off active status can alleviate this anxiety and allow for more relaxed browsing.
- Strategic Advantage: In some professional contexts, you might want to observe competitors or monitor industry trends without revealing your presence.
Ultimately, the decision to turn off active status is a personal one. It’s about reclaiming control over your online presence and tailoring your Instagram experience to your individual needs and preferences.
The Step-by-Step Guide: Hiding Your Active Status on Instagram Video
Turning off your active status on Instagram is a straightforward process. Here’s a step-by-step guide for both iOS and Android devices:
Method 1: Turning Off Activity Status for All Accounts
- Open Instagram: Launch the Instagram app on your smartphone or tablet.
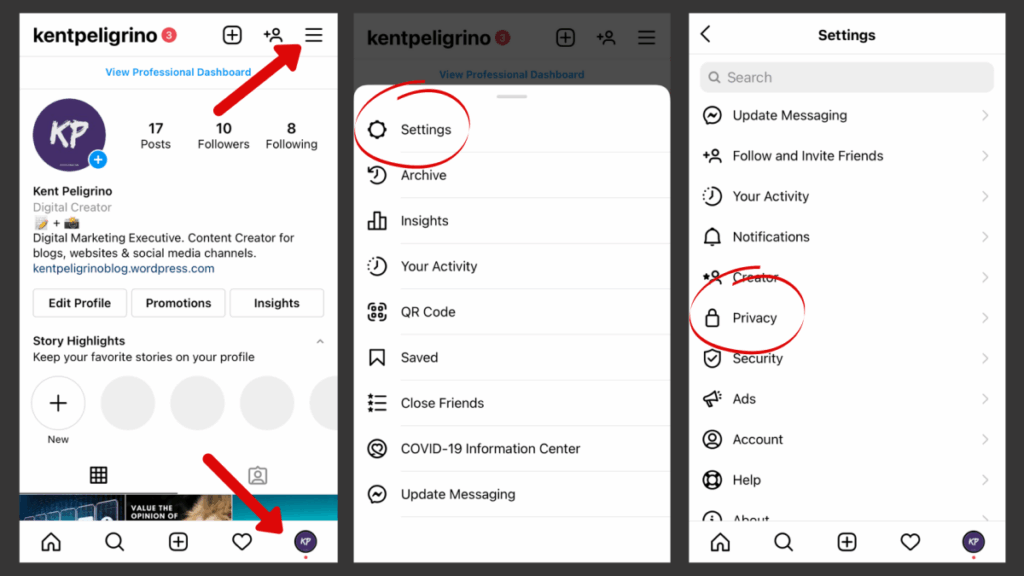
- Go to Your Profile: Tap on your profile picture in the bottom right corner of the screen.
- Access the Menu: Tap the three horizontal lines (hamburger menu) in the top right corner of your profile page.
- Select Settings and Privacy: In the menu that appears, tap on “Settings and privacy.”
- Find “Messages and story replies”: Scroll down until you find this option and tap on it.
- Tap “Show activity status”: This will take you to the activity status settings.
- Toggle the Switch: Toggle the “Show activity status” switch to the off position (it should turn grey).
That’s it! Once you’ve toggled the switch, your active status will be hidden from all of your followers. You will also no longer be able to see the activity status of other accounts.
Method 2: Hiding Activity Status for Specific Accounts (Indirectly)
Instagram doesn’t offer a direct way to hide your activity status from specific accounts. However, there are a couple of indirect methods you can use to achieve a similar result:
- Restricting Accounts: Restricting an account limits their ability to interact with you. They won’t be able to see when you’re online, and their comments and messages will be filtered. To restrict an account, go to their profile, tap the three dots in the top right corner, and select “Restrict.”
- Blocking Accounts: Blocking an account completely prevents them from seeing your profile or interacting with you in any way. To block an account, go to their profile, tap the three dots in the top right corner, and select “Block.”
Keep in mind that these methods are more extreme than simply turning off your active status, and they will affect your interactions with the targeted accounts.
Understanding the Implications: What Happens When You Hide Your Active Status?
Turning off your active status on Instagram has a few key implications:
- You Become Invisible: Your followers will no longer be able to see when you’re online or when you were last active.
- You Lose Visibility of Others: You will also lose the ability to see the active status of other accounts. This is a reciprocal feature; you can’t hide your own status while still seeing everyone else’s.
- Direct Messages Are Unaffected: Turning off active status does not affect direct messages. People can still send you messages, and you can still respond to them.
- Story Views Are Unaffected: Your story views will still be visible to the account that posted the story. Hiding your active status does not make you anonymous when viewing stories.
It’s important to be aware of these implications before turning off your active status, as they may affect your overall Instagram experience.
Troubleshooting: Common Issues and Solutions
While turning off active status is generally a simple process, you may encounter some issues. Here are some common problems and their solutions:
- The “Show activity status” switch is greyed out: This usually indicates a temporary glitch. Try closing and reopening the Instagram app, or restarting your device.
- The changes don’t seem to be taking effect: It may take a few minutes for the changes to propagate across Instagram’s servers. Try waiting a few minutes and then checking again.
- I can still see the active status of some accounts: Make sure you’ve completely toggled the “Show activity status” switch to the off position. If you’re still seeing the active status of some accounts, it’s possible that they haven’t turned off their own active status.
If you’re still experiencing issues, you can try contacting Instagram’s support team for assistance.
Advanced Tips and Tricks for Instagram Privacy
Beyond turning off active status, there are several other ways to enhance your privacy on Instagram:
- Control Who Can Follow You: Make your account private to control who can see your posts and stories. To do this, go to your profile, tap the three horizontal lines, select “Settings and privacy”, then “Account privacy”, and toggle the “Private account” switch to the on position.
- Manage Your Followers List: Remove followers you don’t want to have access to your content. To remove a follower, go to your profile, tap on “Followers”, and then tap “Remove” next to the follower you want to remove.
- Adjust Story Settings: Customize who can see your stories. You can hide your stories from specific accounts, or share them only with your close friends list. To adjust your story settings, go to your profile, tap the three horizontal lines, select “Settings and privacy”, then “Story”, and customize the settings to your liking.
- Review Tagging and Mentions: Control who can tag you in photos and videos, and who can mention you in their stories or posts. To adjust these settings, go to your profile, tap the three horizontal lines, select “Settings and privacy”, then “Tags and mentions”.
- Use the “Close Friends” Feature: Share more personal content with a smaller group of trusted friends. Create a close friends list and share stories exclusively with them.
By utilizing these features, you can create a more private and curated Instagram experience.
Frequently Asked Questions (FAQs)
Q: Does turning off active status affect my ability to send and receive direct messages?
A: No, turning off active status only hides your online presence. You can still send and receive direct messages as usual.
Q: Can I still see who has viewed my stories if I turn off active status?
A: Yes, you can still see who has viewed your stories, regardless of whether you have active status turned on or off.
Q: If I turn off active status, will people know that I’ve turned it off?
A: No, Instagram does not notify people when you turn off your active status. They will simply no longer see when you’re online.
Q: Can I turn off active status for specific accounts only?
A: No, Instagram does not offer a direct way to hide your active status from specific accounts. You can either turn it off for everyone or use the restrict or block features for individual accounts.
Q: Will turning off active status affect my explore page recommendations?
A: It’s unlikely. Your Explore page recommendations are primarily based on your past activity, the accounts you follow, and the content you interact with, not your active status.
The Future of Privacy on Instagram
Instagram, like other social media platforms, is constantly evolving. As user awareness of privacy concerns grows, it’s likely that Instagram will continue to introduce new features and settings to give users more control over their online presence. Staying informed about these changes and actively managing your privacy settings is crucial for maintaining a comfortable and secure online experience.
Consider regularly reviewing your privacy settings and adjusting them to reflect your current preferences. Explore the various features available and experiment with different settings to find what works best for you.
Conclusion: Reclaiming Your Digital Space
In conclusion, turning off active status on Instagram video is a simple yet powerful way to reclaim your digital space and enjoy the platform on your own terms. Whether you’re seeking privacy, avoiding unwanted interactions, or simply wanting to browse in peace, mastering this feature will empower you to curate your Instagram experience and maintain control over your online presence.
By following the steps outlined in this guide, you can easily hide your active status and enjoy a more private and personalized Instagram experience. Remember to regularly review your privacy settings and explore the various features available to you. Take control of your digital footprint and create an online environment that feels comfortable and secure.
So go ahead, embrace stealth mode, and enjoy Instagram without the constant spotlight. Your privacy is your right, and Instagram provides the tools to exercise it.
