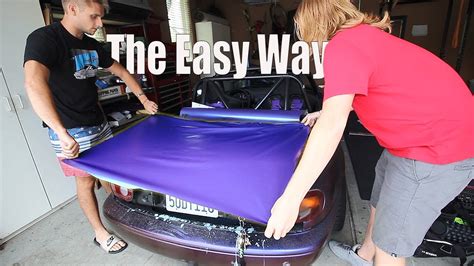
How To Wrap a Car: A Comprehensive Guide for Beginners
Wrapping your car is a fantastic way to personalize its look, protect its paint, and even increase its resale value. But before you dive in, it's crucial to understand the process. This comprehensive guide will walk you through everything you need to know about how to wrap a car, from preparation to finishing touches.
1. Planning and Preparation: Laying the Foundation for Success
Before you even think about touching your car with vinyl, meticulous planning is key. This stage will significantly impact the final result and prevent costly mistakes.
Essential Materials:
- Vinyl Wrap: Choose a high-quality vinyl wrap that matches your desired look and finish. Consider factors like color, texture, and durability. Research different brands and read reviews before committing to a purchase.
- Heat Gun: A crucial tool for manipulating the vinyl and ensuring a smooth, wrinkle-free finish.
- Squeegee: Used to smooth out air bubbles and ensure proper adhesion. A felt-edged squeegee is ideal to prevent scratching.
- Measuring Tape & Ruler: Accurate measurements are paramount for cutting the vinyl to the right size.
- Utility Knife/Razor Blade: Sharp blades are essential for precise cuts. Use fresh blades for the best results.
- Cutting Mat: Protects your work surface and provides a stable base for cutting.
- Microfiber Cloths: Used for cleaning the car and smoothing the vinyl.
- Isopropyl Alcohol (IPA): Used for cleaning the car's surface to ensure proper adhesion.
- Primer (Optional): A primer can improve adhesion, particularly on textured surfaces.
Preparing Your Car:
- Thorough Cleaning: Wash your car meticulously, removing all dirt, debris, and contaminants. Use a degreaser to ensure a completely clean surface.
- Surface Inspection: Carefully inspect your car's paint for any chips, scratches, or imperfections. Repair these beforehand for a flawless wrap.
- Seam Removal: Remove any existing trim pieces or moldings that may interfere with the wrap.
- Masking: Carefully mask areas you don't want to be wrapped, such as windows, lights, and handles.
2. Applying the Vinyl Wrap: A Step-by-Step Guide
This is where the precision and patience come in. Take your time, and don't rush the process.
Starting the Wrap:
Begin with a relatively flat panel, like the hood or roof. This will allow you to practice your technique before moving onto more complex areas.
Cutting and Positioning:
Measure the panel carefully and cut the vinyl slightly larger than needed. Position the vinyl, ensuring it's aligned correctly. Use your squeegee to smooth out the vinyl, working from the center outwards to expel air bubbles.
Using the Heat Gun:
The heat gun is crucial for stretching and molding the vinyl to conform to curves and edges. Use low heat and move the gun constantly to avoid burning the vinyl.
Working Around Complex Areas:
Areas like door handles, mirrors, and bumpers require extra care. Use small pieces of vinyl and carefully work them around these areas, ensuring a clean finish.
Trimming Excess Vinyl:
Once the vinyl is fully adhered, use a sharp utility knife to trim away any excess material. Be careful not to cut into the wrapped surface.
3. Finishing Touches and Aftercare
After completing the wrapping process, there are a few final steps to ensure its longevity and appearance.
Inspection and Refinement:
Carefully inspect the entire wrap for any imperfections, air bubbles, or creases. Address these issues immediately before they become more difficult to fix.
Removing Masking Tape:
Carefully remove the masking tape, ensuring it doesn't pull up any of the vinyl.
Cleaning and Protection:
Clean the wrapped surface with a microfiber cloth and appropriate cleaner, removing any fingerprints or smudges. Consider applying a sealant to protect the wrap from UV damage and scratches.
4. When to Seek Professional Help
While a DIY car wrap is achievable, it's a challenging project. If you lack experience or confidence, consider seeking professional help. A professional wrap will ensure a higher quality result, with less risk of mistakes.
Wrapping your car is a rewarding experience, but it demands patience, precision, and attention to detail. By following this comprehensive guide and practicing safe techniques, you can transform your vehicle's look and enjoy a unique and personalized ride. Remember to always prioritize safety and take your time to achieve a professional finish.
