How To Write Checks: A Simple Guide
Writing checks might seem like an outdated skill in our digital age, but understanding how to do so remains surprisingly relevant. Whether you're managing a small business, paying bills, or simply prefer a tangible record of your transactions, knowing how to write a check correctly is a valuable skill. This guide provides a step-by-step walkthrough, ensuring you can confidently handle your check writing needs.
Understanding Check Components
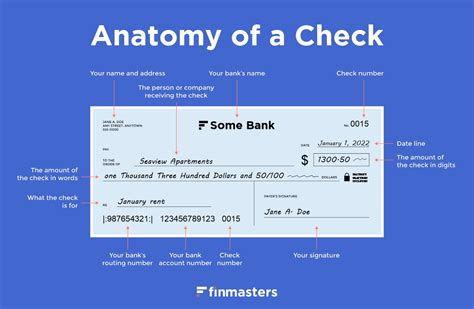
Before diving into the writing process, let's familiarize ourselves with the key components of a check:
- Your Name and Address: Located at the top left, this section clearly identifies the account holder.
- Check Number: A unique number assigned to each check, found in the upper right corner. This is crucial for tracking and reconciliation.
- Date: Write the date you're issuing the check in the upper right-hand corner. This helps with record-keeping.
- Pay to the Order Of: This line is where you write the name of the person or business you're paying. Be precise and avoid abbreviations.
- Amount in Numeric Form: Write the numerical value of the check in the box provided. This is critical for preventing fraud.
- Amount in Written Form: Write out the amount in words on the corresponding line. This acts as a double check against errors and alteration. Always start with the dollar amount. For example: "Thirty-five and 00/100 Dollars". Spell out the cents as well.
- Memo: This optional section is for adding details about the payment's purpose, such as "Rent Payment" or "Invoice #1234." This improves your accounting and record keeping.
- Your Signature: Sign the check in the lower right-hand corner. This is what validates the check.
- Your Account Number: Located at the bottom of the check, this number is crucial for processing the check.
- Bank's Routing Number: Usually located at the bottom left, this number identifies your bank.
Step-by-Step Guide to Writing a Check
Let's break down the process:
-
Date the Check: Write the current date in the upper right corner.
-
Pay to the Order Of: Write the name of the payee (the person or business receiving the payment) clearly and accurately. Avoid using nicknames or abbreviations.
-
Fill in the Numerical Amount: Enter the amount of the check in numbers in the box provided. Make sure it aligns with the written amount to avoid discrepancies.
-
Write the Amount in Words: Write the amount of the check in words on the line below. Start with the dollar amount, followed by "and" and the cents. For example, $35.00 would be written as "Thirty-five and 00/100 Dollars."
-
Memo (Optional): Add a brief description of the payment's purpose in the memo section.
-
Sign the Check: Sign the check in the designated area. Your signature needs to match the one on file with your bank.
-
Double-Check: Before detaching the check, review all the information carefully for accuracy.
Common Mistakes to Avoid
- Mismatched Amounts: Ensure the numerical and written amounts match precisely. Any discrepancy can lead to delays or rejection of the check.
- Spelling Errors: Double-check the payee's name for correct spelling. Incorrect spelling might delay or prevent payment.
- Forgetting to Sign: A check without a signature is invalid.
- Using Abbreviations: Write out full names and avoid abbreviations to ensure clarity.
Beyond the Basics: Protecting Yourself
- Keep your checks secure: Store checks in a safe place to prevent theft or loss.
- Use checkbook registers: Maintain a detailed record of all your check transactions for accurate budgeting and accounting.
- Reconcile your bank statements: Regularly compare your checkbook register to your bank statement to identify any discrepancies.
Mastering the art of writing checks might seem old-fashioned, but it's a practical skill that retains its usefulness. By following these steps and avoiding common mistakes, you can confidently and accurately handle your financial transactions, maintaining a clear and organized record of your payments.
