

Mastering Checkboxes on Mac Excel: A Comprehensive Guide
Microsoft Excel is a powerhouse for data management and analysis. While most people associate Excel with spreadsheets and formulas, it also offers interactive features that can significantly enhance your data entry and presentation. One such feature is the checkbox. Checkboxes in Excel provide a simple yet effective way to create interactive lists, track project progress, or manage tasks. If you’re a Mac user, this guide will provide you with a comprehensive understanding of how to insert and use checkboxes in Excel. We’ll explore everything from enabling the Developer tab to advanced techniques that will make you a checkbox pro.
Why Use Checkboxes in Excel?
Before diving into the how-to, let’s understand why you might want to use checkboxes in your Excel spreadsheets. Checkboxes offer several advantages:
- Enhanced Interactivity: Checkboxes make your spreadsheets more interactive, allowing users to directly engage with the data.
- Simplified Data Entry: Instead of typing “Yes” or “No,” users can simply click a checkbox.
- Visual Clarity: Checkboxes provide a clear visual representation of the status of an item, such as completed or pending.
- Improved User Experience: A well-designed spreadsheet with checkboxes is more intuitive and user-friendly.
- Automated Reporting: Checkbox states can be linked to formulas to automate reporting and analysis.
Imagine you’re managing a project with multiple tasks. Using checkboxes, you can easily track which tasks are completed, which are in progress, and which are yet to start. Or, perhaps you’re creating a checklist for a training program; checkboxes allow participants to mark off completed modules, providing an instant visual representation of their progress.
Prerequisites: Enabling the Developer Tab
Before you can start inserting checkboxes, you need to ensure the Developer tab is visible in your Excel ribbon. By default, this tab is hidden. Here’s how to enable it on a Mac:
- Open Excel: Launch Microsoft Excel on your Mac.
- Go to Excel Preferences: In the top menu, click on “Excel” and select “Preferences.”
- Show Developer Tab: In the Excel Preferences window, click on “Ribbon & Toolbar.”
- Check the Developer Box: On the right-hand side, under “Customize the Ribbon,” find “Developer” in the list of main tabs and check the box next to it.
- Save and Close: Click “Save” and close the Excel Preferences window.
Now you should see the “Developer” tab in your Excel ribbon. This tab contains all the tools you need to insert and customize checkboxes.
Inserting a Checkbox in Excel on Mac
With the Developer tab enabled, you can now insert checkboxes into your spreadsheet. Here’s how:
- Select the Cell: Click on the cell where you want to insert the checkbox.
- Go to the Developer Tab: Click on the “Developer” tab in the ribbon.
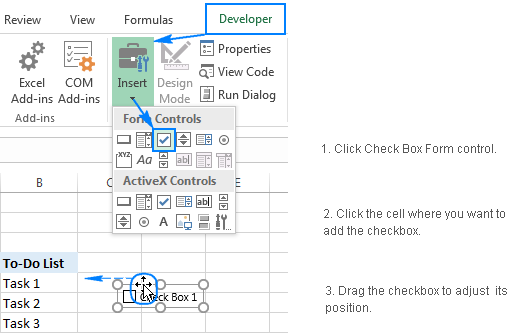
- Insert Control: In the “Controls” group, click on “Insert.”
- Choose Checkbox: Under “Form Controls,” select the checkbox icon (it looks like a small checkbox).
- Draw the Checkbox: Click and drag on the cell to draw the checkbox. You can resize and reposition it as needed.
Once you’ve drawn the checkbox, you’ll notice that it comes with default text, usually “Check Box 1.” You’ll probably want to change this to something more meaningful.
Editing the Checkbox Text
To edit the text associated with the checkbox:
- Right-Click the Checkbox: Right-click on the checkbox. If you’re using a Mac trackpad, this typically involves tapping with two fingers.
- Select “Edit Text”: From the context menu, select “Edit Text.”
- Edit the Text: The text will become editable. You can now type in the desired text, such as “Completed,” “In Progress,” or a specific task name.
- Click Outside the Checkbox: Once you’re done editing, click outside the checkbox to save the changes.
Ensure the text is clear and concise, providing users with a clear understanding of what the checkbox represents. For example, if you’re tracking project tasks, the text might be the name of the task.
Formatting the Checkbox
You can format the checkbox to better fit your spreadsheet’s design. While the formatting options are somewhat limited, you can still make adjustments to improve its appearance.
- Right-Click the Checkbox: Right-click on the checkbox.
- Select “Format Control”: From the context menu, select “Format Control.”
- Adjust Properties: In the “Format Control” window, you can adjust properties such as the checkbox size, position, and cell protection.
Unfortunately, you cannot directly change the color or font of the checkbox text through the “Format Control” window. However, you can adjust the size and position to ensure it aligns properly with the cell and text.
Linking Checkboxes to Cells
The real power of checkboxes comes from linking them to cells. When a checkbox is checked, it can display a value of TRUE in a linked cell; when unchecked, it displays FALSE. This allows you to use the checkbox state in formulas and calculations.
- Right-Click the Checkbox: Right-click on the checkbox.
- Select “Format Control”: From the context menu, select “Format Control.”
- Control Tab: In the “Format Control” window, go to the “Control” tab.
- Cell Link: In the “Cell Link” field, enter the cell reference where you want to display the TRUE/FALSE value (e.g., A1). You can also click the button next to the field and then click on the desired cell.
- Click OK: Click “OK” to save the changes.
Now, when you check or uncheck the checkbox, the linked cell will display TRUE or FALSE, respectively. You can use this value in other formulas to perform calculations or conditional formatting.
Using Checkboxes in Formulas
Linking checkboxes to cells opens up a world of possibilities for using them in formulas. Here are a few examples:
Counting Checked Checkboxes
You can use the COUNTIF function to count the number of checked checkboxes in a range. For example, if you have checkboxes linked to cells A1:A10, you can use the following formula to count the number of TRUE values (i.e., checked checkboxes):
=COUNTIF(A1:A10, TRUE)This formula will return the number of checkboxes that are checked.
Conditional Formatting Based on Checkbox State
You can use conditional formatting to change the appearance of a cell based on the state of a checkbox. For example, you can highlight a row when a checkbox is checked to indicate that a task is completed.
- Select the Range: Select the range of cells you want to format (e.g., A1:C1).
- Go to Conditional Formatting: On the “Home” tab, click on “Conditional Formatting” in the “Styles” group.
- New Rule: Select “New Rule.”
- Use a Formula: Select “Use a formula to determine which cells to format.”
- Enter the Formula: Enter a formula that references the linked cell. For example, if the checkbox is linked to cell D1, you might enter the formula “=$D$1=TRUE”.
- Format: Click the “Format” button and choose the desired formatting (e.g., fill color, font style).
- Click OK: Click “OK” to save the rule.
Now, when the checkbox is checked, the selected range will be formatted according to the rule you defined.
Creating Dynamic Charts
Checkboxes can be used to create dynamic charts that update based on the state of the checkboxes. For example, you can create a chart that shows the progress of a project, with different segments of the chart appearing or disappearing based on whether the corresponding tasks are completed.
- Link Checkboxes to Cells: Link checkboxes to cells as described earlier.
- Create Helper Columns: Create helper columns that contain formulas that return data based on the state of the checkboxes. For example, if you want to show the percentage of completed tasks, you might create a formula that calculates the percentage based on the number of checked checkboxes.
- Create the Chart: Create a chart using the data in the helper columns.
As you check and uncheck the checkboxes, the data in the helper columns will update, and the chart will dynamically change to reflect the new data.
Copying Checkboxes
If you need to insert multiple checkboxes, you don’t have to repeat the process for each one. You can copy and paste checkboxes just like any other cell content.
- Select the Cell: Select the cell containing the checkbox.
- Copy: Press Command+C (or right-click and select “Copy”).
- Select the Destination Cells: Select the cells where you want to paste the checkbox.
- Paste: Press Command+V (or right-click and select “Paste”).
However, keep in mind that copying checkboxes will also copy the cell link. If you want each checkbox to be linked to a different cell, you’ll need to manually update the cell link for each checkbox.
Troubleshooting Common Issues
While using checkboxes in Excel is generally straightforward, you might encounter some common issues. Here are a few troubleshooting tips:
- Checkboxes Not Working: Ensure the Developer tab is enabled. If the checkboxes are not responding when you click on them, make sure they are properly inserted as form controls and not just images.
- Cell Link Issues: Double-check the cell link in the “Format Control” window. Make sure the cell reference is correct and that the linked cell is not protected.
- Formatting Problems: If you’re having trouble formatting the checkbox, remember that the formatting options are limited. You can adjust the size and position, but you cannot directly change the color or font of the text.
- Copying Issues: When copying checkboxes, be aware that the cell link will also be copied. Update the cell link for each checkbox if needed.
Advanced Techniques
Once you’ve mastered the basics of using checkboxes, you can explore some advanced techniques to further enhance your spreadsheets.
Using Option Buttons and Group Boxes
In addition to checkboxes, Excel also offers option buttons (also known as radio buttons) and group boxes. Option buttons allow users to select one option from a group of options, while group boxes are used to group related controls together.
To insert an option button or group box, go to the “Developer” tab, click on “Insert,” and select the desired control under “Form Controls.”
Creating Dynamic Drop-Down Lists
While not directly related to checkboxes, dynamic drop-down lists can be used in conjunction with checkboxes to create more interactive and user-friendly spreadsheets. Dynamic drop-down lists allow users to select from a list of options that changes based on the state of a checkbox.
To create a dynamic drop-down list, you can use the INDIRECT function in combination with named ranges. The INDIRECT function allows you to reference a range of cells indirectly, based on the value of another cell (such as the linked cell of a checkbox).
Using VBA for Advanced Customization
For advanced users, VBA (Visual Basic for Applications) can be used to customize the behavior of checkboxes and create more complex interactions. VBA allows you to write code that responds to checkbox events, such as when a checkbox is checked or unchecked.
To access the VBA editor, go to the “Developer” tab and click on “Visual Basic.” From there, you can write code that interacts with the checkboxes and other elements of your spreadsheet.
Best Practices for Using Checkboxes
To ensure your spreadsheets with checkboxes are effective and user-friendly, follow these best practices:
- Use Clear and Concise Text: Make sure the text associated with each checkbox is clear and concise, providing users with a clear understanding of what the checkbox represents.
- Align Checkboxes Properly: Align checkboxes properly with the cells and text to ensure a clean and professional look.
- Use Consistent Formatting: Use consistent formatting throughout your spreadsheet to maintain a cohesive design.
- Provide Instructions: Provide clear instructions on how to use the checkboxes, especially if the spreadsheet is intended for users who are not familiar with Excel.
- Test Thoroughly: Test your spreadsheet thoroughly to ensure the checkboxes are working as expected and that the formulas and calculations are accurate.
Conclusion
Checkboxes are a powerful tool for enhancing the interactivity and usability of your Excel spreadsheets on a Mac. By enabling the Developer tab, inserting checkboxes, linking them to cells, and using them in formulas, you can create dynamic and user-friendly spreadsheets that streamline data entry, track progress, and automate reporting. Whether you’re managing projects, creating checklists, or analyzing data, checkboxes can help you work more efficiently and effectively in Excel. So, go ahead and experiment with checkboxes in your spreadsheets and discover the many ways they can improve your workflow. With a little practice, you’ll become a checkbox pro in no time!
