

Introduction: Unleash the Power of Screen Recording on Windows 11 with OBS Studio
In today’s digital age, screen recording has become an indispensable skill. Whether you’re creating tutorials, recording gameplay, presenting demonstrations, or simply capturing important moments on your screen, the ability to record your screen effectively is paramount. Windows 11, the latest iteration of Microsoft’s operating system, offers native screen recording capabilities. However, for users seeking advanced features, customization options, and professional-grade results, OBS (Open Broadcaster Software) Studio emerges as the ultimate solution.
OBS Studio is a free, open-source software suite for video recording and live streaming. It is available for Windows, macOS, and Linux operating systems. It’s a powerhouse tool, widely used by gamers, educators, content creators, and professionals alike. This comprehensive guide will walk you through the process of recording your screen on Windows 11 using OBS Studio, covering everything from installation and configuration to advanced techniques and troubleshooting tips. We’ll explore the depths of OBS Studio, ensuring you harness its full potential for your screen recording endeavors.
Why Choose OBS Studio for Screen Recording on Windows 11?
Before diving into the ‘how-to,’ let’s address the ‘why.’ Windows 11 offers a built-in screen recorder, accessible via the Windows key + Alt + R shortcut. So, why opt for OBS Studio? The answer lies in its unparalleled versatility and feature set.
Unmatched Customization
OBS Studio provides granular control over every aspect of your recording. You can customize video resolution, frame rate, audio sources, and more. This level of customization is simply not available with the built-in Windows screen recorder.
Multiple Sources and Scenes
OBS Studio allows you to incorporate multiple sources into your recordings, such as webcam feeds, application windows, and even other video files. You can also create scenes, which are pre-configured arrangements of sources. This feature is particularly useful for creating professional-looking tutorials and presentations.
Advanced Audio Control
OBS Studio offers advanced audio mixing capabilities. You can adjust the volume of individual audio sources, apply filters such as noise suppression and gain, and even monitor your audio levels in real-time. This ensures that your recordings sound crystal clear.
Live Streaming Capabilities
While this guide focuses on screen recording, it’s worth noting that OBS Studio is also a powerful live streaming tool. You can stream your screen directly to platforms like YouTube, Twitch, and Facebook Live. This makes OBS Studio a versatile tool for content creators who want to both record and stream their content.
Extensibility
OBS Studio supports a wide range of plugins that extend its functionality. These plugins can add features such as advanced transitions, automated scene switching, and even integration with third-party services.
Cost-Effective
Perhaps the most compelling reason to choose OBS Studio is that it’s completely free. There are no hidden costs or subscription fees. You get access to all of its features without spending a dime. This is especially beneficial for beginners or those on a tight budget.
Step-by-Step Guide: Recording Your Screen on Windows 11 with OBS Studio
Now that you understand the benefits of using OBS Studio, let’s walk through the process of recording your screen on Windows 11, step-by-step.
Step 1: Download and Install OBS Studio
The first step is to download and install OBS Studio. You can download the latest version of OBS Studio from the official website: obsproject.com. Make sure you download the version for Windows.
Once the download is complete, double-click the installer file to launch the installation wizard. Follow the on-screen instructions to install OBS Studio. It’s generally recommended to install OBS Studio in the default location.
Step 2: Configure OBS Studio for Screen Recording
After installing OBS Studio, launch the application. The first time you launch OBS Studio, you’ll be prompted to run the Auto-Configuration Wizard. This wizard will help you configure OBS Studio for your specific hardware and use case. However, for more granular control, we recommend configuring OBS Studio manually.
Here’s how to configure OBS Studio for screen recording:
- Create a New Scene: In the main OBS Studio window, you’ll see a ‘Scenes’ panel in the bottom-left corner. Click the ‘+’ button to add a new scene. Give your scene a descriptive name, such as ‘Screen Recording.’
- Add a Source: In the ‘Sources’ panel, click the ‘+’ button to add a new source. Select ‘Display Capture’ to capture your entire screen. Alternatively, you can select ‘Window Capture’ to capture a specific window. If you have multiple monitors, select the monitor you want to record.
- Configure Audio Input: To record audio, you need to add an audio input source. In the ‘Sources’ panel, click the ‘+’ button and select ‘Audio Input Capture.’ Select your microphone from the list of available devices. You can also add ‘Audio Output Capture’ to record system sounds.
- Adjust Audio Levels: In the ‘Audio Mixer’ panel, you’ll see the audio levels for your microphone and system audio. Adjust these levels to ensure that your audio is clear and balanced. You can also mute individual audio sources by clicking the speaker icon.
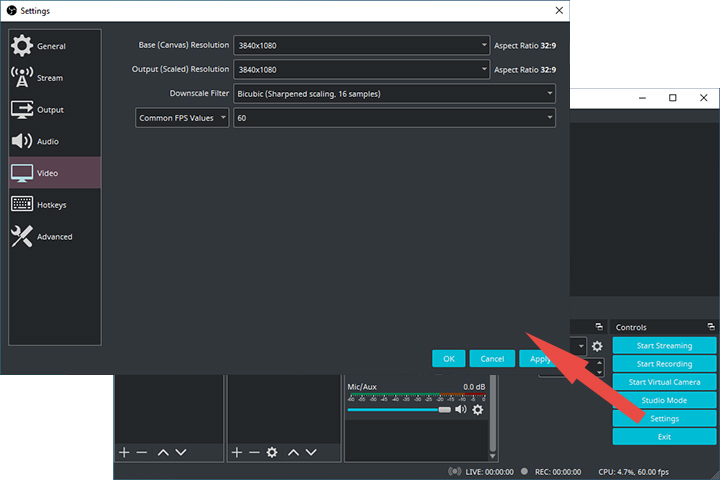
- Configure Video Settings: Go to ‘File’ > ‘Settings’ > ‘Video’. Here, you can configure your video resolution, frame rate, and other video settings. For screen recording, a resolution of 1920×1080 (1080p) and a frame rate of 30fps are generally recommended. However, you can adjust these settings based on your specific needs.
- Configure Output Settings: Go to ‘File’ > ‘Settings’ > ‘Output’. Here, you can configure your recording format, video encoder, and audio encoder. For recording, the MP4 format and the H.264 video encoder are generally recommended. You can also adjust the bitrate to control the quality of your recordings. A higher bitrate will result in better quality but will also increase the file size.
Step 3: Start and Stop Recording
Once you’ve configured OBS Studio, you’re ready to start recording. To start recording, click the ‘Start Recording’ button in the main OBS Studio window. To stop recording, click the ‘Stop Recording’ button.
By default, your recordings will be saved in the ‘Videos’ folder in your user directory. You can change the output folder in the ‘Output’ settings.
Advanced Techniques for Screen Recording with OBS Studio
Now that you know the basics of screen recording with OBS Studio, let’s explore some advanced techniques that can help you create even better recordings.
Using Hotkeys
OBS Studio allows you to assign hotkeys to various actions, such as starting and stopping recording, muting audio sources, and switching scenes. This can be incredibly useful for quickly controlling your recordings without having to switch back to the OBS Studio window.
To configure hotkeys, go to ‘File’ > ‘Settings’ > ‘Hotkeys’. Here, you can assign hotkeys to any action in OBS Studio. For example, you can assign the ‘Ctrl + Shift + R’ hotkey to start and stop recording.
Adding Overlays
Overlays are graphics that are displayed on top of your screen recording. They can be used to add branding, watermarks, or other visual elements to your recordings. OBS Studio allows you to add overlays by adding an ‘Image’ or ‘Text (GDI+)’ source to your scene.
To add an overlay, click the ‘+’ button in the ‘Sources’ panel and select ‘Image’ or ‘Text (GDI+)’. Select the image file or enter the text you want to display. You can then position and resize the overlay as needed.
Using Filters
Filters are effects that can be applied to audio and video sources. OBS Studio offers a wide range of filters, such as noise suppression, gain, color correction, and chroma key. These filters can be used to improve the quality of your recordings.
To add a filter, right-click on a source in the ‘Sources’ panel and select ‘Filters’. Click the ‘+’ button to add a new filter. Select the filter you want to apply and configure its settings.
Creating Multiple Scenes
As mentioned earlier, scenes are pre-configured arrangements of sources. You can create multiple scenes for different recording scenarios. For example, you can create a scene for recording your desktop, a scene for recording a specific application, and a scene for recording your webcam.
To switch between scenes, simply click on the scene you want to activate in the ‘Scenes’ panel. You can also use hotkeys to switch between scenes.
Utilizing Game Capture
If you’re recording gameplay, you can use the ‘Game Capture’ source instead of ‘Display Capture’ or ‘Window Capture’. ‘Game Capture’ is specifically designed for recording games and offers better performance and compatibility.
To use ‘Game Capture’, click the ‘+’ button in the ‘Sources’ panel and select ‘Game Capture’. Select the game you want to record from the list of available applications. You can also choose to capture any full-screen application or a specific window.
Troubleshooting Common Issues
While OBS Studio is a powerful and reliable tool, you may encounter some issues when recording your screen on Windows 11. Here are some common issues and their solutions:
Lagging or Stuttering
If your recordings are lagging or stuttering, it could be due to several factors:
- High CPU Usage: OBS Studio can be CPU-intensive, especially when recording at high resolutions and frame rates. Try reducing your resolution and frame rate to see if that improves performance. Also, close any unnecessary applications that are running in the background.
- Insufficient Hardware: If your computer doesn’t meet the minimum system requirements for OBS Studio, you may experience performance issues. Consider upgrading your CPU, GPU, or RAM.
- Incorrect Encoder Settings: The wrong encoder settings can also cause performance issues. Try using the ‘Hardware (NVENC)’ encoder if you have an NVIDIA graphics card. This encoder offloads the encoding process to your GPU, which can significantly improve performance.
Audio Issues
If you’re experiencing audio issues, such as distorted audio, low volume, or no audio at all, try the following:
- Check Your Audio Input Device: Make sure that your microphone is properly connected and selected as the audio input device in OBS Studio.
- Adjust Audio Levels: Adjust the audio levels for your microphone and system audio in the ‘Audio Mixer’ panel. Make sure that the levels are not too low or too high.
- Apply Audio Filters: Use audio filters such as noise suppression and gain to improve the quality of your audio.
Black Screen
If you’re seeing a black screen when using ‘Display Capture’ or ‘Game Capture’, try the following:
- Run OBS Studio as Administrator: Running OBS Studio as an administrator can sometimes resolve compatibility issues.
- Disable Hardware Acceleration: Disable hardware acceleration in your browser or other applications that you’re trying to record.
- Update Your Graphics Drivers: Make sure that you have the latest graphics drivers installed.
Crashing
If OBS Studio is crashing, try the following:
- Update OBS Studio: Make sure that you’re using the latest version of OBS Studio.
- Disable Plugins: Disable any plugins that you’ve installed to see if that resolves the issue.
- Reinstall OBS Studio: If all else fails, try reinstalling OBS Studio.
Tips for Creating High-Quality Screen Recordings
Here are some tips for creating high-quality screen recordings with OBS Studio:
- Plan Your Recording: Before you start recording, plan what you’re going to say and do. This will help you create a more focused and engaging recording.
- Use a Good Microphone: A good microphone is essential for creating high-quality audio. Invest in a decent USB microphone for the best results.
- Record in a Quiet Environment: Record in a quiet environment to minimize background noise.
- Use a High Resolution and Frame Rate: Record at a high resolution and frame rate to ensure that your recordings look sharp and smooth.
- Edit Your Recordings: Edit your recordings to remove any mistakes or unnecessary segments.
Conclusion: Elevate Your Screen Recording Game with OBS Studio
Recording your screen on Windows 11 with OBS Studio opens up a world of possibilities. From creating professional tutorials to capturing memorable gameplay moments, OBS Studio provides the tools and flexibility you need to create high-quality screen recordings. By following this comprehensive guide, you can master the art of screen recording with OBS Studio and unlock its full potential. Embrace the power of OBS Studio and elevate your screen recording game to the next level. Experiment with different settings, explore advanced techniques, and discover the endless possibilities that OBS Studio has to offer.
With its unmatched customization, advanced features, and free price tag, OBS Studio is the ultimate screen recording solution for Windows 11 users. So, go ahead, download OBS Studio, and start creating amazing screen recordings today!
