

Introduction: Unleashing the Power of Bulk Data Export in SQL Server
In the realm of database management, SQL Server stands as a titan, a robust and versatile platform powering countless applications worldwide. One of the essential tasks for database administrators and developers alike is the ability to extract data from SQL Server databases for various purposes, such as backups, migrations, reporting, or data warehousing. While exporting a single table is a relatively straightforward process, the challenge arises when you need to export multiple tables efficiently and effectively. This comprehensive guide dives deep into the art of exporting multiple tables in SQL Server, providing you with a range of techniques, tools, and best practices to streamline your data extraction workflows.
Imagine you are tasked with migrating a subset of your SQL Server database to a development environment. Or perhaps you need to generate a comprehensive report that requires data from several tables. Manually exporting each table individually would be a tedious and time-consuming process, prone to errors and inefficiencies. This is where the ability to export multiple tables simultaneously becomes invaluable. Whether you are a seasoned database professional or a budding SQL enthusiast, mastering this skill will significantly enhance your ability to manage and manipulate data within SQL Server.
Why Export Multiple Tables? Understanding the Use Cases
Before we delve into the technical aspects of exporting multiple tables, let’s explore some of the common scenarios where this capability proves to be indispensable:
- Data Migration: Moving data between different SQL Server instances, versions, or even to different database platforms often requires exporting multiple related tables.
- Backup and Recovery: While full database backups are crucial, exporting specific tables can be useful for creating granular backups of critical data subsets.
- Reporting and Analytics: Generating comprehensive reports often involves combining data from multiple tables. Exporting these tables allows you to analyze the data using external tools like Excel or Power BI.
- Data Warehousing: Extracting data from operational databases and loading it into a data warehouse typically involves exporting multiple tables and transforming the data for analytical purposes.
- Development and Testing: Creating a development or testing environment with a subset of production data often requires exporting specific tables to isolate and replicate the relevant data.
- Data Archiving: Moving historical data from active tables to archive tables can improve performance and reduce storage costs. Exporting the data before archiving ensures that you have a backup of the historical data.
Methods for Exporting Multiple Tables in SQL Server
SQL Server offers several methods for exporting multiple tables, each with its own advantages and disadvantages. Let’s explore the most common approaches:
1. SQL Server Management Studio (SSMS) – Tasks -> Generate Scripts
SQL Server Management Studio (SSMS) provides a graphical interface for managing SQL Server instances. One of its most useful features is the ability to generate scripts for various database objects, including tables. This method allows you to export the schema and data of multiple tables into a single SQL script file.
Steps to Export Multiple Tables using SSMS Script Generation:
- Connect to the SQL Server instance: Open SSMS and connect to the SQL Server instance containing the database you want to export.
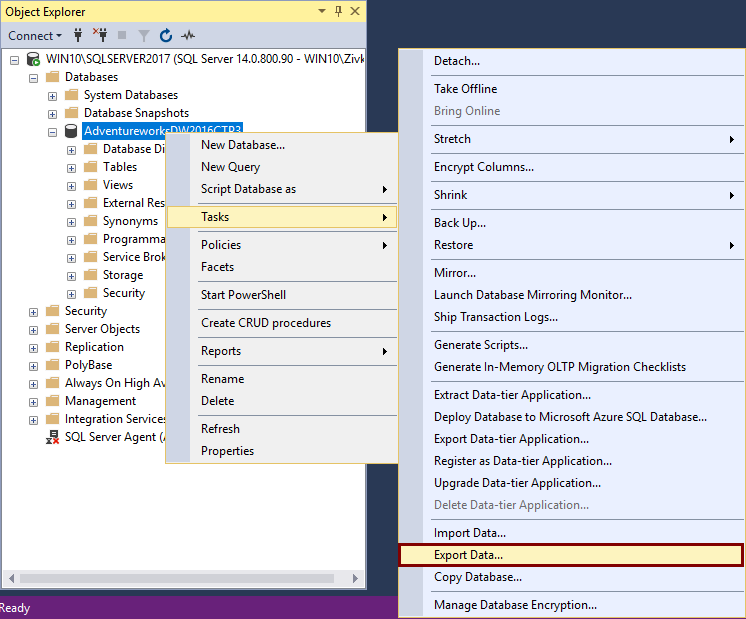
- Right-click on the database: In Object Explorer, right-click on the database and select Tasks -> Generate Scripts…
- Choose Objects: In the Generate and Publish Scripts wizard, select Select specific database objects.
- Select Tables: Check the Tables checkbox. Then, select the specific tables you want to export from the list.
- Set Scripting Options: Click the Advanced button. In the Advanced Scripting Options dialog, configure the following settings:
- Types of data to script: Select Schema and data to export both the table schema and the data.
- Script DROP and CREATE: Set to Script DROP and CREATE to include DROP TABLE and CREATE TABLE statements in the script. This is useful for recreating the tables in a different database.
- Script for server version: Choose the appropriate SQL Server version for compatibility.
- Choose Output Options: Specify where to save the generated script file (e.g., a file path or a new query window).
- Review and Generate: Review the summary of your selections and click Next to generate the script.
- Execute the Script: Once the script is generated, you can execute it against another SQL Server instance to recreate the tables and import the data.
Advantages of using SSMS Script Generation:
- Easy to use: The graphical interface makes it simple to select and configure the export process.
- Flexible: You can customize the scripting options to control which objects and data are included in the script.
- Self-contained: The generated script contains all the necessary SQL statements to recreate the tables and import the data.
Disadvantages of using SSMS Script Generation:
- Slow for large tables: Generating scripts for very large tables can be time-consuming.
- Large script files: The generated script file can become very large, especially when exporting multiple tables with a lot of data.
- Limited error handling: The script execution may stop if an error occurs during the import process.
2. bcp Utility (Bulk Copy Program)
The bcp utility is a command-line tool provided by SQL Server for bulk copying data between SQL Server tables and data files. It is a powerful and efficient tool for exporting and importing large amounts of data.
Steps to Export Multiple Tables using bcp:
- Open a command prompt: Open a command prompt or PowerShell window.
- Construct the bcp command: Use the following syntax to construct the bcp command for each table you want to export:
bcp "DatabaseName.SchemaName.TableName" out "FilePathTableName.dat" -c -t"," -S ServerName -U Username -P Password- DatabaseName.SchemaName.TableName: The fully qualified name of the table you want to export.
- “FilePathTableName.dat”: The path and filename for the output data file.
- -c: Specifies that the data should be exported in character format.
- -t”,”: Specifies that the fields should be delimited by commas. You can use a different delimiter if needed.
- -S ServerName: The name of the SQL Server instance.
- -U Username: The username for connecting to the SQL Server instance.
- -P Password: The password for the specified username.
- Execute the bcp commands: Execute the bcp command for each table you want to export.
- Create a format file (Optional): For more complex data types or specific formatting requirements, you can create a format file to define the data types and delimiters for each column.
Advantages of using bcp:
- Fast and efficient: bcp is a very fast and efficient tool for exporting large amounts of data.
- Command-line driven: bcp can be easily automated using batch scripts or PowerShell scripts.
- Flexible: You can customize the data format and delimiters using command-line options or format files.
Disadvantages of using bcp:
- Requires command-line knowledge: Using bcp requires familiarity with command-line syntax and options.
- Security concerns: Storing usernames and passwords in batch scripts can pose a security risk. Consider using integrated security or environment variables to store credentials.
- No schema export: bcp only exports the data, not the table schema. You need to export the schema separately using SSMS or other tools.
3. SQLCMD Utility
The SQLCMD utility is a command-line tool that allows you to execute SQL commands and scripts against a SQL Server instance. You can use SQLCMD to generate SELECT statements for each table and output the results to a file.
Steps to Export Multiple Tables using SQLCMD:
- Open a command prompt: Open a command prompt or PowerShell window.
- Construct the SQLCMD command: Use the following syntax to construct the SQLCMD command for each table you want to export:
sqlcmd -S ServerName -U Username -P Password -d DatabaseName -Q "SELECT * FROM SchemaName.TableName" -o "FilePathTableName.txt" -s "," -W- -S ServerName: The name of the SQL Server instance.
- -U Username: The username for connecting to the SQL Server instance.
- -P Password: The password for the specified username.
- -d DatabaseName: The name of the database.
- -Q “SELECT * FROM SchemaName.TableName”: The SQL query to execute (in this case, selecting all columns from the table).
- -o “FilePathTableName.txt”: The path and filename for the output file.
- -s “,”: Specifies that the fields should be delimited by commas.
- -W: Removes trailing spaces from the output.
- Execute the SQLCMD commands: Execute the SQLCMD command for each table you want to export.
Advantages of using SQLCMD:
- Flexible: You can use any SQL query to extract data, allowing you to filter and transform the data as needed.
- Command-line driven: SQLCMD can be easily automated using batch scripts or PowerShell scripts.
- Widely available: SQLCMD is included with SQL Server and is available on most SQL Server installations.
Disadvantages of using SQLCMD:
- Requires SQL knowledge: Using SQLCMD requires knowledge of SQL syntax and commands.
- Security concerns: Storing usernames and passwords in batch scripts can pose a security risk. Consider using integrated security or environment variables to store credentials.
- No schema export: SQLCMD only exports the data, not the table schema. You need to export the schema separately using SSMS or other tools.
4. SQL Server Integration Services (SSIS)
SQL Server Integration Services (SSIS) is a powerful ETL (Extract, Transform, Load) tool that can be used to export multiple tables from SQL Server to various destinations, such as flat files, other databases, or cloud storage. SSIS provides a graphical development environment for creating data integration packages.
Steps to Export Multiple Tables using SSIS:
- Create an SSIS package: Open SQL Server Data Tools (SSDT) or Visual Studio with the SSIS extension and create a new SSIS package.
- Add a Data Flow Task: Add a Data Flow Task to the control flow of the package.
- Add a Source Component: Inside the Data Flow Task, add an OLE DB Source component for each table you want to export. Configure each source component to connect to the SQL Server database and select the appropriate table.
- Add a Destination Component: Add a Flat File Destination component for each table you want to export. Configure each destination component to write the data to a separate flat file.
- Connect the Source and Destination Components: Connect each OLE DB Source component to its corresponding Flat File Destination component using a data flow path.
- Configure the Data Flow Paths: Configure the data flow paths to map the columns from the source tables to the columns in the destination files.
- Run the Package: Run the SSIS package to export the data from the tables to the flat files.
Advantages of using SSIS:
- Powerful and flexible: SSIS provides a wide range of data transformation and integration capabilities.
- Graphical development environment: The graphical interface makes it easy to design and develop complex data integration workflows.
- Scalable: SSIS can handle large volumes of data and can be deployed to multiple servers for parallel processing.
Disadvantages of using SSIS:
- Steep learning curve: SSIS has a steep learning curve and requires significant expertise to use effectively.
- Complex configuration: Configuring SSIS packages can be complex and time-consuming.
- Requires SQL Server Integration Services: SSIS requires a separate installation of SQL Server Integration Services.
5. Using a Cursor in T-SQL
While not the most performant method, using a cursor in T-SQL can be helpful in situations where you need to dynamically iterate through a list of tables and perform an action on each one. This approach involves creating a cursor that loops through the tables you want to export and then executes a command (like bcp or a SELECT statement) for each table.
Example T-SQL Script using a Cursor and bcp:
DECLARE @TableName VARCHAR(255)
DECLARE @SQL VARCHAR(MAX)
DECLARE TableCursor CURSOR FOR
SELECT TABLE_NAME
FROM INFORMATION_SCHEMA.TABLES
WHERE TABLE_TYPE = 'BASE TABLE' AND TABLE_CATALOG = 'YourDatabaseName'

OPEN TableCursor

FETCH NEXT FROM TableCursor INTO @TableName

WHILE @@FETCH_STATUS = 0
BEGIN
 SET @SQL = 'bcp "YourDatabaseName.dbo.' + @TableName + '" out "C:Export' + @TableName + '.dat" -c -t"," -S YourServerName -U YourUsername -P YourPassword'
 EXEC xp_cmdshell @SQL

 FETCH NEXT FROM TableCursor INTO @TableName
END

CLOSE TableCursor
DEALLOCATE TableCursor
Explanation:
- Declare Variables: Declares variables to hold the table name and the SQL command.
- Declare Cursor: Declares a cursor that selects all table names from the INFORMATION_SCHEMA.TABLES view. Modify the WHERE clause to filter the tables as needed.
- Open Cursor: Opens the cursor.
- Fetch First Row: Fetches the first table name into the @TableName variable.
- Loop Through Tables: The WHILE loop iterates through each table name fetched by the cursor.
- Construct bcp Command: Inside the loop, the @SQL variable is constructed with the bcp command for the current table. Remember to replace placeholders for database name, server name, username, and password.
- Execute bcp Command: The xp_cmdshell extended stored procedure is used to execute the bcp command. Note: xp_cmdshell needs to be enabled on the SQL Server instance. Enabling xp_cmdshell can introduce security risks, so consider the implications before enabling it.
- Fetch Next Row: Fetches the next table name into the @TableName variable.
- Close and Deallocate Cursor: After the loop finishes, the cursor is closed and deallocated.
Advantages of using a Cursor:
- Dynamic: Allows you to dynamically iterate through a list of tables based on certain criteria.
- Flexible: You can perform different actions on each table based on its properties.
Disadvantages of using a Cursor:
- Performance: Cursors are generally slower than other methods for exporting data.
- Complexity: Requires writing T-SQL code and understanding cursor syntax.
- Security: Using xp_cmdshell can introduce security risks.
Choosing the Right Method: Factors to Consider
Selecting the most appropriate method for exporting multiple tables depends on several factors:
- Data Volume: For large tables, bcp or SSIS are generally more efficient than SSMS script generation or cursors.
- Complexity: If you need to perform complex data transformations, SSIS is the best choice.
- Automation: If you need to automate the export process, bcp, SQLCMD, or SSIS are good options.
- Security: Consider the security implications of storing credentials in scripts or using xp_cmdshell.
- SQL Server Version: Some features and tools may not be available in older versions of SQL Server.
- Existing Infrastructure: If you already have SSIS installed and configured, it may be the most convenient option.
- Skillset: Choose a method that you and your team are comfortable using.
Best Practices for Exporting Multiple Tables
To ensure a smooth and efficient export process, follow these best practices:
- Plan your export: Before you start exporting tables, carefully plan which tables you need to export and how you will use the exported data.
- Test your export: Before exporting large tables, test your export process with a small subset of data to ensure that it is working correctly.
- Monitor your export: Monitor the export process to ensure that it is completing successfully and that there are no errors.
- Use appropriate delimiters: Choose delimiters that are not used in the data itself to avoid data corruption.
- Handle errors gracefully: Implement error handling mechanisms to catch and log any errors that occur during the export process.
- Secure your data: Protect your exported data by encrypting it and storing it in a secure location.
- Document your process: Document your export process so that others can understand and maintain it.
- Consider performance: Optimize your queries and scripts to minimize the impact on the SQL Server instance.
- Use transactions: When exporting related tables, consider using transactions to ensure data consistency.
- Schedule exports: For recurring exports, schedule them during off-peak hours to minimize the impact on performance.
Advanced Techniques and Considerations
Partitioned Tables
If you are working with partitioned tables, consider exporting each partition separately to improve performance and manageability. You can use the $PARTITION function to identify the data within each partition.
File Naming Conventions
Establish a consistent file naming convention for your exported data files. Include the table name, date, and time in the filename to make it easier to identify and manage the files.
Compression
Compress the exported data files to reduce storage space and improve transfer speeds. You can use tools like gzip or zip to compress the files.
Metadata
Consider exporting metadata along with the data, such as column names, data types, and descriptions. This can be helpful for understanding and using the exported data.
Incremental Exports
For large tables that are frequently updated, consider using incremental exports to only export the changes since the last export. This can significantly reduce the amount of data that needs to be exported and improve performance. You can use change tracking or change data capture (CDC) to identify the changes.
Cloud Storage
Consider exporting the data directly to cloud storage services like Amazon S3 or Azure Blob Storage. This can simplify data storage and management and provide scalability and redundancy.
Troubleshooting Common Issues
Permissions Errors
Ensure that the user account running the export process has the necessary permissions to access the tables and write to the output files. Grant the user account the SELECT permission on the tables and the WRITE permission on the output directory.
Connection Errors
Verify that the connection string or connection parameters are correct. Check the SQL Server instance name, database name, username, and password.
Data Type Mismatches
Ensure that the data types in the source tables are compatible with the destination format. You may need to perform data type conversions during the export process.
Encoding Issues
Specify the correct encoding for the output files to avoid character encoding issues. UTF-8 is a common and widely supported encoding.
Large File Sizes
If you are exporting very large tables, consider splitting the data into multiple files to improve manageability and performance. You can use the `bcp` utility’s `-b` option to control the batch size.
Conclusion: Mastering the Art of Data Extraction
Exporting multiple tables in SQL Server is a fundamental skill for database professionals. By understanding the various methods available and following best practices, you can streamline your data extraction workflows, improve data quality, and enhance your ability to manage and analyze data within SQL Server. Whether you choose to use SSMS, bcp, SQLCMD, SSIS, or a combination of these tools, the key is to select the method that best suits your specific needs and environment. Embrace the power of data extraction and unlock the full potential of your SQL Server databases.
From simple data migrations to complex data warehousing projects, the ability to efficiently export multiple tables is an invaluable asset. So, dive in, experiment with the different techniques, and master the art of data extraction in SQL Server. Your future self (and your database) will thank you for it!
