

Mastering Word: How to Effortlessly Delete Page Breaks in Your Documents
Microsoft Word, the ubiquitous word processing software, is a staple in offices, schools, and homes worldwide. It’s the go-to tool for crafting reports, writing essays, composing letters, and much more. But, like any powerful tool, it can sometimes feel a bit overwhelming, especially when you’re wrestling with formatting issues. One common frustration many users face is dealing with page breaks. Whether they’re accidentally inserted, misplaced, or simply no longer needed, these pesky breaks can throw off your document’s layout and disrupt the flow of your writing. Fear not! Deleting page breaks in Word is a straightforward process once you know the tricks. This comprehensive guide will walk you through various methods to identify, select, and remove page breaks, ensuring your document looks exactly as you envision it.
Understanding Page Breaks in Word
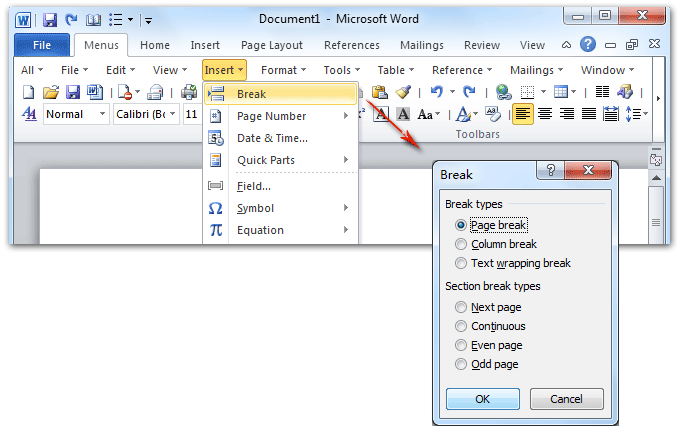
Before we dive into the how-to, let’s clarify what page breaks are and why they’re used. A page break is a formatting mark that forces the text following it to begin on a new page. They’re essential for organizing long documents into distinct sections, chapters, or parts. Word offers different types of page breaks, each serving a specific purpose:
- Page Break: This is the standard page break, simply starting the next text on a new page. It’s the most common type you’ll encounter.
- Column Break: Used in documents with columns, this break forces the subsequent text to the next column on the same page.
- Text Wrapping Break: This break allows you to control how text wraps around images or other objects.
- Section Breaks: These are more advanced and divide your document into sections, each with its own formatting settings (e.g., different headers, footers, or margins). Section breaks can be either continuous, next page, even page, or odd page.
While page breaks are invaluable for structuring your documents, they can sometimes be inadvertently inserted or become obsolete as your document evolves. That’s where knowing how to delete them comes in handy. Sometimes, you might find yourself staring at a blank page, wondering why your text stubbornly refuses to fill the space. More often than not, a rogue page break is the culprit.
Method 1: Using the Show/Hide ¶ Button
The easiest and often most effective way to delete a standard page break is by using the Show/Hide ¶ button. This button reveals all the hidden formatting marks in your document, including page breaks, paragraph marks, spaces, and tabs. Here’s how to use it:
- Locate the Show/Hide ¶ button: It’s usually found in the Paragraph group on the Home tab. It looks like a backwards P (¶).
- Click the button: This will display all the hidden formatting marks in your document. You’ll now be able to see the page break as a dotted line with the words “Page Break” in the middle.
- Select the page break: Click and drag your mouse over the page break to select it. Alternatively, you can position your cursor just before the page break and press the Shift key while using the right arrow key to select it.
- Delete the page break: Press the Delete key or the Backspace key on your keyboard. The page break will disappear, and the text following it will flow onto the previous page.
- Toggle Show/Hide ¶ off: Click the Show/Hide ¶ button again to hide the formatting marks and return to the normal document view.
This method is particularly useful for quickly identifying and removing unwanted page breaks. It’s also helpful for troubleshooting other formatting issues, as it allows you to see exactly what’s going on behind the scenes.
Method 2: Deleting Section Breaks
Section breaks are a bit more complex than standard page breaks, as they divide your document into sections with potentially different formatting. Deleting a section break can have a significant impact on your document’s layout, so it’s important to understand the consequences before proceeding. The process for deleting section breaks is similar to deleting standard page breaks, but with a few key differences.
- Enable Show/Hide ¶: As with standard page breaks, you’ll need to enable the Show/Hide ¶ button to see the section breaks.
- Locate the section break: Section breaks are displayed as double dotted lines with the words “Section Break (type)” in the middle, where “type” indicates the type of section break (e.g., Next Page, Continuous, Even Page, Odd Page).
- Select the section break: Click and drag your mouse over the section break to select it. Or, position your cursor just before the break and use the Shift key and right arrow key.
- Delete the section break: Press the Delete key or the Backspace key.
Important Considerations When Deleting Section Breaks:
- Formatting Changes: When you delete a section break, the formatting of the section following the break will merge with the formatting of the section preceding it. This can lead to unexpected changes in headers, footers, margins, page numbering, and other formatting elements.
- Undo Function: If you’re unsure about the consequences of deleting a section break, it’s always a good idea to save your document first or use the Undo function (Ctrl+Z or Cmd+Z) immediately after deleting the break to revert the changes if necessary.
- Alternative Solutions: In some cases, instead of deleting a section break, it might be more appropriate to modify the section’s formatting to achieve the desired result. For example, if you want to remove a different header or footer in a particular section, you can unlink it from the previous section instead of deleting the section break altogether.
Method 3: Using the Navigation Pane
The Navigation Pane is a powerful tool for navigating and organizing long documents. It displays a hierarchical view of your document’s headings, allowing you to quickly jump to different sections. It can also be used to locate and delete page breaks, especially in documents with a clear heading structure. Here’s how:
- Open the Navigation Pane: Go to the View tab and check the “Navigation Pane” box in the Show group. The Navigation Pane will appear on the left side of your Word window.
- Navigate to the Page Break: While the Navigation pane primarily shows headings, you can use the Find function within it to locate “Page Break”. Type “Page Break” into the search bar at the top of the Navigation Pane. This will highlight all instances of “Page Break” in your document.
- Select and Delete: Click on the highlighted “Page Break” in the Navigation Pane. This will take you directly to the page break in your document. Now, use Method 1 (Show/Hide ¶) to select and delete the page break.
This method is particularly useful when you need to find and delete multiple page breaks throughout a long document. The Navigation Pane provides a quick and easy way to jump to each instance, making the process much more efficient.
Method 4: Finding and Replacing Page Breaks
Word’s Find and Replace feature is a versatile tool that can be used to locate and replace specific text, formatting, and special characters in your document. It can also be used to delete page breaks, especially when you need to remove multiple page breaks at once. Here’s how:
- Open the Find and Replace dialog box: Press Ctrl+H (or Cmd+H on a Mac) to open the Find and Replace dialog box. Alternatively, you can go to the Home tab, click the “Replace” button in the Editing group.
- Enter the Page Break code: In the “Find what” field, enter “^m” (without the quotes). This is the code for a manual page break in Word.
- Leave the “Replace with” field blank: This tells Word to replace the page break with nothing, effectively deleting it.
- Click “Replace All”: Click the “Replace All” button to delete all the page breaks in your document. Word will display a message indicating how many replacements were made.
- Close the Find and Replace dialog box: Click the “Close” button to close the dialog box.
Important Considerations When Using Find and Replace:
- Caution with Replace All: Be cautious when using the “Replace All” button, especially in long or complex documents. It’s always a good idea to review the changes carefully after using this feature to ensure that you haven’t inadvertently deleted something you didn’t intend to.
- Specific Page Breaks: If you only want to delete specific page breaks, you can use the “Find Next” button to locate each page break individually and then click the “Replace” button to delete it.
- Other Special Characters: The Find and Replace feature can also be used to find and replace other special characters, such as tabs, paragraph marks, and section breaks. Refer to Word’s help documentation for a complete list of special character codes.
Method 5: Adjusting Paragraph Settings
Sometimes, unwanted page breaks are caused by paragraph settings that force a new page before a particular paragraph. This is often used to keep headings at the top of a page or to prevent paragraphs from being split across pages. To remove these types of page breaks, you need to adjust the paragraph settings.
- Select the Paragraph: Identify the paragraph that is consistently starting on a new page. Select the paragraph by clicking anywhere within it.
- Open Paragraph Settings: Right-click on the selected paragraph and choose “Paragraph” from the context menu. This will open the Paragraph dialog box.
- Check Line and Page Breaks Tab: In the Paragraph dialog box, click on the “Line and Page Breaks” tab.
- Review Options: Under the “Pagination” section, look for the following options:
- Page Break Before: If this box is checked, it means the paragraph will always start on a new page. Uncheck it to remove the forced page break.
- Keep with Next: This option prevents a paragraph from being separated from the paragraph that follows it.
- Keep Lines Together: This option prevents a paragraph from being split across two pages.
- Widow/Orphan Control: Prevents the first or last line of a paragraph from appearing alone at the top or bottom of a page.
- Uncheck “Page Break Before”: If the “Page Break Before” box is checked, uncheck it.
- Click OK: Click the “OK” button to save the changes and close the Paragraph dialog box.
By adjusting these paragraph settings, you can prevent unwanted page breaks and ensure that your paragraphs flow naturally within your document.
Troubleshooting Common Page Break Issues
Even with these methods, you might still encounter some persistent page break issues. Here are some troubleshooting tips to help you resolve them:
- Blank Pages: If you have a blank page in your document, it’s often caused by a page break at the end of the previous page. Use the Show/Hide ¶ button to locate and delete the page break. Sometimes, a table or image extending past the page margin can also cause a blank page.
- Unexpected Page Breaks: If a page break appears in an unexpected location, check the paragraph settings for the preceding paragraph to see if the “Page Break Before” option is enabled.
- Section Break Formatting: If you’re having trouble with section break formatting, make sure that the sections are properly linked or unlinked as needed. Use the Header & Footer Tools Design tab to control the linking behavior.
- Corrupted Document: In rare cases, page break issues can be caused by a corrupted document. Try saving the document in a different format (e.g., .rtf or .txt) and then reopening it in Word. This can sometimes remove the corruption and resolve the issue.
- Update Word: Ensure your Microsoft Word is up to date. Sometimes bugs in older versions can cause unexpected behavior.
Best Practices for Managing Page Breaks
To avoid page break issues in the first place, follow these best practices:
- Plan Your Document Structure: Before you start writing, take some time to plan the structure of your document. This will help you determine where page breaks are needed and avoid inserting them haphazardly.
- Use Headings and Styles: Use Word’s built-in heading styles (e.g., Heading 1, Heading 2, Heading 3) to structure your document. This will make it easier to navigate and format your document consistently.
- Avoid Manual Formatting: Avoid using manual formatting (e.g., inserting blank lines or spaces) to control page breaks. Instead, use paragraph settings and section breaks to achieve the desired layout.
- Review Your Document Carefully: Before finalizing your document, review it carefully to ensure that all page breaks are in the correct locations and that the overall layout is consistent.
- Use Print Preview: Before printing your document, use the Print Preview feature to see how it will look on paper. This will help you catch any last-minute page break issues.
Advanced Tips and Tricks
For advanced Word users, here are some additional tips and tricks for managing page breaks:
- Macros: You can create macros to automate the process of deleting page breaks. For example, you could create a macro that deletes all page breaks in a document with a single click.
- Templates: Create custom templates with pre-defined page break settings to ensure consistent formatting across multiple documents.
- Fields: Use fields to dynamically insert page numbers, section numbers, and other information into your document. This can help you keep track of page breaks and ensure that your document is properly organized.
Conclusion
Deleting page breaks in Word might seem like a minor task, but it’s an essential skill for anyone who wants to create professional-looking documents. By mastering the methods and techniques outlined in this guide, you’ll be able to effortlessly control your document’s layout and ensure that it looks exactly as you intend. Remember to use the Show/Hide ¶ button to reveal hidden formatting marks, understand the different types of page breaks, and be cautious when deleting section breaks. With a little practice, you’ll become a page break deleting pro in no time! So, go forth and conquer those pesky page breaks, and create documents that are both visually appealing and structurally sound. Happy writing!
