

Effortless Pairing: Connecting AirPods to Your iPhone 15 Pro Max
So, you’ve just unboxed your brand-new iPhone 15 Pro Max, and you’re itching to pair it with your trusty AirPods. Maybe you’re upgrading, or perhaps you’re new to the Apple ecosystem altogether. Either way, getting your AirPods connected to your iPhone 15 Pro Max is a breeze. This comprehensive guide will walk you through every step, ensuring a seamless and frustration-free experience. We’ll cover the basics, troubleshoot common issues, and even explore some advanced tips to enhance your audio experience.
Why AirPods and iPhone 15 Pro Max are a Perfect Match
Before we dive into the how-to, let’s quickly touch on why this pairing is so popular. Apple’s AirPods are designed to work flawlessly with iPhones, and the iPhone 15 Pro Max is no exception. The seamless integration provides an unparalleled user experience, from instant pairing to automatic device switching. Plus, the combination of the iPhone 15 Pro Max’s powerful processor and the AirPods’ high-quality audio delivers a truly immersive listening experience.
Step-by-Step Guide to Pairing Your AirPods
Here’s a detailed, step-by-step guide to connecting your AirPods to your iPhone 15 Pro Max. Whether you have the standard AirPods, AirPods Pro, or AirPods Max, the process is remarkably similar.
First-Time Setup: The Initial Pairing
- Ensure Bluetooth is Enabled: On your iPhone 15 Pro Max, swipe down from the top-right corner to open the Control Center. Make sure the Bluetooth icon is blue, indicating that Bluetooth is turned on. If it’s gray, tap it to enable Bluetooth. Alternatively, you can go to Settings > Bluetooth and toggle the switch to the ‘on’ position.
- Open the AirPods Case: With your AirPods inside the charging case, open the lid. Hold the case near your unlocked iPhone 15 Pro Max. A setup animation should appear on your iPhone’s screen.
- Follow the On-Screen Prompts: Your iPhone will display a prompt asking if you want to connect to your AirPods. Tap “Connect.” If you’re signed in to iCloud, your AirPods will automatically be set up with all your devices signed in to iCloud using the same Apple ID.
- (For AirPods Pro and AirPods Max): You might be prompted to customize settings like noise cancellation or transparency mode during the initial setup. Follow the on-screen instructions to personalize your experience.
- Tap “Done”: Once the pairing process is complete, tap “Done” on your iPhone screen. Your AirPods are now connected and ready to use!
Reconnecting Your AirPods: Easy as Pie
Once you’ve paired your AirPods with your iPhone 15 Pro Max for the first time, reconnecting them is even simpler. Just open the AirPods case near your iPhone, and they should automatically connect. If they don’t, try the following:
- Ensure Bluetooth is Enabled: As before, make sure Bluetooth is turned on in your iPhone’s Control Center or Settings.
- Select AirPods from Control Center or Settings: Swipe down to open the Control Center, then tap and hold the audio control card in the upper-right corner. Select your AirPods from the list of available devices. Alternatively, go to Settings > Bluetooth and tap on your AirPods in the list.
- Play Some Audio: Once connected, start playing audio on your iPhone. Your AirPods should automatically start playing the sound.
Troubleshooting Common Connection Issues
While the pairing process is usually smooth, sometimes you might encounter hiccups. Here are some common issues and how to resolve them:
AirPods Not Connecting: General Troubleshooting
- Make Sure AirPods are Charged: Ensure that your AirPods and the charging case have sufficient battery. A low battery can sometimes prevent pairing. Place the AirPods in the case and connect it to a power source for at least 15 minutes.
- Restart Bluetooth: Turn off Bluetooth on your iPhone, wait a few seconds, and then turn it back on. This can often resolve minor connection glitches.
- Restart Your iPhone: A simple restart can fix many software-related issues. Turn off your iPhone 15 Pro Max, wait a few seconds, and then turn it back on.
- Check for Software Updates: Ensure that your iPhone is running the latest version of iOS. Go to Settings > General > Software Update to check for and install any available updates. Outdated software can sometimes cause compatibility issues.
- Reset Your AirPods: If all else fails, try resetting your AirPods. To do this, place the AirPods in the charging case, close the lid, and wait 30 seconds. Then, open the lid and press and hold the setup button on the back of the case until the status light flashes amber, then white. This indicates that the AirPods have been reset and are ready to be paired again.
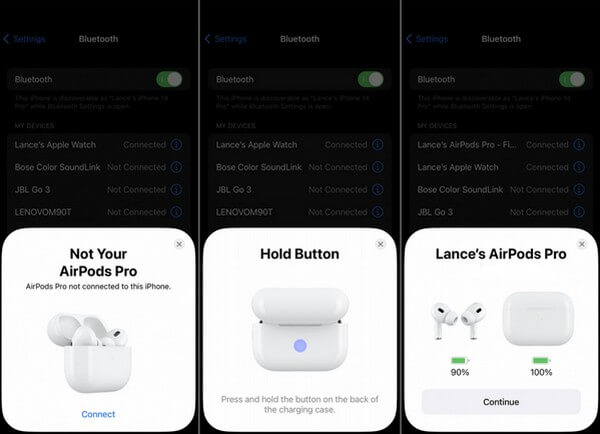
Specific Issue: AirPods Not Appearing in Bluetooth List
If your AirPods aren’t showing up in the Bluetooth device list on your iPhone, try these steps:
- Ensure AirPods are in Pairing Mode: Make sure the AirPods are in pairing mode by opening the case near your iPhone. The status light inside the case should be flashing white. If it’s not flashing white, press and hold the setup button on the back of the case until it does.
- Move Closer to Your iPhone: Ensure that your AirPods case is close to your iPhone during the pairing process. Bluetooth signals can be affected by distance and interference.
- Check for Interference: Other Bluetooth devices or Wi-Fi signals can sometimes interfere with the pairing process. Try moving to a different location or turning off other nearby Bluetooth devices.
Issue: One AirPod Not Working
If you’re experiencing sound only in one AirPod, try these solutions:
- Clean Your AirPods: Dirt or debris can sometimes block the audio output. Clean your AirPods carefully using a soft, dry cloth. Pay particular attention to the speaker mesh.
- Check Audio Balance: Go to Settings > Accessibility > Audio/Visual and ensure that the audio balance slider is centered. If it’s skewed to one side, it could cause sound to only play in one AirPod.
- Reconnect Your AirPods: Try disconnecting and reconnecting your AirPods to your iPhone. Go to Settings > Bluetooth, tap the “i” icon next to your AirPods, and select “Forget This Device.” Then, follow the pairing instructions again.
- Reset Your AirPods: As a last resort, try resetting your AirPods as described earlier.
Advanced Tips and Tricks
Now that you’ve successfully connected your AirPods to your iPhone 15 Pro Max, let’s explore some advanced tips and tricks to enhance your experience.
Customizing AirPods Controls
You can customize the actions that happen when you double-tap or force-touch your AirPods (depending on the model). To do this, go to Settings > Bluetooth, tap the “i” icon next to your AirPods, and then select “Left” or “Right” under the “Double Tap on AirPod” or “Press and Hold AirPod” section. You can choose actions like Siri, Play/Pause, Next Track, Previous Track, or Off.
Using AirPods with Multiple Devices
One of the great features of AirPods is their ability to seamlessly switch between devices signed in to the same iCloud account. For example, if you’re listening to music on your iPhone and then switch to watching a video on your iPad, your AirPods should automatically switch to the iPad. If they don’t, you can manually select them from the Control Center or Bluetooth settings on the device you want to use.
Spatial Audio and Personalized Spatial Audio
AirPods Pro and AirPods Max support Spatial Audio, which creates a theater-like surround sound experience. With iOS 16 and later, you can also set up Personalized Spatial Audio, which uses the TrueDepth camera on your iPhone to scan your head and ears, creating a custom audio profile that’s tailored to your unique anatomy. To set up Personalized Spatial Audio, go to Settings > Bluetooth, tap the “i” icon next to your AirPods Pro or AirPods Max, and then select “Personalized Spatial Audio.” Follow the on-screen instructions to complete the setup.
Using Live Listen
Live Listen turns your iPhone into a remote microphone, sending audio to your AirPods. This can be helpful in noisy environments or when you need to hear someone speaking from a distance. To use Live Listen, go to Settings > Control Center, and add “Hearing” to the list of included controls. Then, swipe down to open the Control Center, tap the Hearing icon, and select your AirPods. Place your iPhone near the sound source you want to hear, and the audio will be streamed to your AirPods.
Finding Lost AirPods
If you’ve misplaced your AirPods, you can use the Find My app to locate them. Open the Find My app on your iPhone, select the “Devices” tab, and then choose your AirPods from the list. You’ll see their last known location on a map. If your AirPods are nearby, you can play a sound to help you find them. Note that this feature requires that your AirPods were previously connected to your iPhone and that Find My was enabled.
Maximizing Your AirPods Experience with iPhone 15 Pro Max
The iPhone 15 Pro Max offers several features that can further enhance your AirPods experience:
Optimized Battery Charging
The iPhone 15 Pro Max includes Optimized Battery Charging, which learns your charging habits and delays charging past 80% until just before you need to use your device. This can help prolong the lifespan of your AirPods case battery. To enable Optimized Battery Charging, go to Settings > Battery > Battery Health & Charging and toggle the switch to the ‘on’ position.
Dolby Atmos Support
The iPhone 15 Pro Max supports Dolby Atmos, which provides an immersive, three-dimensional audio experience. When listening to Dolby Atmos content with your AirPods Pro or AirPods Max, you’ll enjoy a wider soundstage and more realistic audio.
Seamless Integration with Apple Services
The iPhone 15 Pro Max seamlessly integrates with Apple services like Apple Music, Apple Podcasts, and Apple TV+, making it easy to enjoy your favorite content with your AirPods. Simply start playing audio or video on your iPhone, and your AirPods will automatically connect.
Conclusion: Enjoying Your AirPods with iPhone 15 Pro Max
Connecting your AirPods to your iPhone 15 Pro Max is a simple and straightforward process. By following the steps outlined in this guide, you can quickly and easily pair your AirPods and enjoy seamless audio integration. Whether you’re listening to music, watching videos, or making calls, the combination of AirPods and iPhone 15 Pro Max provides an unparalleled audio experience. Remember to troubleshoot any issues using the tips provided, and explore the advanced features to maximize your enjoyment. With a little bit of knowledge and effort, you can unlock the full potential of your AirPods and iPhone 15 Pro Max.
From initial pairing to advanced customization, this guide has provided a comprehensive overview of how to connect and optimize your AirPods experience with the iPhone 15 Pro Max. Enjoy the seamless integration and immersive audio that this powerful combination offers!
