How to Join a Server to a Domain in Windows Server 2022
Joining a server to a domain is a crucial step in managing your network effectively. This guide provides a clear, step-by-step process for adding a Windows Server 2022 machine to your existing domain. We'll cover both the graphical user interface (GUI) method and the command-line approach.
Prerequisites
Before you begin, ensure you have the following:
- Domain Controller: A functioning domain controller running Windows Server (2012 R2 or later is recommended).
- Server Credentials: Administrator-level credentials for the domain. These are essential for joining the server to the domain.
- Network Connectivity: The Windows Server 2022 machine must be connected to the network and able to communicate with the domain controller. Verify network connectivity before proceeding.
- Static IP (Recommended): While not strictly mandatory, assigning a static IP address to your server is best practice for consistent network access.
Method 1: Joining a Server to a Domain via the GUI
This method is the most user-friendly and visually intuitive.
-
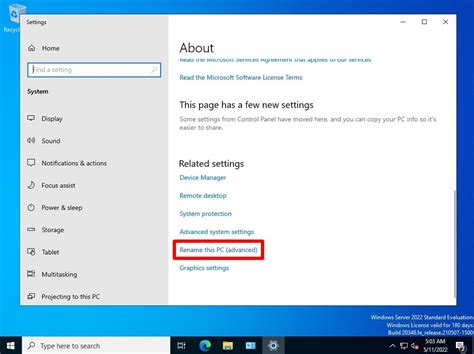
Open System Properties: Search for "System" in the Windows search bar and select "System." Alternatively, press
Win + Xand choose "System." -
Access System Properties: Click "Change settings" under "Related settings."
-
Navigate to "Computer Name/Domain Changes": In the "System Properties" window, click on "Change..."
-
Join a Domain: In the "System Properties" window, click the "Change..." button. You'll then be presented with the "System Properties" window. Select the "Change" button under "Computer Name/Domain Changes".
-
Specify Domain Credentials: Select "Domain" and then enter the fully qualified domain name (FQDN) in the "Member of" field. For example:
yourdomain.localoryourdomain.com. Click "OK." -
Enter Domain Credentials: You'll be prompted to enter the username and password of a domain administrator account. Enter these credentials and click "OK."
-
Restart the Server: The server will need a restart to complete the domain join process. Click "OK" to confirm the restart. After the server restarts, it will be part of the domain.
Method 2: Joining a Server to a Domain via the Command Line
For advanced users, the command line offers a quicker alternative.
-
Open Command Prompt as Administrator: Search for "cmd" in the Windows search bar. Right-click on "Command Prompt" and select "Run as administrator."
-
Execute the Command: Use the following command, replacing
<domain_name>with your actual domain name and<administrator_account>with a domain administrator account:netdom join/domain: /userd: For example:
netdom join MyServer /domain:mydomain.local /userd:[email protected] -
Enter Password: You will be prompted to enter the password for the specified administrator account.
-
Restart the Server: Similar to the GUI method, a restart is required to finalize the domain join.
Troubleshooting
- Incorrect Credentials: Double-check your domain credentials for accuracy. Incorrect credentials are a common cause of failure.
- Network Connectivity: Ensure the server has stable network connectivity to the domain controller.
- DNS Resolution: Verify that the server can resolve the domain controller's name.
- Firewall: Ensure that firewalls on both the server and the domain controller aren't blocking necessary network traffic.
By following these steps, you can successfully join your Windows Server 2022 machine to your domain, streamlining network management and security. Remember to always back up your system before making significant changes.
