How to Add a Certificate to Your LinkedIn Profile: A Step-by-Step Guide
Adding your certificates to your LinkedIn profile is a smart move to boost your credibility and showcase your skills and achievements to potential employers and recruiters. It's a simple process, but this guide will walk you through it step-by-step, ensuring you get it right.
Why Add Certificates to LinkedIn?
Before we dive into the how, let's briefly cover the why. Adding certificates to your LinkedIn profile offers several key benefits:
- Enhanced Credibility: Certificates instantly demonstrate that you've invested time and effort in professional development. They lend weight to your claims of expertise.
- Improved Profile Visibility: A richer profile with certifications is more likely to appear in search results when recruiters are looking for candidates with specific skills.
- Skill Validation: Certificates act as verifiable proof of your capabilities, surpassing simple claims in your profile summary.
- Competitive Advantage: In a competitive job market, showcasing your accomplishments through certifications gives you an edge.
Adding Your Certificate: A Detailed Walkthrough
Here's a comprehensive guide on how to add a certificate to your LinkedIn profile:
Step 1: Log in to your LinkedIn Account
This is the first and most obvious step! Make sure you're logged into your LinkedIn account.
Step 2: Navigate to Your Profile
Click on your profile picture in the top right corner of the LinkedIn homepage. This will take you to your profile page.
Step 3: Access the "Add Profile Section" Area
Look for the "Add profile section" button. It's usually located under your profile banner and main introductory information. The exact location might vary slightly depending on LinkedIn's ongoing updates, but it will be easily visible.
Step 4: Select "Licenses & certifications"
From the dropdown menu of "Add profile section," choose "Licenses & certifications."
Step 5: Add Your Certificate Information
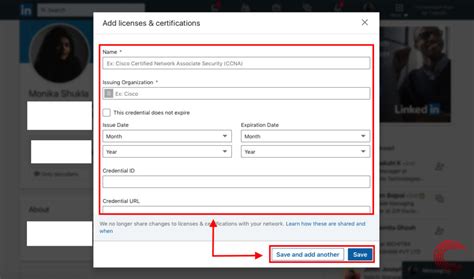
Click on the "Add license or certification" button. You'll then be presented with a form to fill out:
- Name of certificate: Enter the full name of your certificate.
- Issuing organization: Enter the name of the institution or organization that issued the certificate. Be precise and consistent with the certificate itself.
- Credential ID or URL (optional): If your certificate has a unique ID number or a URL, add it here. This adds further verification.
- Credential URL (optional): This is the web address of the certificate, if available online.
- Issue date: Enter the date you received the certificate.
- Expiration date (optional): If your certificate expires, enter the expiry date.
- License number (optional): If applicable, include the license number.
- Criteria for renewal: If there are specific criteria to renew the certificate, provide a summary.
Step 6: Add Media (Optional)
Consider adding a visual element, such as a scan or photo of the certificate, to further improve your profile's impact and credibility. LinkedIn allows you to attach files.
Step 7: Save Your Changes
Once you've completed filling in all the necessary information, click "Save" to add your certificate to your LinkedIn profile.
Tips for Optimizing Your Certificate Display
- Use keywords: When adding your certificate, think about the keywords recruiters might use when searching for candidates with your skills. Incorporate relevant keywords naturally into the certificate title and description.
- Multiple Certificates: If you have multiple certificates, add them all! Each one reinforces your skills and expertise.
- Keep it updated: Regularly review and update your certificates to reflect your latest achievements and ensure all information is accurate.
By following these steps, you can effectively showcase your achievements and enhance your LinkedIn profile to attract more opportunities. Remember, a well-maintained and informative profile significantly increases your chances of career success.
