How to Customize Your Signature in Outlook: A Step-by-Step Guide
Creating a professional and effective email signature is crucial for branding and making a lasting impression. This guide will walk you through customizing your Outlook signature, covering everything from adding basic text to incorporating logos and social media links. We'll cover different versions of Outlook, ensuring you can follow along regardless of your specific setup.
Understanding the Power of a Customized Email Signature
Before diving into the how-to, let's understand why a customized signature is so important. A well-crafted signature isn't just a name and contact details; it's a mini-marketing tool. It allows you to:
- Reinforce your brand: Use your company logo and consistent branding elements.
- Provide key contact information: Make it easy for recipients to connect with you.
- Drive traffic to your website or social media: Include relevant links to boost your online presence.
- Add a professional touch: A well-designed signature enhances your overall email communication.
Step-by-Step Guide to Creating Your Outlook Signature
The process varies slightly depending on your Outlook version (Outlook 365, Outlook 2019, etc.), but the core steps remain consistent. We'll outline the general process, and then address some version-specific nuances.
1. Accessing Signature Settings
First, open Outlook and navigate to File > Options. This opens the Outlook Options dialog box.
2. Selecting the Mail Tab
In the Outlook Options dialog box, select the Mail tab.
3. Finding the Signatures Button
Locate the Signatures... button towards the bottom of the Mail tab. Click it.
4. Creating or Editing a Signature
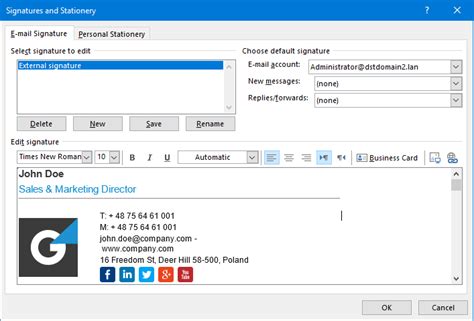
This opens the Signature and Stationery dialog box. Here, you can:
- Create a new signature: Click the "New" button to create a signature from scratch. Give it a descriptive name (e.g., "Main Signature").
- Edit an existing signature: Select the signature you wish to modify and click "Edit".
5. Designing Your Signature
This is where the fun begins! Use the formatting options (bold, italics, font size, color) to create a visually appealing signature. Remember to keep it concise and professional.
- Adding Text: Enter your name, title, company, contact information (phone number, email address), and website address.
- Adding a Logo: Click the "Insert Picture" button to add your company logo. Resize it appropriately to avoid cluttering your signature. Ensure the image is optimized for web use (relatively small file size).
- Adding Social Media Links: You can manually add links, or use image links (e.g., a small icon linked to your social media page).
- Formatting for Readability: Use clear formatting, line breaks, and consistent font styling to make your signature easy to read.
6. Assigning Your Signature
Choose which email accounts this signature should be attached to. You can also choose to have it automatically added to new messages or replies/forwards.
7. Saving Your Changes
Once you're happy with your signature, click "OK" to save your changes.
Version-Specific Notes:
While the general process remains the same, minor differences exist between Outlook versions. If you encounter difficulties, searching for "[Your Outlook Version] create email signature" will provide more specific instructions.
Optimizing Your Signature for Best Results
- Keep it concise: Avoid lengthy signatures that overwhelm recipients.
- Use professional fonts: Stick to easily readable fonts like Arial or Calibri.
- Test it thoroughly: Send a test email to yourself to ensure everything looks correct.
- Update regularly: Keep your contact information up to date.
By following these steps, you can create a customized email signature that reflects your professional brand and enhances your communication. Remember to regularly review and update your signature to keep it current and effective.
